Are you worried that the downloaded file may be compromised by malware or other cybersecurity threats? Then you can open the checksum file and verify its integrity on Windows to ensure it is not tampered with, corrupted, or incomplete.
For better understanding, imagine an IP packet’s content gets corrupted on the way to the receiver. The checksum helps the receiver know the IP packet is corrupted. When sending the packet, the sender calculated the checksum of the file based on its content and appended it to the packet. When the file reaches the receiver, the receiver recalculates the checksum of the received content. If the calculated checksums do not match, the file is corrupted.
While you can access the checksum file through text editors and verify the checksums via the Command Prompt, File Explorer, or Windows PowerShell, it’s important to choose the method that best fits your experience level.
For beginners, using File Explorer with a third-party tool like HashTab is usually the easiest option, thanks to its simple interface. Command Prompt and PowerShell offer more advanced features and flexibility, but they require comfort with command-line tools. Let’s first clear the air about what a checksum means, so no confusion remains.
What Is a Checksum
The checksum meaning is a file’s unique hash value (an alphanumeric string), i.e., its digital fingerprint. In other words, a checksum is a value created from the data inside a file. When you download a file, you can hash and compare it to the checksum given by the source to ensure it was not modified.
It helps verify the file integrity to ensure the downloaded files have not been corrupted while transferring them (due to issues like network errors), detect tampering to ensure files have not been altered maliciously, and confirm authenticity to make sure you have the correct file.
MD5 (a 32-character hash), SHA-1 (a 40-character hash), SHA-256 (a 64-character hash), and SHA-512 (a 128-character hash) are the common checksum types, with MD5 and SHA-256 being the most popular.
While a checksum ensures file authenticity, does Windows have a checksum? Let’s answer this question next.
Is there a Windows Checksum
Windows has built-in tools to calculate and verify checksums. CertUtil, a built-in Windows command-line tool, allows you to create a hash value through a selected algorithm. You can run this tool in Windows Command Prompt or PowerShell.
As for opening a checksum file, it is a simple text file that stores calculated hash values. You can open it with a text editor available on Windows, such as Notepad or WordPad.
How to Open a Checksum File
As mentioned above, a Windows checksum file is accessible through a text editor. Below are the detailed steps to open the file.
- First, right-click the checksum file you want to open.
- Click the Open With option in the context menu that appears.
- Lastly, choose your text editor to open the checksum file.
While opening the checksum file is simple, verifying the checksum is also easy through checksum tools in Windows, Command Prompt, File Explorer, and PowerShell.
How to Verify Checksum on Windows
You can verify an MD5 or SHA256 checksum on Windows through Command Prompt, File Explorer, or PowerShell. Here is how.
Method 1: Use the Command Prompt for Windows Checksum verification
You can follow the steps below to verify the Windows checksum using Command Prompt.
- First, click the Start button, type cmd in the search bar, and choose Command Prompt from the search results.
- Next, go to the folder containing the MD5 checksum you wish to verify.
- In the Command Prompt, type cd followed by the MD5 checksum folder path. For example, if the MD5 checksum you want to verify is in the Downloads folder, type cd Downloads.
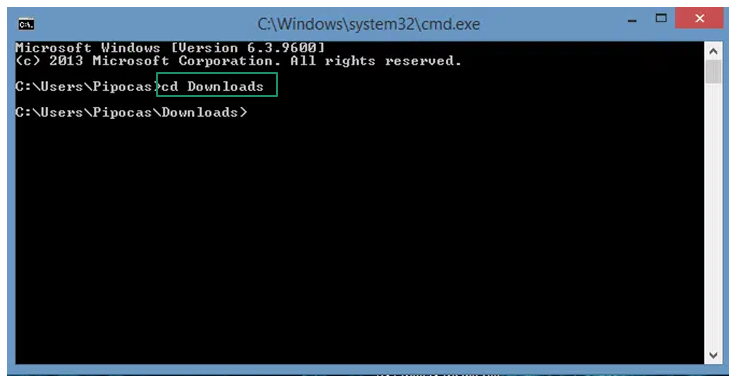
- Type the following command and press Enter. In the command below, remember to replace the <file> with your filename.
certutil -hashfile <file> MD5
- Lastly, compare the checksum with the expected checksum of the downloaded file.
Also know: How to Set Your Time and Time Zone Manually in Windows 11 & 10
Method 2: Verify the Checksum with File Explorer
Another easy way to verify a checksum file on Windows is through File Explorer. Here is how to do it.
- First, download HashTab on your computer from its official website to make sure you avoid malware or unwanted programs. After downloading, click the HashTab file and follow the instructions that appear on the screen to install it.
Note: HashTab is a trusted program that helps you calculate and verify file hashes within the file management workflow of your operating system.
- After installing HashTab, right-click the file for which you want to verify the checksum.
- Choose Properties from the context menu that appears.
- Next, click the File Hashes tab to locate the MD5, SHA-1, and CRC32 hashes for your file.
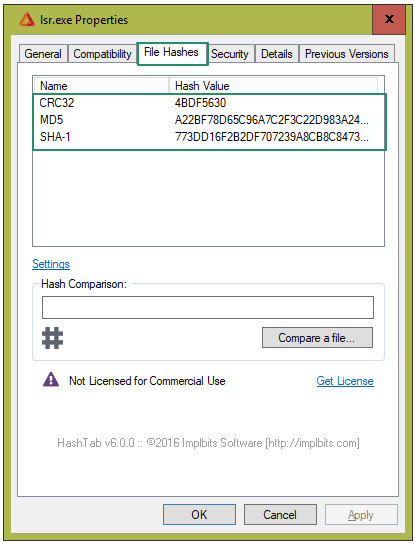
- Copy the checksum you wish to compare and paste it into the Hash Comparison box. If the hashes match, a green check mark will appear; if they do not match, a red X will appear.
Method 3: Perform Windows Checksum verification with PowerShell
Windows PowerShell also lets you verify the checksum. Here is how to use it.
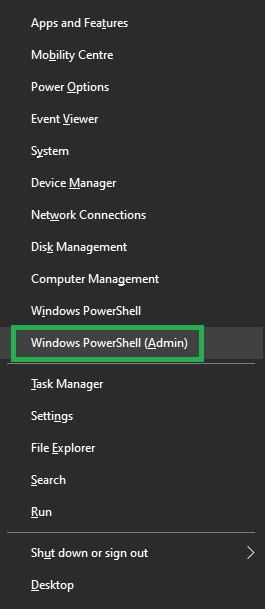
- First, right-click the Start button and choose Windows PowerShell from the context menu that appears. Please note that some Windows 11 versions replace PowerShell with Windows Terminal.
- In the on-screen Windows PowerShell, type the following command and add a space.
Get-FileHash
- Next, drag the ZIP file you downloaded onto Windows PowerShell after the Get-FileHash command you typed in the previous step. The command now should look something like this:
C:\Users\UserName> Get-fileHash C:\Users\UserName\Downloads\cdq2019s14_Windows.zip
- Lastly, check the calculated hash value while comparing it with the original hash value.
If you notice any checksum errors, you can check the section below for solutions.
How to Fix Checksum Errors
You may experience BIOS or CMOS checksum errors, signaling that a Basic Input/Output System (BIOS) test did not pass. Here is how to fix these and other issues.
BIOS checksum error
A BIOS checksum error occurs when you build your own computer, upgrade hardware, or try to revive an old computer that has not been used for a long time. You may encounter this issue when something interacts with your BIOS code and interferes with the generated checksum, or when something changes the pre-defined checksum in the CMOS memory.
To fix the BIOS checksum error, you can:
- Replace the dead or old battery with a new one.
- Enter the BIOS and change the BIOS settings to their defaults. You can check the motherboard manual to learn how to do it.
- If the BIOS checksum error appears after an unsuccessful upgrade, remove the newly installed components, test them in another machine, identify and replace the troublemaker component with another component, or remove it from your upgrade plan.
Also know: Set Up Windows Hello for Sign-in with Face, Pin & Fingerprint
CMOS checksum error
A CMOS checksum error occurs when the BIOS detects corrupted settings during boot-up or fails to read the CMOS chip. To fix this issue, you can:
- Replace the CMOS battery with a new one.
- Change the BIOS settings to the default by following the steps in your motherboard’s manual.
- Ensure BIOS has the correct date and time.
- Hard reset your computer by powering off the PC, unplugging it, and holding the power button for fifteen to thirty seconds.
- Enter the BIOS setup, check the BIOS version, and update it to the latest version from your manufacturer’s website.
Checksum file not opening
If you are experiencing problems with opening a checksum file, you can:
- Right-click the checksum file, click “Open with,” choose another app, select another program to open the checksum file, and check the box “Always use this app to open *.checksum files.” Common checksum file extensions include .md5, .sha256, .sha1, and sometimes simply .checksum. Recognizing these extensions can help you easily identify which files are intended to verify downloads.
- Update your text editor to the latest version because only the newer versions support the latest checksum file format.
- Scan your checksum file with a program like Google’s virustotal.com to ensure the file is not virus-infected.
That’s all from our end on how to open a checksum file, verify it, and solve related problems. If you notice that the checksum does not match the original value provided by the source, try re-downloading the file and checking again. If the problem persists after multiple downloads, contact the file provider for support, as the original file may be corrupted or tampered with. We hope you find this article helpful. If you have any questions, you can drop us a comment.
