If you rely on a dependable internet connection for work-related tasks, online classes, or recreational activities like gaming and streaming, experiencing problems with your TP-Link WiFi not working on your Windows PC can be very annoying.
Users frequently describe situations in which their usual WiFi network mysteriously stops working, making it impossible for them to access the internet at all. This could appear as frequent disconnections, slow internet speeds, or your network not appearing in the list of available connections.
Experiencing all problems is usually caused by TP-Link driver issues. However, there are a number of other troubleshooting techniques, such as updating the TP-Link driver using the best free Windows driver updater, that you can use to find the problem and successfully fix it.
This comprehensive guide will walk you through the process of diagnosing the TP-Link WiFi not working problem and looking into potential solutions. Let’s dive in.
How to Fix Tp-Link Wifi Not Working in Windows PC
If you’re having trouble fixing the TP-Link WiFi not working error, don’t worry! This article is here to help you out with some easy troubleshooting steps. Here, we will discuss a number of solutions, including updating the TP-Link driver that users in comparable circumstances have found to be effective in resolving the problem.
Try using the techniques in the listed order until you find the one that suits you the best. Here you go.
1. Restart your TP-Link router.
If you haven’t rebooted your TP-Link router or modem in a while, you might find yourself unable to access the setup screen. This is possible due to a useful security feature that protects your network.
For many TP-Link models, there’s a built-in setting that temporarily blocks access to the tplinkwifi.net page if no one has logged into the management panel for a long time. It’s simply a measure to help prevent unauthorized access!
The good news is that if you simply restart your TP-Link modem or router, you’ll regain access to the setup page. Then you’ll be all set to manage your network with ease! However, if this method does not work out for you, proceed to the next method.
Also know: How to Fix Wifi Network Not Showing Up on Windows PC
Method 2: Reinstall TP-Link Router with the Easy Setup Assistant
Using the Easy Setup Assistant, a TP-Link tool that greatly simplifies the initial setup, is the best way to solve this issue.
But it’s crucial to make sure your computer is set up to get the IP address automatically before you launch the utility. If this method isn’t enabled, the setup won’t be eager to allow the router to give the computer an address so that they can properly communicate.
Here’s how you can use the Easy Setup Assistant to make your TP-Link WiFi accessible to you:
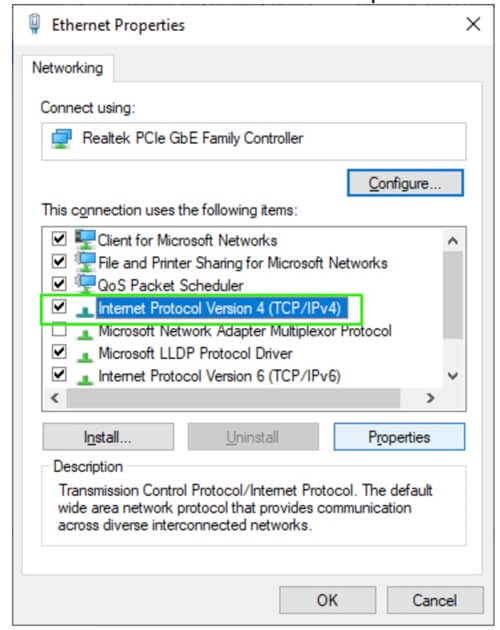
- To begin, simply press the Run dialog box by pressing the Windows key + R on your keyboard. After that, type “ncpa.cpl” and press Enter. This will let you access the Network Connections option!
- Once you’re there, simply right-click on the network you’re connected to and select Properties.

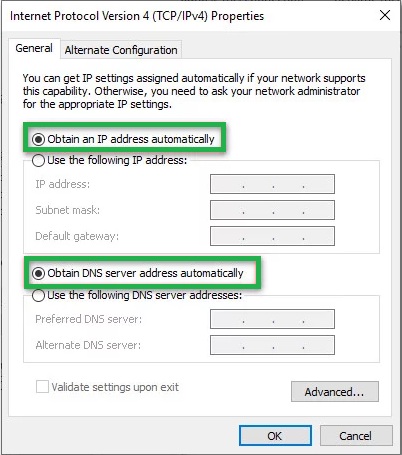
- Navigate to the Networking tab after opening the Properties screen. To access the Internet Protocol version, simply double-click on it.
- Go ahead and select “Obtain an IP address automatically” and “Obtain DNS server address automatically” from the Internet Protocol Version 4 (TCP/IPv4) Properties window. To save your changes, just click OK when you’re finished.
- Double-click on Internet Protocol Version 6 (TCP/IPv6) after returning to your network’s Properties screen. After that, simply carry out the previous procedures by turning on the settings for “Obtain an IP address automatically” and “Obtain DNS server address automatically.”
- Go to the link, enter your router or modem in the upper right corner search box, and hit Enter. Click the Support link corresponding to the model of your router or modem if a list containing several results is returned.
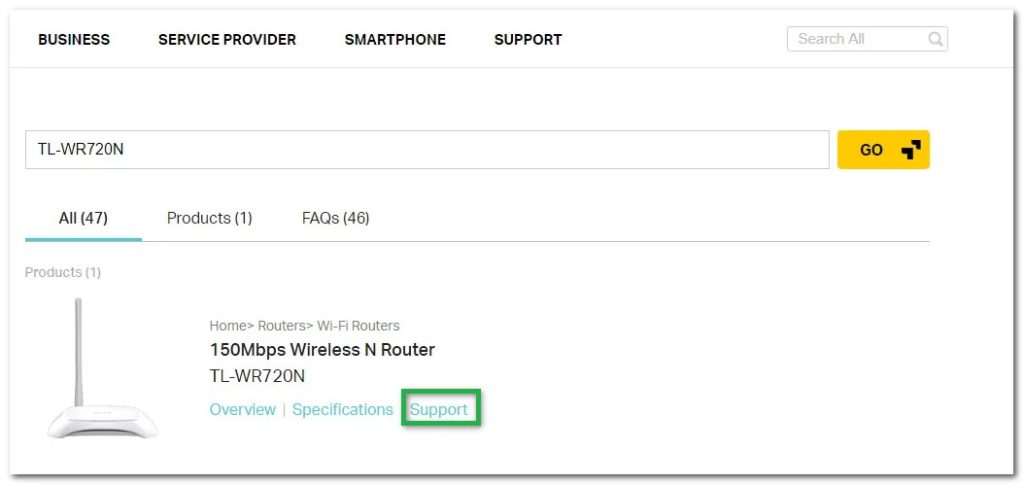
- Click on Utility in the Support screen linked to your device to download the most recent Easy Setup Assistant version.
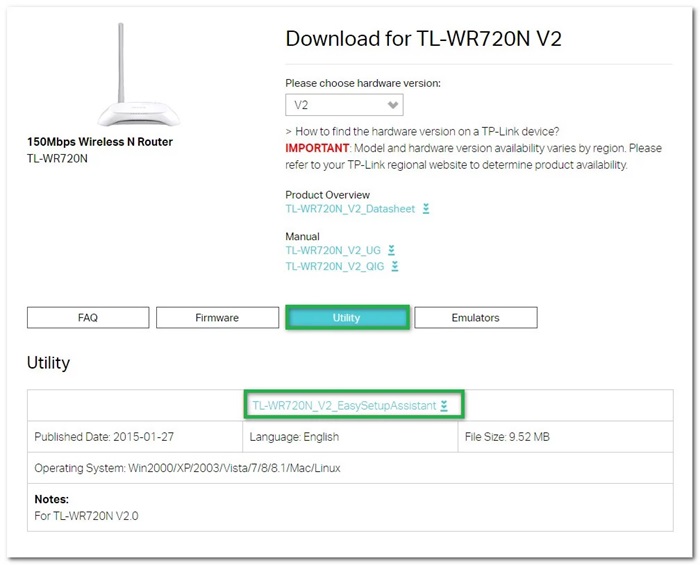
- Once you’ve finished downloading, go ahead and double-click on EasySetupAssistant after extracting the archive to kick off the setup process. Follow the prompts on your screen to set up your router or modem. Remember that the procedures may differ slightly based on your model.
- After you’ve completed the setup, restart your computer and check if you can access tplinkwifi.net when it comes back up.
If you were unable to fix the problem using this method, proceed to the next method.
Method 3: Update TP-Link Driver
A wireless network driver helps your operating system communicate with your wireless and network adapters. If you can’t see your wireless network on your laptop, it might be because your TP-Link Driver is missing, outdated, or possibly a bit messed up.
You can update your drivers in two easy ways: manually or automatically.
Manually Download TP-Link Driver From TP-Link’s Website
TP-Link regularly updates its drivers to enhance the performance and compatibility of its products, and these updates are readily available on its official website. If you need the latest driver for your TP-Link wireless adapter, follow these comprehensive steps to ensure a smooth download and installation process.
- Navigate to TP-Link’s official website, where all their resources are readily accessible.
- From the menu, select Networking.
- Next, proceed to the next menu and select “Adapters.” This step will guide you to a range of adapters that TP-Link offers.
- Now, choose USB Adapters, which includes the wireless adapters you will need.
- Now, you’ll come across a search box. Enter the model number of your TP-Link driver adapter in this space—make sure to input the exact model to avoid any confusion.

- Once you’ve located your adapter, click on it to access the driver options. If your device has multiple hardware versions, you may need to select the exact hardware version from the provided list.
- After confirming your selection, locate the “Download” button and click on it to start downloading the necessary TP-Link driver setup file to your computer.
- Once the download is complete, navigate to your downloads folder and double-click the downloaded file.
- Follow the on-screen instructions carefully to install the TP-Link driver, ensuring that you are set up properly on Windows 10 or any other Windows version you may be using.
Also know: Intel WiFi Drivers Download and Install for Windows PC
Automatically Download the TP-Link Driver Update
When it comes to downloading and installing the TP-Link drivers, doing it manually can be a bit risky. You might accidentally end up with the wrong driver, which can slow down your device.
Furthermore, it can be quite time-consuming to update everything by yourself. That’s where we come in with a super handy solution: automatic driver updates through software like Win Riser!
With just a single click, Win Riser can quickly and safely update all your outdated drivers, making your life a whole lot easier.
But that’s not all! This fantastic program also allows you to back up and restore drivers, schedule scans, and even speed up the download process for drivers. It’s packed with features to make your experience smooth and hassle-free.
So, just click on the link below to download and install this tool.
After installation, Win Riser will scan your computer in just a few seconds and show you any outdated drivers. Once you see them, you can update all of them with one click!

If you’re only looking to update your TP-Link driver, you can use the Update Now button for that. However, if you want everything to be flawless and error-free, updating all of your drivers is the best course of action.
Fixed: TP-Link Wifi Not Working in Windows PC
Fixing the TP-Link WiFi problems on your Windows computer doesn’t have to be difficult. Following the steps outlined in this article will allow you to quickly troubleshoot and restore your internet connection.
You can keep your TP-Link WiFi running smoothly by taking proactive measures and using the tools available to you. With the right approach, you’ll be able to confidently navigate any issues while maintaining strong connections.
