Imagine you’re working from home and need to access important work documents stored on your office computer. Every time you attempt to retrieve these files, you’re faced with cumbersome logins and access errors that slow down your progress. Windows 11 network drive mapping can be a smart idea to reduce repeated logins and streamline access, improving your workflow efficiency.
Mapping a network drive in Windows 11 assigns a drive letter to a shared folder, allowing you to access the folder as if it were a local drive. It is a special networking trick that helps you access shared folders more efficiently from any Windows program without browsing the network.
However, if you are confused about how to map a drive in Windows 11, we are here to help you.
You can map a network drive in Windows 11 through File Explorer, Command Prompt, and PowerShell. This article explains all three ways to map a network drive in detailed steps, beginning with clearing the drive mapping basics.
What Does it Mean to Map a Network Drive in Windows 11
Mapping a network drive means creating a shortcut to link a shared folder on another device or server to your computer and assigning it a drive letter (for example, “G:” or “Z:”).
It saves you time and effort, as you don’t have to go through the real headache of finding shared files on a network. Moreover, Windows 11 network drive mapping has several other advantages that we discuss next.
Why Map a Network Drive in Windows 11
Network drive mapping is a go-to solution for many users who want to access files on a network without the hassle of navigating IP paths. It assigns persistent access, ensuring users can easily share resources across different departments. Additionally, it helps in avoiding duplication of files across endpoints, making collaboration seamless, as if the files are stored right on your own PC.
Moreover, with older systems migrating to newer solutions (for reasons such as Windows 10’s end-of-life), network drive mapping helps IT professionals and system users ensure legacy compatibility, standardized resource access, scalability, and improved security.
Before you begin Windows 11 network drive mapping, keep a few prerequisites in mind.
Prerequisites to Map Windows 11 Network Drive
Before we begin the detailed step-by-step tutorial for how to map a network drive in Windows 11, ensure you have the following.
- Make sure you have network discovery and file sharing enabled. To enable network discovery and file sharing, navigate to Control Panel>Network and Sharing Center>Change advanced sharing settings. Next, turn on Network discovery and File and Printer sharing for your current profile.
- Ensure you have the network path of the shared folder. You may require the Universal Naming Convention (UNC) path of the folder you wish to map. This path generally looks like this \\ServerName\SharedFolder.
- Verify the access credentials. You may need the access credentials of the target folder for authentication. Hence, ensure you have the right username and password to map a Windows 11 network drive.
- Ensure you have administrative privileges. While not always required, administrative rights may sometimes be needed to map drives for multiple users or deploy via script.
- Connect your computer and the shared resource to the same network, whether wired or WiFi.
With all of the above in check, let’s begin with how to map a network drive in Windows 11.
How to Map Windows 11 Network Drive (Quick and Easy Methods)
Whether you are a beginner or an experienced user, you can map a network drive in Windows 11 effortlessly in nearly fifteen to thirty minutes at zero cost using File Explorer, Command Prompt, or PowerShell. Here is how.
Method 1: Map Windows 11 network drive using File Explorer
File Explorer is a Windows tool created to explore, i.e., find files on your computer. It is among the most accessible methods to map a network drive, especially for beginners who may be intimidated by command-line tools such as Command Prompt and PowerShell. Hence, below is how to map a Windows 11 network drive with File Explorer.
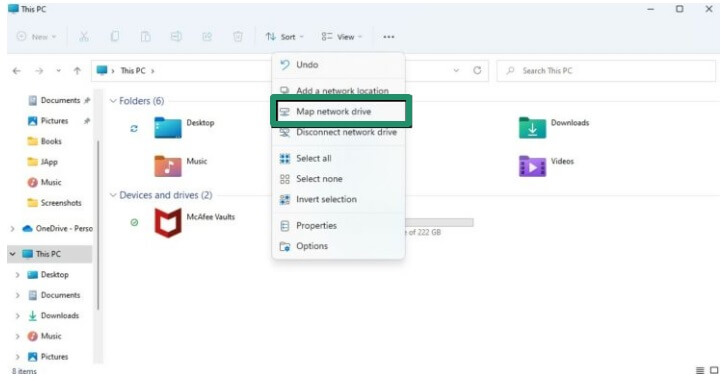
- First, click the folder icon in the taskbar or press Windows+E on the keyboard to open File Explorer.
- Once the File Explorer window opens, locate and click This PC in the left panel to access your drive options.
- Next, choose Map network drive from the three-dot menu at the top.
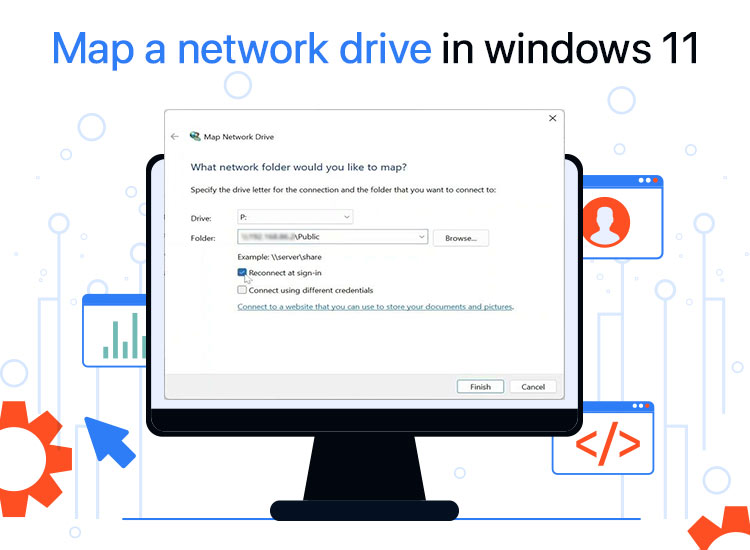
- In the Map Network Drive window, choose a drive letter from the Drive dropdown menu. You can select any letter that is currently not in use.
- Next, enter the network location path you wish to map in the Folder field. This path should be in UNC format: \\ServerName\SharedFolder. For example, \\OfficeServer01\FinanceDocs.
Note: If you are unsure of the exact path, click Browse to locate the folder within your network.
- Optionally, you can choose Reconnect at sign-in if you wish the drive to appear in your This PC window every time you log into your PC, and Connect using different credentials if you want to use different login details to access your network folder.
- If prompted, enter your domain login credentials.
- Lastly, click Finish to complete the Windows 11 network drive mapping process. The mapped drive will now be visible under “This PC” like all your local drives.
Also know: How to Install a Network Adapter Driver on Windows 10 without Internet
Method 2: Use the Command Prompt to map a drive in Windows 11
Command Prompt is an excellent way to map a Windows 11 network drive if you are a little experienced with command-line tools. It maps your network drive for automation or scripting tasks with login scripts that work even on older Windows systems, where GUI support is unreliable or restricted, or when you need fast, repeatable commands for batch deployment across various endpoints. Hence, the following is how to map a network drive in Windows 11 using Command Prompt.
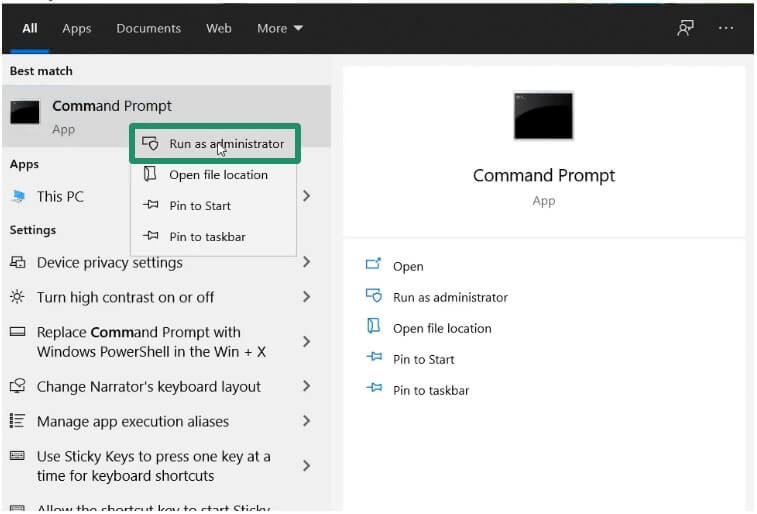
- First, type cmd in Windows search (you can access the search function using the Windows+S shortcut).
- Next, right-click the first search result, i.e., Command Prompt, and choose Run as administrator from the on-screen menu.
- In the Administrator Command Prompt, type the mapping command with the following syntax.
\ServerName\SharedFolder /user:DOMAIN\username password /persistent:yes
In the above command, make sure to make the following replacements.
- Replace Z: with the desired drive letter.
- Replace \ServerName\SharedFolder with the actual path of the network.
- Replace DOMAIN\username with your real credentials (you can use “username” for workgroup situations).
- Replace the password with your correct password.
- To reconnect the drive automatically at login, use /persistent:yes. For temporary mappings, use /persistent:no.
Below is an example of how this command looks.
net use H: \\FileServer01\Documents /user:MyCorp\jsmith P@ssw0rd123 /persistent:yes
In the above example, the command maps \\FileServer01\Documents to drive H: for jsmith in the MyCorp domain, having a password P@ssw0rd123, and makes the mapping persistent.
- After typing the mapping command, press Enter.
- If prompted, enter your username and password to complete the Windows 11 network drive mapping. After the mapping is complete, you can access the mapped drive from File Explorer.
Note: If you do not have domain authentication, you can simply use the command net use Z: \\ServerName\SharedFolder /persistent:yes. When you wish to remove the mapped drive, you can run the command net use Z: /delete to delete it from your system.
Method 3: Map a network drive in Windows 11 using PowerShell
You can use PowerShell to map a Windows 11 network drive if you want complete enterprise-level control with advanced features, such as error handling, credential management, integration with the latest management platforms, and conditional logic, making this another suitable mapping method for automation and scripting tasks. Below is how to map a network drive in Windows 11 with PowerShell.
Note: PowerShell is a suitable method when you want to automate drive mappings across various endpoints with complex requirements, integrate with Group Policy, manage remote sessions/headless server deployments, implement credential controls that differentiate sensitive data from script code, and build maintainable automation with proper logging and error handling.
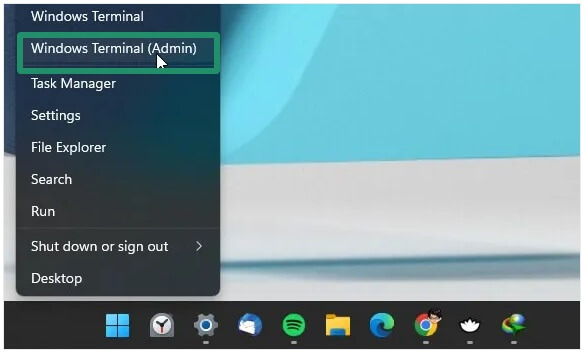
- First, right-click the Start button and choose Windows PowerShell (Admin) from the on-screen menu.
Note: In newer versions of Windows 11, Windows Terminal has replaced Windows PowerShell. Hence, you can choose whichever is available on your computer, as their functionality is the same.
- Next, type the mapping command with the following syntax.
New-PSDrive -Name “Z” -PSProvider “FileSystem” -Root “\ServerName\SharedFolder” -Persist
In the above command, make sure to use the replacements below.
- Replace Z with your drive letter (do not add a colon).
- Replace \ServerName\SharedFolder with your network’s actual path.
While you can include -Persist to ensure the drive reconnects at login, you can omit it if you wish to map the network drive temporarily.
Below is an example of how this command looks.
New-PSDrive -Name “H” -PSProvider “FileSystem” -Root “\\COMPUTER\ShareFiles” -Persist
In the above example, the command maps the ShareFiles folder to the computer with the “H” drive letter.
- After typing the mapping command, press Enter to complete the process. You can now access your mapped drive in the File Explorer window.
The methods above explained how to map a drive in Windows 11. Next, we have some more useful tips to help you map a network drive effortlessly.
Helpful Tips for Mapping a Network Drive in Windows 11
The tips below will help you with effortless network drive mapping in Windows 11.
- To map a drive in Windows 11 quickly through the network with network discovery enabled, you can open File Explorer, click Network, locate and right-click the desired shared folder, and select Map Network Drive from the on-screen menu.
- You can use an asterisk (*) when using the net use command instead of a drive letter to make Windows assign the next available drive letter automatically. The command then becomes: net use * \\server\sharedfolder.
- To view all currently mapped drives, open Command Prompt, type the net use command, and press Enter to get a list of all mapped network drives with their paths.
- You can remove a mapped network drive easily through File Explorer. To do so, open File Explorer, right-click on the mapped drive, and click Disconnect.
Having problems with Windows 11 drive mapping?
You can check the following section to learn what you can do if Windows 11 network drive mapping is not working.
Also know: How to Fix Wifi Connected But No Internet Connection
Troubleshooting Common Windows 11 Network Drive Mapping Issues
Here are the common problems users encounter when mapping a network drive in Windows 11, with their solutions.
Access denied
The “Access denied” error when mapping a network drive in Windows 11 means you do not have the necessary authentication to access the shared folder. To fix this issue, ensure:
- You have the correct credentials, such as username and password.
- You have the required share and NTFS permissions.
Network path not found
The “network path not found” error when performing Windows 11 network drive mapping means the shared folder’s server is disconnected, offline, or the path is not correct. To fix this problem, you can:
- Make sure the host device is online, accessible, and connected to the same network.
- Check the UNC path and ensure you are entering the correct network location in the appropriate format.
Drive doesn’t reconnect
If the network drive does not reconnect after rebooting your computer, you can:
- Ensure the persistent mapping is enabled.
- Make sure you have used /persistent:yes, or checked Reconnect at sign-in.
Mapped drive not visible
If the drive is mapped but not visible, below is how to find the network drive mapped in Windows 11.
- Restart the File Explorer from Task Manager. To do so, right-click on the empty space on the taskbar, choose Task Manager, navigate to the Processes tab, locate Windows Explorer, right-click Windows Explorer, and then click Restart.
- Sign out and sign in again to refresh your user session.
With that, we have come to the end of our Windows 11 how to map a network drive guide. Hope it helps you access shared network drive files on your computer hassle-free.
