If you’re encountering issues with “WiFi connected but no internet access” on your Windows 10/11 system, this guide is here to rescue you. By following the solutions outlined here, you can resolve the problem in just a matter of minutes.
Whether you’re using a Windows laptop or desktop, WiFi is a crucial aspect of our daily computing. Your device may utilize an integrated WiFi adapter (typically found in laptops) or an external one (commonly used for desktop setups) to establish a connection. However, occasional network connectivity issues can arise, even if your adapter is functioning correctly. This occurs when the adapter successfully receives and interprets the network signal, but the system fails to transmit it to other parts or servers within your system.
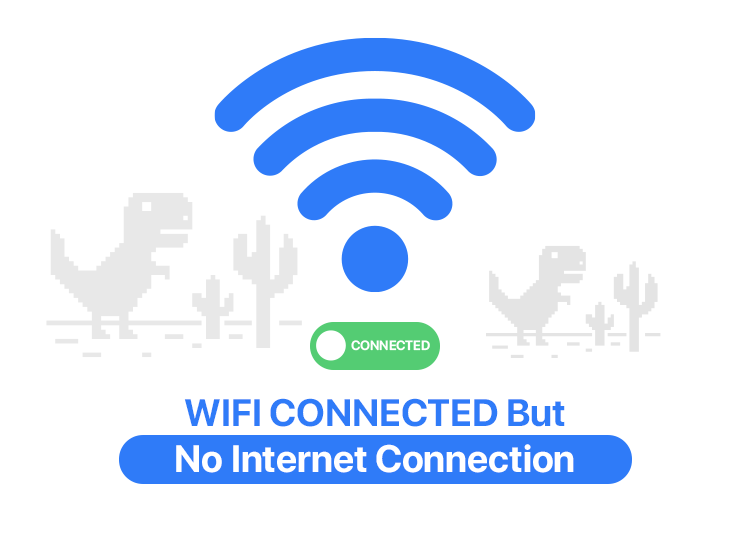
In such scenarios, it’s not uncommon to encounter errors indicating that your WiFi is connected but there’s no internet access. You’ll notice this error when attempting to utilize the WiFi or network functionalities of your device, with a message displaying “No Internet” below the connected network.
What Causes the “WiFi Connected but No Internet” Error?
The issue of WiFi being connected but without internet access can stem from various factors. Typically, common reasons behind this problem include:
- Outdated network adapter driver.
- Faulty or damaged adapter.
- Faulty or damaged router.
- Improper IP address configuration.
- Issues with the Internet service provider.
- Software-related problems.
- DNS server and cache issues, and more.
In some cases, a combination of these factors may contribute to the “WiFi connected but no internet” error on your device. To ensure smooth and consistent internet usage, it’s essential to address all potential underlying causes.
In this article, we’ll provide you with some highly effective solutions to resolve the issue of being connected to WiFi but no internet connection on Windows 10. Let’s delve into these solutions promptly to eliminate this frustrating and recurring problem in one fell swoop.
Fixing “WiFi Connected But No Internet” Error on Windows 10 and 11
Methods listed below are some of the top solutions to help you resolve the WiFi shows connected, but no internet error on your Windows 10 and 11 devices effortlessly. For a swift and effective resolution, we recommend following these solutions sequentially. One or more of these methods are likely to eliminate the error for you.
Note: Before proceeding with the solutions, we advise you to check the modem light to determine if there is a connection issue. If the light indicates normal operation, then the error likely lies within the system.
Without delay, let’s delve into the guide and explore the solutions for fixing the “WiFi connected, but no internet” error.
Let’s jump into the guide and the solutions for fixing the issue of WiFi showing connected, but no internet right away.
1. Power Cycle the System and Router
A straightforward and commonly effective solution to address this issue is to power off both your device and the router. Once powered off, allow a brief waiting period (typically 2-3 minutes), then restart both devices. This simple action often resolves the “WiFi connected but no internet”, error.
This process grants your system and the router/modem a fresh start, facilitating internet connectivity for all connected devices. You should now be able to browse the internet without any issues. If the problem persists, proceed to the next solution.
2. Determine if the ISP Is Responsible
Another common cause of the connected WiFi but no internet connection issue on Windows 11 and 10 is an issue with the Internet Service Provider (ISP). Occasionally, the ISP’s network may experience downtime due to maintenance or routine servicing. In such instances, check your ISP’s official website to ascertain if there’s a reported outage in your area.
You can also contact their support for further information. Alternatively, you may wait for some time to see if the connection is restored. However, we recommend using the WiFi connection on another device to confirm whether the issue lies with the ISP.
3. Switch to 4GHz from 5GHz
Another potential fix for the error is to switch your network frequency from 5GHz to 4GHz. However, this solution applies only if your device is currently using a 5GHz connection and encountering the “WiFi connected, but no internet access” error on Windows 10. Follow these steps to implement the change:
- Click on the WiFi icon located on the Windows taskbar.
- Choose the 4GHz network, enter the network credentials, and click on Connect.
- Forget the 5GHz network to prevent your system from automatically switching to it.
If switching networks doesn’t resolve the error, proceed to the next solution.
4. Deactivate Internet Security Software or Antivirus
If you have antivirus or Internet security software installed, it could potentially disrupt connectivity and cause issues such as WiFi showing connected, but no internet” on Windows 10 and 11.
If this is the case, the optimal solution is to disable the protection and security software temporarily. By doing so, your system can circumvent any interruptions caused by the software and access the internet without hindrance. However, if the issue persists even after deactivating the antivirus software, proceed to the next solution.
Also Read: Best software for PC
5. Disable the VPN
If the previous solutions haven’t resolved the issue, this one might do the trick. If you’re utilizing a VPN tool on your device to access the internet, you may encounter the connected to WiFi, but no internet connection issue on Windows 11. VPN tools are designed to alter network configurations, and sometimes, this alteration can disrupt connectivity. Therefore, the straightforward solution is to close or disable the VPN connection. This action will enable your system to access a standard, unmodified connection.
If you’re not using a VPN but are still experiencing these issues, proceed to the next solution for further assistance.
6. Update the Network Adapter Driver to Resolve “WiFi Connected but No Internet”
An effective solution to address errors like no internet access despite being connected on Windows 11/10 is to update the network adapter driver. Your device relies on a network adapter to access the internet smoothly. For optimal performance, this adapter must have up-to-date drivers. These drivers consist of system files that govern the functionality, efficiency, and connectivity of the device with the system.
Therefore, keeping the drivers updated is crucial. There are both manual and automatic methods available for driver updates, with the latter being more user-friendly. We recommend utilizing an automatic method, such as using a reputable driver updater tool like Bit Driver Updater.
Bit Driver Updater is a reliable tool that simplifies the driver update process with its one-click functionality. By using this tool, you can easily fix the “WiFi connected, but no internet” issue. Additionally, Bit Driver Updater offers several outstanding features and benefits, including:
- Instant and assured driver updates
- WHQL-certified drivers
- Options for driver backup and restoration
- Ability to ignore driver updates for specific devices
- Comprehensive yet swift system scanning capabilities.
These are just a few of the features provided by Bit Driver Updater. Let’s delve into how this tool effortlessly resolves the “WiFi connected, but no internet” issue on Windows 10.
How to Utilize Win Riser for Driver Updates:
- Click the button below to download Win Riser.
- Once downloaded, install the software and launch it to initiate the system scan, to identify issues with the installed drivers.
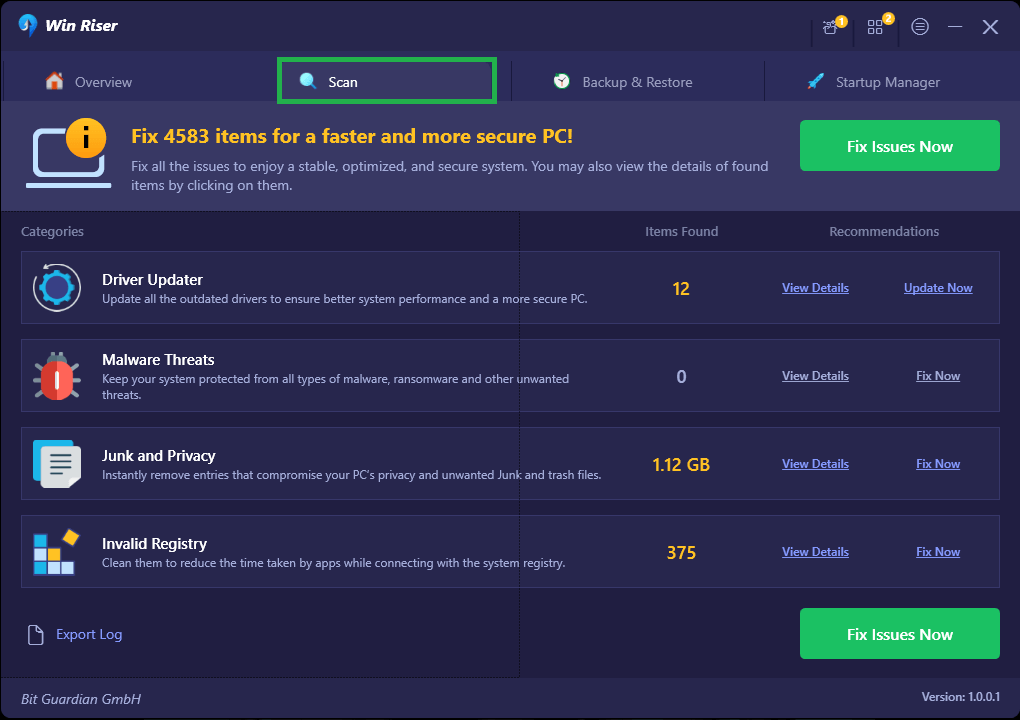
- Then, check the results, and use the Fix Issues Now button. Thus, it will install the necessary driver updates.
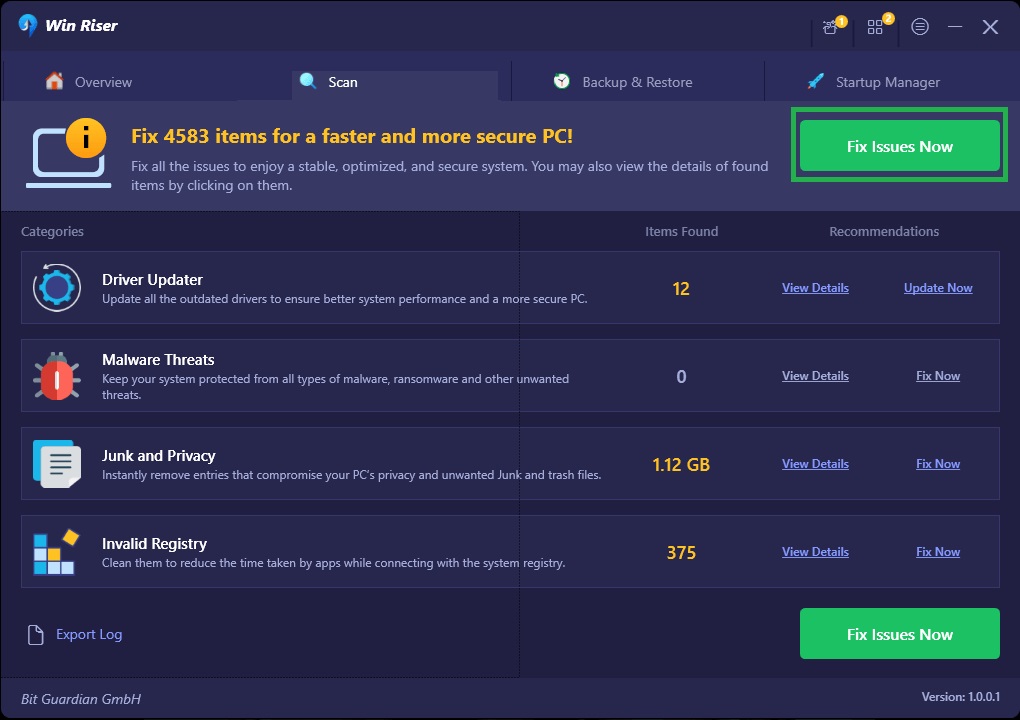
- After the driver updates are complete, restart your system to apply the changes.
If the WiFi connectivity issue persists, proceed to the next solution for further assistance.
7. Utilize Windows Troubleshooting
Another method you can employ to resolve the WiFi-connected but no internet issue on Windows 10 is by using the built-in troubleshooter. The Windows Troubleshooter is a native utility designed to identify and rectify underlying issues within your system, including those related to internet connectivity, such as WiFi problems. Follow these steps to utilize the troubleshooter:
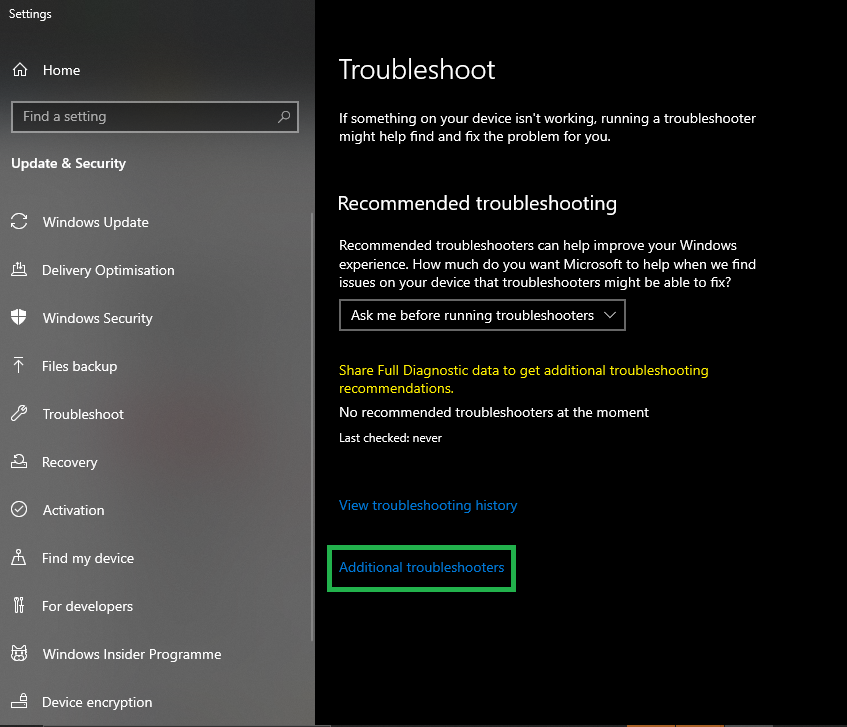
- Press the Win+S keys simultaneously, type “Troubleshoot Settings,” and press Enter.
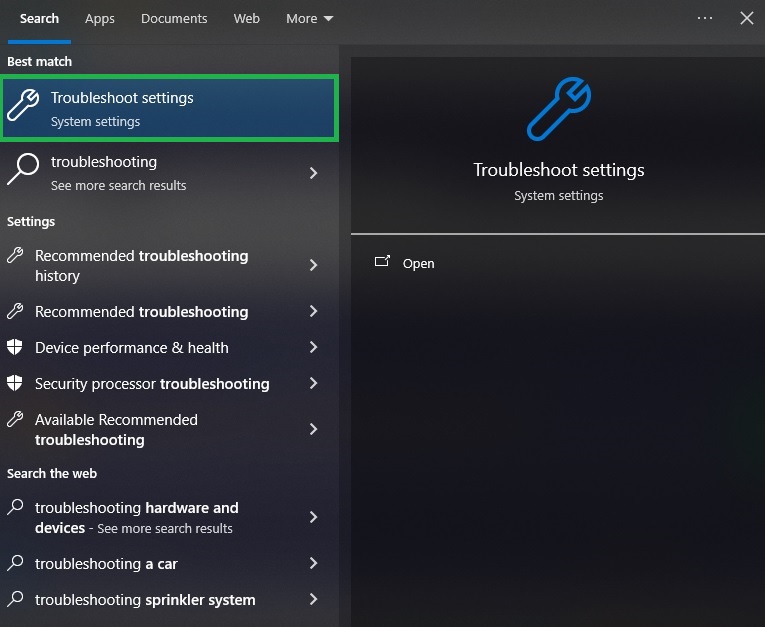
- On the Troubleshoot page, click on “Additional Troubleshooters.”
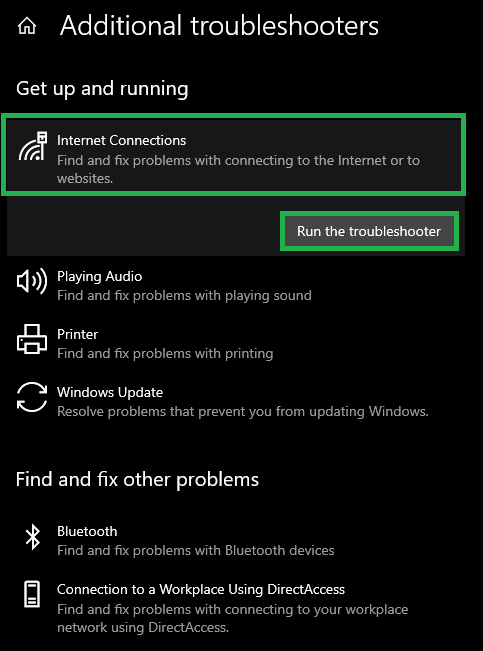
- In the subsequent window, click on “Internet Connections,” then select “Run the Troubleshooter.”
- Allow the troubleshooter to scan for network issues. Follow any on-screen instructions that may appear.
- Similarly, run the troubleshooter for the Network Adapter.

This method should effectively resolve the “WiFi connected, without internet” error if the root cause lies within the system. If the problem persists, proceed to the next solution.
8. Set DNS and IP Addresses to Automatic for IPv4 and IPv6
Another potential solution to resolve the “WiFi connected, but no internet” error on Windows 10/11 is to configure the system to automatically retrieve the DNS and IP addresses from the server. This enables your system to obtain the necessary network credentials based on its requirements. Follow these steps to implement the changes:
- Press the Win+S keys simultaneously, type “Network Status“, and press Enter.
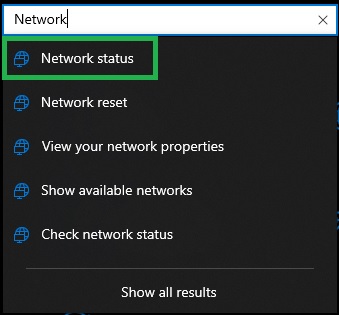
- In the network settings, click on “Change Adapter Options.“
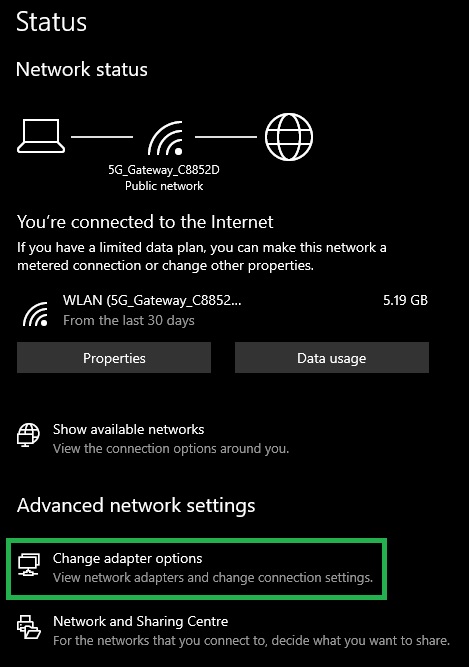
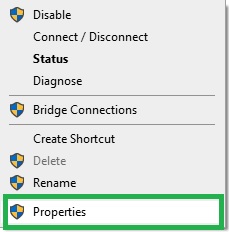
- Right-click on the specific WiFi network and select Properties.
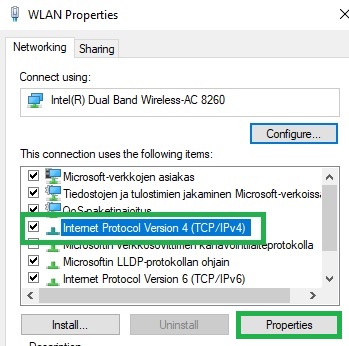
- In the properties window, navigate to the settings for Internet Protocol Version 4 (TCP/IPv4) and open its Properties.
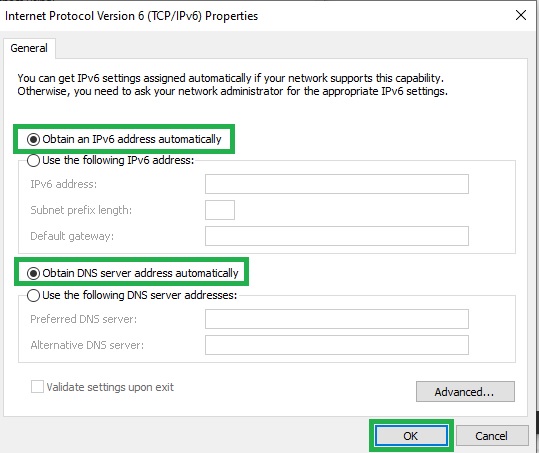
- Ensure that the options for “Obtain DNS Server address automatically” and “Obtain an IP address automatically” are selected.
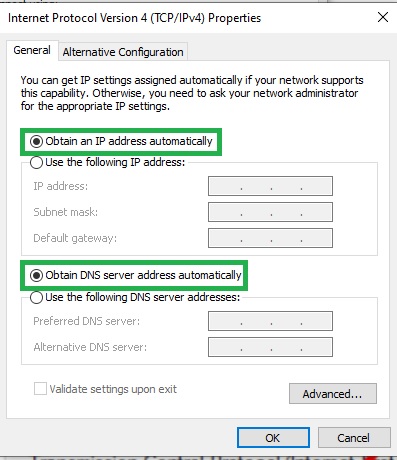
- Click “OK” to apply changes.
- Repeat the same process for Internet Protocol Version 6 (TCP/IPv6) settings.
If changing the settings to automatic does not resolve the issue on your device, revert the changes. Proceed to the next solution to address the error of being connected without internet access on Windows 10.
9. Attempt DNS Flushing
Using Command Prompt, you can flush and renew the entire DNS of your system, providing it with a fresh start free from bugs. This action may also assist in resolving the “WiFi connected, but no internet” error on Windows 11. Follow the steps below to flush the DNS completely:
- Press the Win+S keys simultaneously, type “Command Prompt,” and right-click to run it as Administrator.
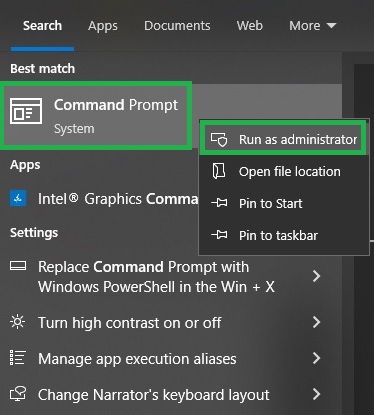
- Choose “Yes“.
- Use the Command Prompt window to input the following commands one by one. Remember to press Enter after each of them:
- Use ipconfig /flushdns.
- Then, insert ipconfig /release.
- Eventually, type ipconfig /renew
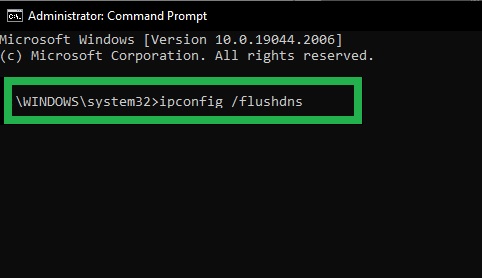
- Once the process is complete, close the Command Prompt window.
If the issue persists and your system continues to display “WiFi connected, but no internet” on Windows 10, proceed to the next solution for further troubleshooting.
10. Adjust Date and Time Settings
An effective solution to address the “WiFi connected, but no internet” error on Windows 10 involves configuring the date and time settings. While it may seem unconventional, ensuring accurate date and time settings can significantly impact internet connectivity. Both your system and the internet rely on synchronized date and time settings for seamless operation.
If there’s a discrepancy between the date and time settings of your system and the internet, it can lead to connectivity issues. To avoid such errors, follow these steps to ensure your date and time settings are configured correctly:
- Press the Win+S keys simultaneously, type “Date and Time settings,” and press Enter.

- Enable the settings for “Set the time zone automatically” and “Set the time automatically.”
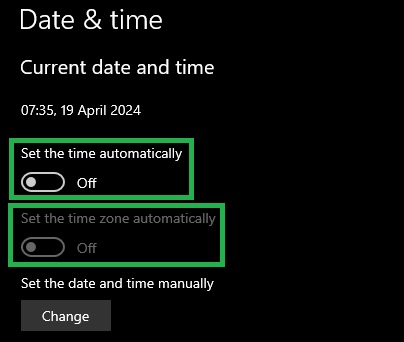
- Click on “Sync Now”, after you adjust the settings.
After making these adjustments, test your internet connection to see if it operates smoothly. If the “WiFi connected, but no internet” error persists, proceed to the next solution for further troubleshooting.
11. Reset Network Settings to Resolve “WiFi Connected But No Internet” Error
Another effective solution, often successful in resolving such issues, is to reset your network settings. This process provides your network and system with a clean slate, allowing them to function properly. Follow the steps below to reset your network settings and fix the “no internet access but connected” error:
- Press the Win+S keys simultaneously, type “Network Status,” and press Enter.
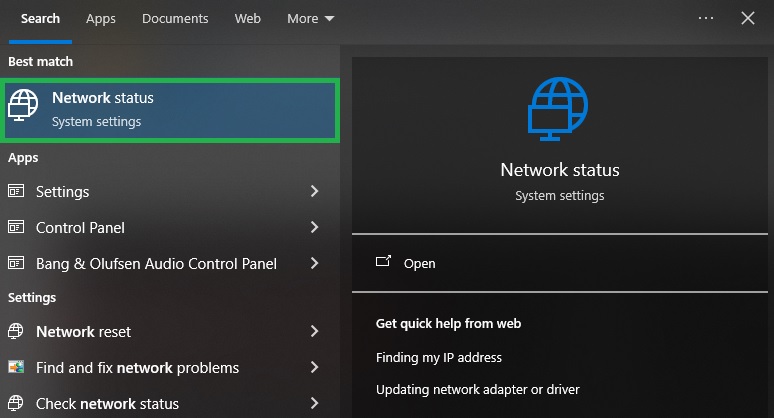
- Scroll down the network settings and select “Network Reset.”
- Click on the “Reset Now” button.
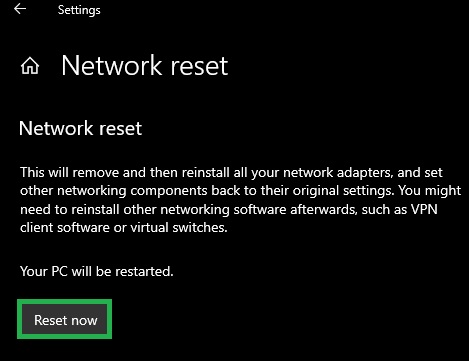
This solution essentially refreshes your network connection, allowing it to establish a new connection with your system. If this method does not resolve the network-related errors, proceed to the next solution for further troubleshooting.
12. Disable Fast Startup Settings
The Fast Startup feature on your device can sometimes cause interference with its overall performance, potentially leading to issues like the “WiFi connected, but no internet” error. In such cases, it’s necessary to disable Fast Startup to address the problem promptly. Follow the steps below to disable this feature for improved connectivity:
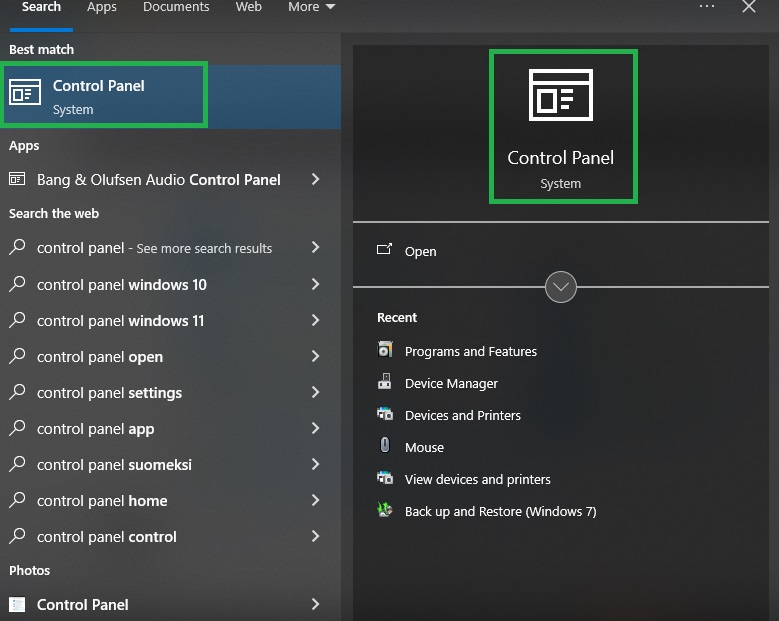
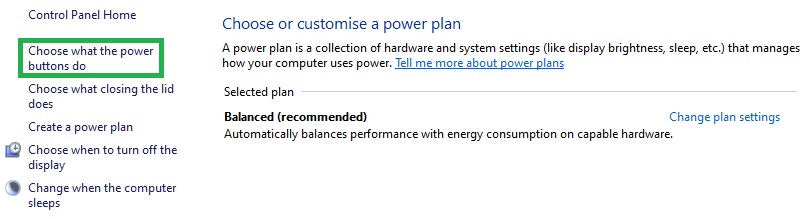
- Press the Win+S keys simultaneously, type “Control Panel,” and press Enter.
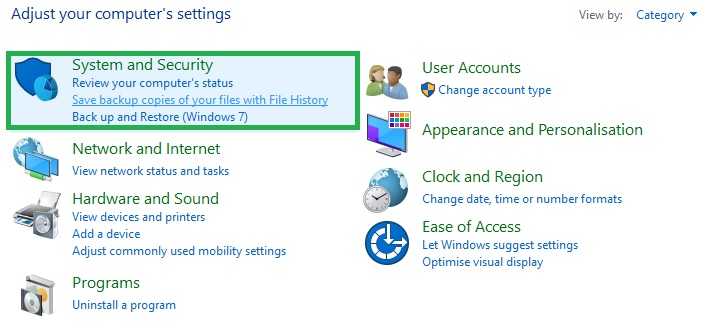
- Choose “System and Security.“
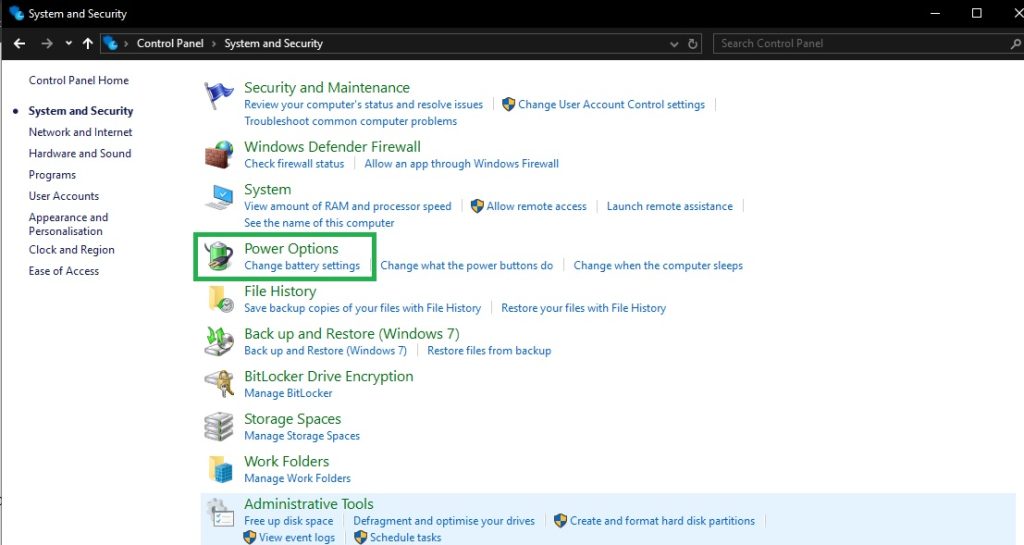
- Access “Power Options.”
- Select “Choose what the power buttons do”, in the left pane of the window.
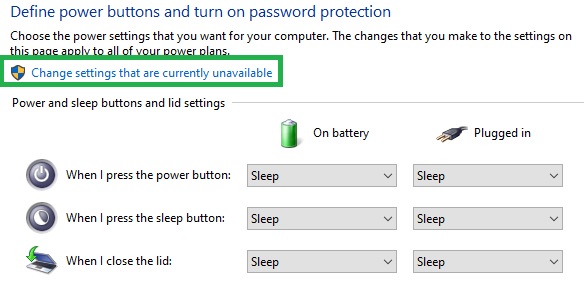
- Click on “Change settings that are currently unavailable.”
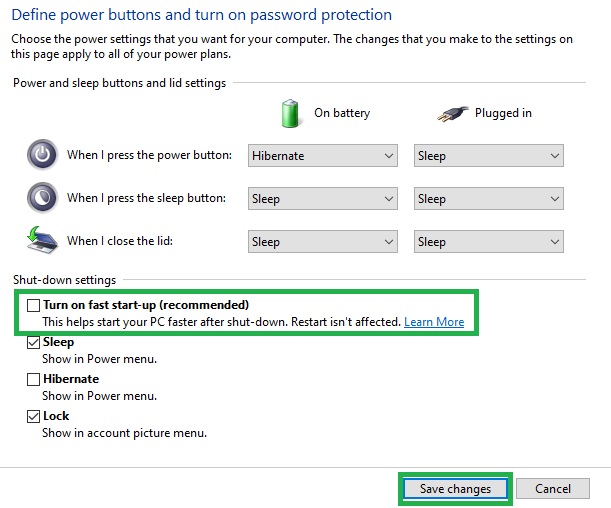
- Locate Shutdown settings and deselect the box next to “Fast Startup.”
- Click “Save Changes” and close all windows.
If none of the previous solutions have resolved the WiFi error, proceed to the final solution below, which is likely to assist.
13. Review Router Permissions
An often overlooked aspect is the ability to adjust router settings, which can dictate whether a device is allowed to access the internet. If a device has been mistakenly disabled from internet access, it could lead to the “WiFi connected, but no internet” issue on Windows To ensure correct router settings, follow the steps below:
- Press the Win+S keys simultaneously, type “Command Prompt,” and right-click to run it as Administrator.

- Click “Yes” to proceed.
- Input the command “ipconfig” into the Command Prompt and press Enter.
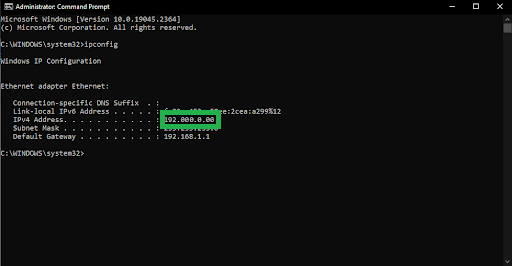
- Copy the IP address displayed on the screen, paste it into your web browser’s search bar, and press Enter. (e.g., 192.X.X.X.)
- Use the network console credentials, and log in.
- Navigate through the console settings, and locate the MAC address filtering options. If enabled, disable this feature. Additionally, ensure that access is enabled for all the devices that may have been disabled.
14. Perform a Router Reset
If you’re still encountering the issue of “WiFi connected, but no internet” on Windows 10, another troubleshooting step to consider is resetting the router. Resetting the router is a relatively straightforward process, but it’s essential to proceed with caution as it will remove any customized settings, including the router’s password. If you’re comfortable with this, follow the steps below:
- Locate the “Reset” button on your router
- Insert a pin into the hole. Press and hold it for a few seconds until the router resets.
- Once the router has reset, reconnect to the internet on your device and check if the issue has been resolved.
Note: Resetting the router will also remove your password!
WiFi Connected But No Internet – Fixed
We trust that the solutions provided have helped you resolve the connected to WiFi connected, but no internet connection issue on Windows 11/10. If you encounter any challenges while implementing the fixes or if the issue persists, don’t hesitate to reach out for assistance in the comments section below.
Support our page by subscribing to our blog newsletter. By doing so, you’ll stay updated with new blog posts and news additions. We value your feedback, so please share your thoughts and reviews regarding this guide.

3 Comments