Imagine losing your crucial data due to hardware failures, human error, malware, or other system crashes that make your files and settings unrecoverable. This frustrating situation can occur if you do not perform a Windows 11 backup using a Windows backup tool, such as the built-in Microsoft Windows Backup app.
Windows 11 boasts a new and simplified Windows Backup tool to back up files, settings, and applications to OneDrive. We are going to take you to the depths of how to back up computer data through this app. However, before that, let’s clear the air about why you need a backup and what this application exactly is.
Why Do I Need to Perform a Windows 11 Backup
Backups are essential on Windows due to reasons such as data safety, system stability, prevention of permanent data loss, moving to a new PC, and file recovery in the case of cyberattacks. Let’s look at these reasons in detail.
Data recovery
If there is a system crash, virus infection, accidental deletion, or hardware malfunction, you can restore your data from the backup, preventing permanent loss of crucial files and documents.
Effortless system migration
You can transfer your files, applications, and settings easily from your old computer to your new computer using a Windows backup.
Hence, you should back up your data on your Windows Backup application. Below is an in-depth explanation of this application and how it works.
What Is Windows Backup App
The Windows Backup app is a built-in tool in Windows 11 that lets you back up and restore your personal files, applications, settings, and Microsoft account credentials, primarily via OneDrive, helping you effortlessly transition to a new computer and keep your data accessible on multiple devices.
Moreover, the first steps towards creating a Windows 11 backup with this tool are quite simple. All you need to do is follow the guide below.
Also know: How to Fix the USB Device Not Recognized Error in Windows PC
How to Use the Windows Backup App to Perform a Windows 11 Backup
Using the Windows Backup app to create a Windows 11 backup involves simple steps, such as searching for the application, signing in to the Microsoft account, configuring your backup settings, starting the backup, and (if needed) purchasing additional storage. Let’s understand all these steps in greater detail.
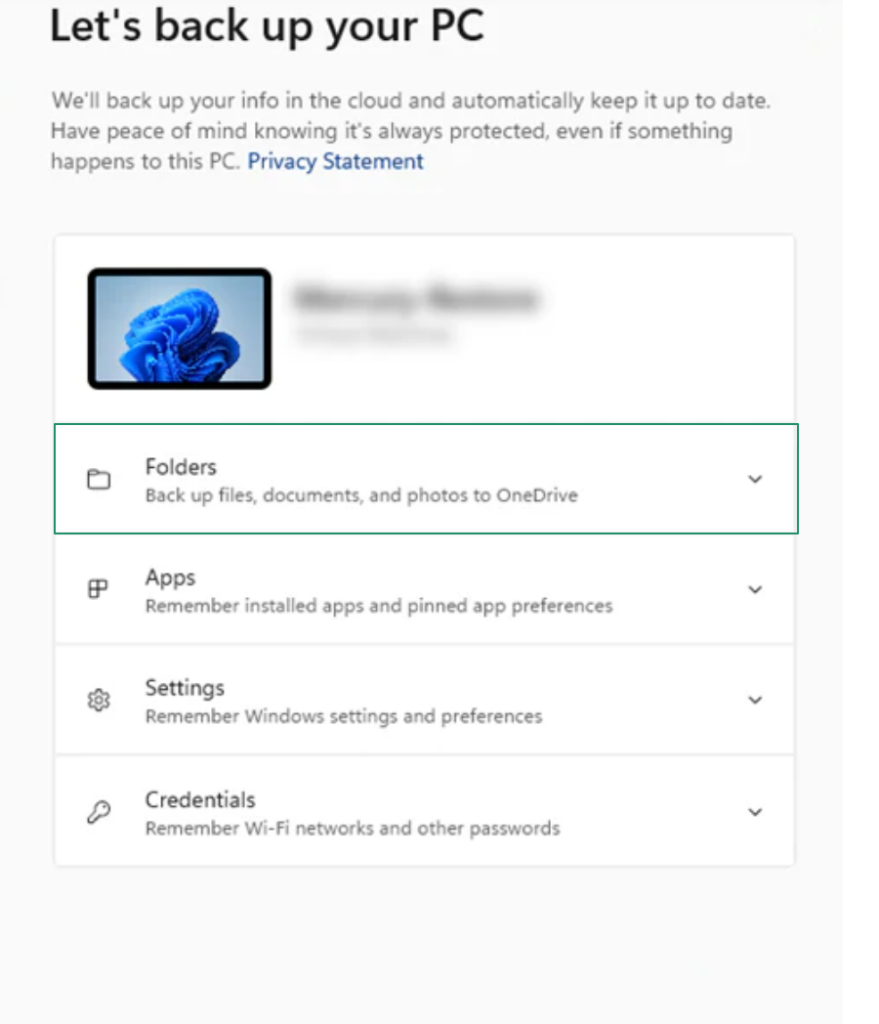
- First, click on the Windows icon on the taskbar, type Windows Backup in the search bar, and then select the application from the search results.
- Second, click on the Folders option in the Windows Backup application.

- Next, toggle on the Folders option to back up your folders (such as desktop, documents, and pictures) to the cloud.
- In this step, navigate to the Apps setting.
- In the Apps setting, toggle on Quick access apps on any Windows device.
- Next, click Settings and then toggle on the buttons, such as language preferences and dictionary, accessibility, personalization, etc.
- In this step, click on the Credential setting and then toggle on Wi-Fi networks & passwords.
- Next, click on the Back up button.
- Lastly, click Close to complete the Windows 11 backup process.
To restore the backup you created in the previous steps, when you get a new PC or reinstall Windows, you can log in to the same Microsoft account that you used to make the backup, wait for Microsoft to find the existing backup, and then follow the on-screen wizard to restore it.
That was about using the Windows Backup tool on Windows 11. However, you are a Windows 10 user who stumbled upon this article accidentally (happened with many users), trying to back up Windows 10, you can create a backup by following this path on your computer: Control Panel>System and Security>Backup and Restore (Windows 7)>Set up backup>External device or network location for the backup>Let me choose>select folders to back up>Save settings>run backup.
Also know: How to fix Unknown USB Device Descriptor Request Failed
Windows 11 Backup Using the Microsoft Backup App: The Conclusion
With that, we have come to the end of this guide on how to back up system settings in Windows 11 using the Windows Backup app. Hopefully, you find this article helpful. However, if you have any doubts, questions, or suggestions, you can leave them in the comments section below.
Also, share this guide with your peers who may find it useful and get more tech guides and solutions for free in your mailbox (no spam, only pure tech!) by subscribing to our newsletter.

