Setting up a VPN (Virtual Private Network) on your Windows PC is a fantastic way to boost your online privacy and keep your information secure while you surf the internet.
Whether you’re working or just browsing for fun, knowing how to set up secure VPN connection on Windows PCs can really help protect your connection. So, if you are worried about your online privacy and keeping your data safe, in this guide, we’ll walk you through the easy steps to get your VPN up and running effectively on your Windows PC.
We’ll cover how to use the built-in settings that Windows offers, as well as how to manually set up a secure VPN connection on Windows PC if you prefer a little more control.
By following our easy steps, you will establish a secure connection that will protect your online activities from prying eyes. So, whether you’re a tech beginner or just looking to improve your skills, this guide will help you connect safely in no time.
Let’s get started with understanding what a VPN is and how it can make your internet experience much safer and more private!
What is a VPN and How Does it Work?
When the internet was first developed, it was excellent, but there were some security and privacy flaws. Unfortunately, those problems are still present today. Although HTTPS has advanced to become the standard for web browsing, it still falls short, particularly when using public Wi-Fi or in your own home. That’s where a virtual private network, or VPN, comes in handy!
When a VPN is activated, an encrypted tunnel is created between your device and a server that is under the control of the VPN provider. Your information is protected as it passes through this secure tunnel and out onto the internet via the VPN server.
This means that if someone is spying on your network or if a public Wi-Fi owner is acting maliciously, they won’t be able to see what you’re doing. Furthermore, it will be more difficult for your Internet Service Provider (ISP) to keep an eye on your browsing habits. Using a VPN also makes it more difficult for advertisers to track your online activities because it makes it look like your traffic is coming from the VPN server rather than your own device.
Another benefit of a VPN is that it can conceal your actual location. Any observer will see the VPN server’s IP address, not yours. Keeping your IP hidden can help keep people from figuring out where you are because it is connected to your location. You can even connect to a VPN server in another country to have a little fun and act like you’re there!
Virtual private networks, or VPNs, are great tools for enhancing your privacy and security online, but they are not a solution for every internet threat. For added security, it’s still a good idea to use a standalone antivirus program, even though some VPNs make claims about blocking malware.
There are three primary categories of VPN connections:
- Remote user VPN
- Using a Third-party VPN to conceal user activity and the source IP
- Site-to-site VPN
1. Remote user VPN
A VPN, or Virtual Private Network, allows remote users, like workers or students, to access a private local network over the internet. To connect, users need a VPN client, which is software or an app.
2. Third-party VPN
This type of VPN enables users to connect remotely to other systems while masking their IP addresses through a third-party provider, allowing them to circumvent firewall rules. Third-party VPNs are becoming more popular as more people try to conceal their online activity from potential employers.
3. Site-to-site VPN
This type of VPN is typically used to connect routers or other endpoints located in different locations. Site-to-site VPNs can be set up between branches in corporate settings so that they can access intranet systems.
Also know: How to Change VPN Location in Windows
How to Set Up a Secure VPN Connection on Windows 10
Setting up a secure VPN connection on Windows 10 is straightforward and can significantly protect your information from attackers. These easy steps below will help you set up a secure VPN connection on your Windows 10 device so you can browse the internet with confidence and safety. Let’s get started!
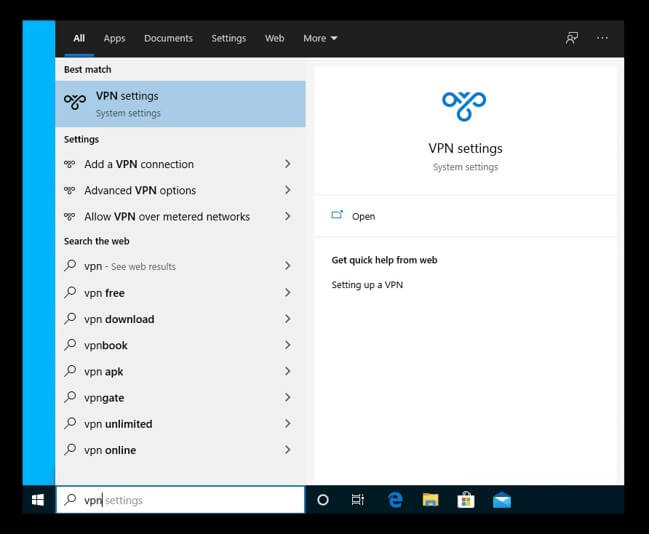
- Open the Windows menu by clicking the Windows icon in the lower-left corner of your screen, and then enter “VPN.” Additionally, if you have Cortana enabled, you can type “VPN” straight into the taskbar’s search bar.
- Next, select VPN settings.
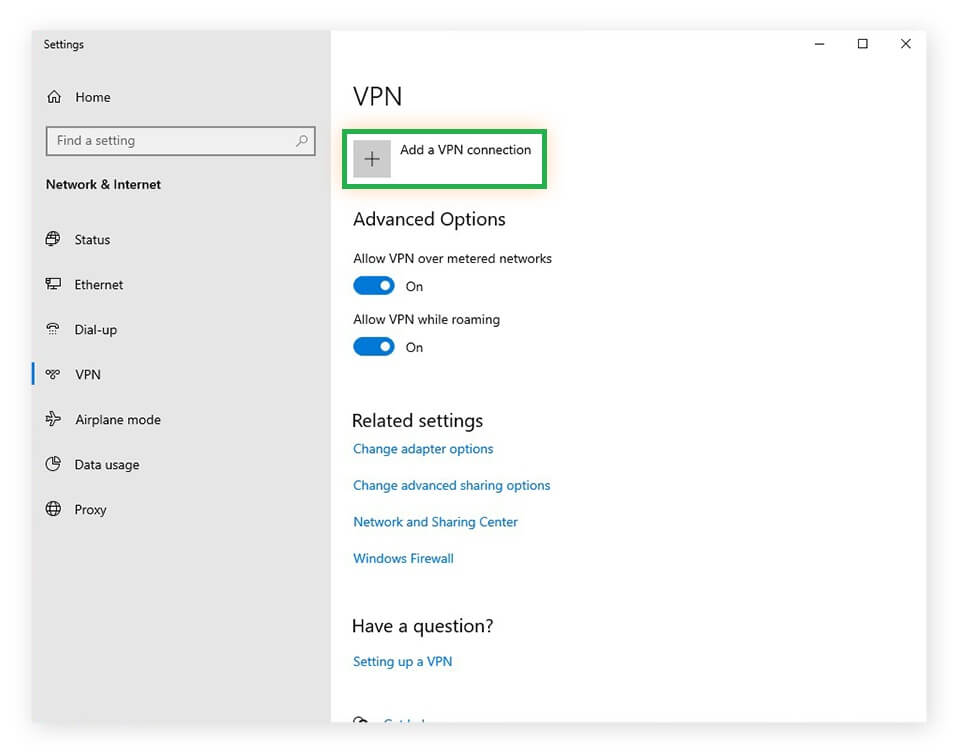
- Select “Add a VPN connection” from the VPN menu.
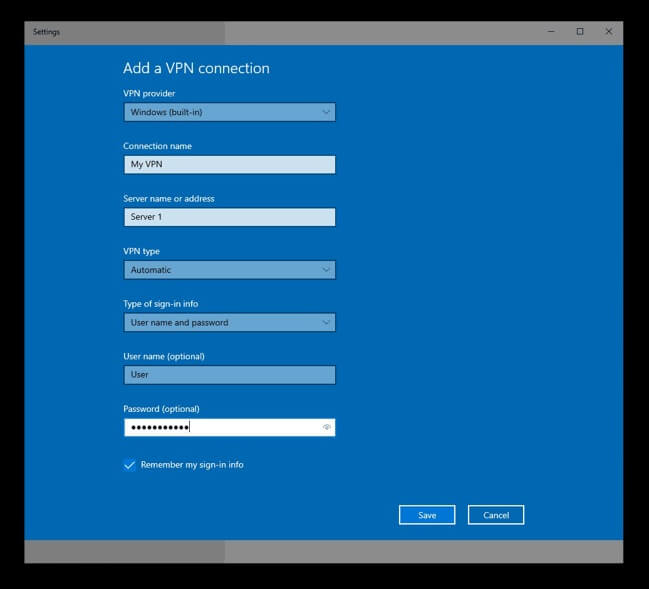
- Enter your VPN server information on the next screen. Click on Windows (built-in) in the VPN provider field, then select the VPN type and authentication method (in the VPN type field and Type of sign-in info field, respectively), and enter all required information. You might need to download and install extra software or security certificates for certain protocols.
- Click Save when you’re done.
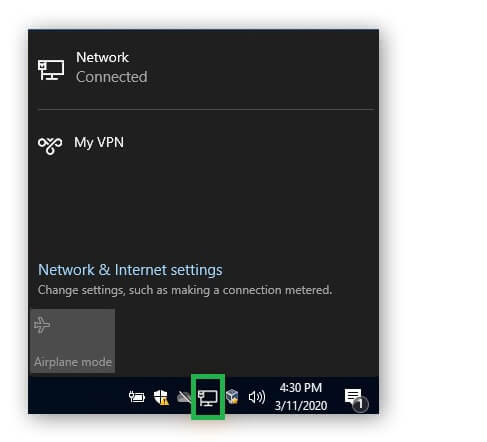
- Connect to your new VPN by selecting the Wi-Fi or Network icon located in the taskbar’s system tray.
- In this way, you can set up a secure VPN connection in Windows 10!
How to Set Up a Secure VPN Connection on Windows 8 and Windows 7
The process of setting up a VPN on a Windows 7 computer is very similar to that of Windows 8. We will guide you through the process of setting up a secure VPN connection in the Windows 7 environment.
- On the taskbar in the bottom-left corner of your screen, click the Windows icon. Next, click Set up a virtual private network (VPN) connection after typing “VPN” into the search bar.
- After entering your VPN server’s IP address or web address, click Next.
- In the next screen, enter your username and password, then click Connect to activate. After entering your username and password in the next screen, click Connect to activate your new VPN.
- You can also set up a VPN in Windows 8 by following the above instructions.
Also know: How to Use a VPN for Downloading Safe Content from the Web
How to Set Up a VPN on Your Router
If you’re looking for a way to use a VPN without having to set it up on each of your devices, why not try configuring it on your router instead?
This option is excellent because it enables all of the devices on your network to benefit from VPN protection, including those that don’t typically support VPN traffic. Just remember that this method can still improve your overall security even though the connection between your devices and the router won’t be encrypted.
Setting up a VPN on your router may require a little more effort, but it’s not difficult! Here’s a simple step-by-step guide to help you get started.
1. Log into Your Router:
Simply enter your username and password if you have changed them recently. If you can’t recall them, look up the login instructions in the user manual for your router.
2. Set Up Your VPN:
Some routers have a dedicated section for VPN settings, making it super easy! If it does, simply enter your login credentials and VPN server information. You can still configure it, so don’t worry if it doesn’t. For precise instructions, simply consult your user manual.
Now that everything is configured, it’s time to give it a try! Check to see how well everything functions by connecting a few different devices.
Setting up a secure VPN connection on your Windows device is a straightforward process that significantly enhances your online privacy and security. By following the steps outlined in this article, you can enjoy a safer browsing experience and protect your sensitive information from prying eyes. Remember to choose a trustworthy VPN provider and configure your settings carefully. With your VPN up and running, you can surf the web with confidence.
