Microsoft offers an ocean of applications for various purposes, but not every enterprise environment requires the full suite. For example, IT administrators might only want to deploy Outlook to call center workstations to limit distractions and save system resources, while reserving Excel and Access for finance team desktops. Similarly, an organization may choose to exclude Teams on kiosk PCs used for customer self-service. To help with these scenarios, Microsoft provides the Office Customization Tool, which lets IT teams select specific applications to install or exclude, as well as choose between 64-bit or 32-bit architectures.
Before jumping to the Office Customization Tool download and configuration, let’s clear the basics around what exactly this tool is and its role.
What Is the Office Customization Tool
Simply put, the MS Office Customization Tool is a web-based utility for IT administrators that allows them to create customized XML configuration files to deploy Microsoft 365 apps and other Click-to-Run MS Office products.
Used together with the Office Deployment Tool, the Office Customization Tool rolls out tailored Office installations across a network, offering complete control over installation, including selection of apps, language packs, licensing, and update channels.
Please note that since the Office Customization Tool (OCT) is a web-based tool, you cannot really download it. What you create with the OCT is a configuration file in XML format, which defines your desired Office installation settings. You then use the Office Deployment Tool (ODT), which you can download from Microsoft, to deploy Office using your custom configuration file.
In summary, the workflow is: create the configuration XML in the OCT, then use the ODT to perform the actual deployment. The Office Deployment Tool is an essential component for deploying Microsoft Office with the Office Customization Tool.
Now that you have a better understanding of the MS Office Customization Tool, let’s help you use it.
How to Use the Office Customization Tool
Below is a beginner-friendly step-by-step guide to help you deploy MS Office with the Office Customization Tool.
- First, click here to navigate to the Microsoft Office Customization Tool from the official website.
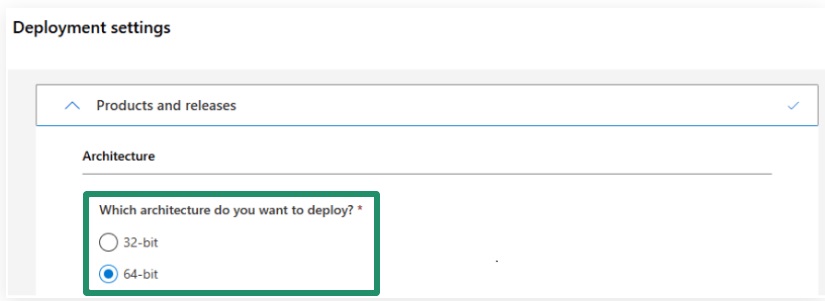
- In the Products and Releases section of the Deployment Settings of the Microsoft 365 Apps Admin Center, select whether you have a 32-bit or 64-bit system architecture. You can check this by pressing Windows+I, choosing System, and navigating to the About section.
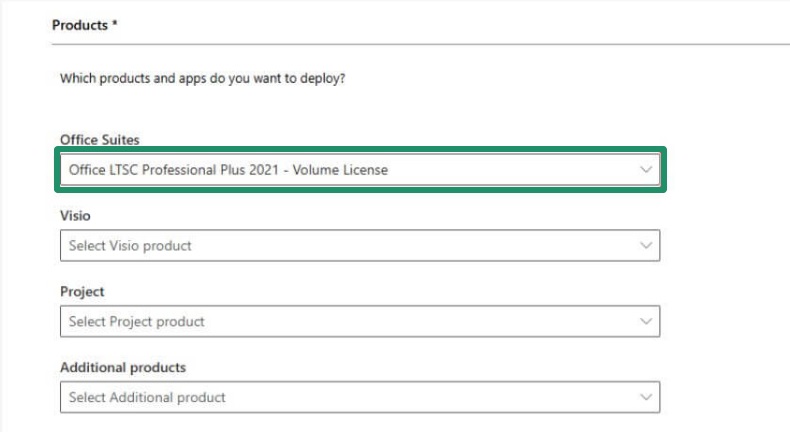
- Next, choose the Office version you want, such as Office LTSC Professional Plus 2021.
- In this step, toggle on the application you wish to install.
- Keep the Update Channel settings as they are unless you have any specific requirements.
- Click the Language section and then select the primary language of the Office suite. You can also add a proofing or additional language.
- Click Next.
- If unsure, keep the Installation Options as they are and click Next.
- In the Updates and Upgrades section, keep updates at their default settings and select whether you wish to remove previous Office versions.
- In the Licensing and Activation section, choose KMS if you are using a volume license and leave the activation settings untouched.

- Click Next.
- In the General Information section, you can provide your organization’s name to set the company property on Office documents if you want.
- Click Next.
- In the Application Preferences, do not make any changes unless you need any special adjustments.
- Choose the Office Open XML Formats in the Export dialog box and click OK.
- Tick the “I accept the terms in the license agreement” box and then click Export to save the export configuration to XML.
- After saving the configuration file in XML format, click here to navigate to the official Office Deployment Tool download page.
- On the download page of the Office Deployment Tool, choose your preferred language and then click Download.
- Next, with both deployment files ready, right-click the Office Deployment Tool in the folder and select Run as Administrator from the context menu.
- Tick mark “Click here to accept the Microsoft Software License Terms” and then click Continue.

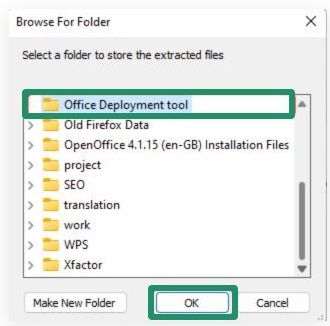
- Next, choose a folder where you wish to extract the files and click OK.
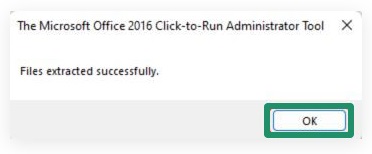
- Click OK to complete the extraction of the Office Deployment configuration files.
- In the search bar on the taskbar, type cmd, right-click the first search result, and choose Run as Administrator from the context menu to open the Administrator Command Prompt.
- Navigate to the folder where you extracted the files, go to the folder’s address bar, and press CTRL+C to copy the file path.
- In the Administrator Command Prompt, type cd, press the space key, and then paste the path you copied in the previous step by pressing CTRL+V, and then press Enter.
- Next, copy and paste the command below into the Administrator Command Prompt.
setup.exe /configure configuration.xml
Note: Configuration.xml is the exported configuration file’s name. Ensure you use the correct file name if you changed it.
- Press Enter to execute the command you pasted in the previous step.
- Lastly, you can verify the Office suite installation by opening any MS Office application, such as Excel, on your computer and clicking the Account tab. In the Account tab, you will get the Office suite product details, confirming that it is fully operational and activated on your system.
That’s how you can customize your MS Office experience with the Microsoft Office Customization Tool 2016 and above, Click-to-Run Office deployments. If you have any questions or concerns about this guide, you can let us know in the comments section.
Also know: How to Set an Out of Office Message in Microsoft Teams
Frequently Asked Questions
Q1. Does Configuration Manager integrate the Office Customization Tool with the Microsoft 365 client installation wizard?
Since version 1806, Microsoft Configuration Manager can integrate with the Office Customization Tool directly into the Microsoft 365 Apps installer wizard to streamline the creation of Office applications without manually editing XML files for most deployment conditions.
Q2. What is the use of the Office Customization Tool?
The primary role of the Office Customization Tool is to help IT administrators create configuration or XML files to customize the Microsoft 365 applications and Click-to-Run programs. It defines the installation settings, language packs, product versions, application preferences, and update channels for large-scale rollouts to streamline the deployment process.
Q3. Which Office suites can I deploy with the Office Customization Tool?
Microsoft 365 Apps for Enterprise and Business, Office LTSC Professional Plus 2024/2021, Office LTSC Standard 2024/2021, Office Professional Plus 2019, Office Standard 2019, Project Online Desktop Client, Project Professional, and Visio Plan 2 are some of the key Office suites and products you can deploy using the Office Customization Tool.
