
You should update your Dymo Labelwriter 400 driver for Windows 11, and 10 if you already have a thermal label printer from Dymo. Although it is easy to use and has a decent price, the printer needs the latest drivers to work and help you take advantage of its features.
So, here are the best ways to get the latest Dymo Labelwriter 400 driver download. Read on and pick your favorite method. However, first go through the following overview of the latest driver to ensure downloading and installing the correct drivers.
Latest Dymo Labelwriter 400 Driver Details
- Manufacturer: DYMO
- Latest Version: 8.7.4
- File Size: Approximately 69.1 MB
Ways to get the Dymo Labelwriter 400 driver download for Windows
As mentioned before, you can choose from a variety of methods to get the Dymo Labelwriter 400 driver update. Some of them need more skills, and time, while others are less time-consuming and easier. So, let’s check each of them/
Use the Official Website
One option, if you need the Dymo Labelwriter 400 driver update, is to go straight to the peripheral producer’s website. It is the same with this label printer.
To get the Dymo Labelwriter 400 driver download, you need to:
- Visit the producer’s website.
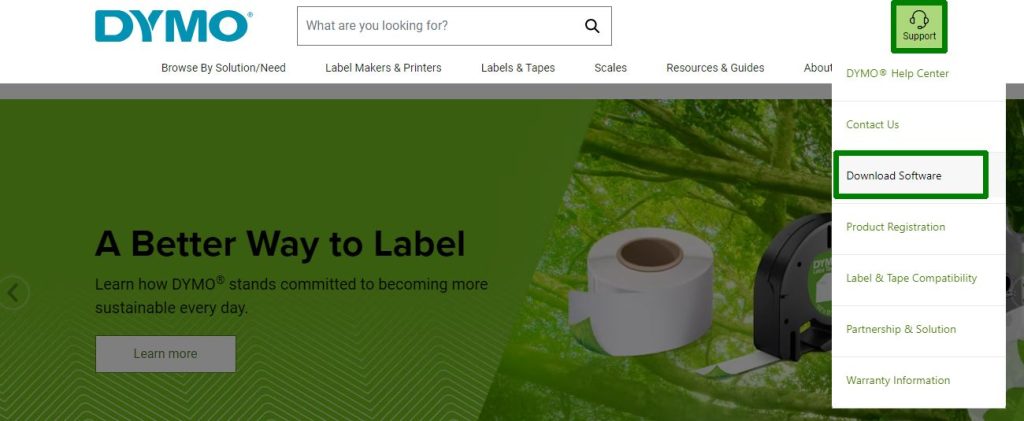
- Click the Support icon, and open the Download Software option.
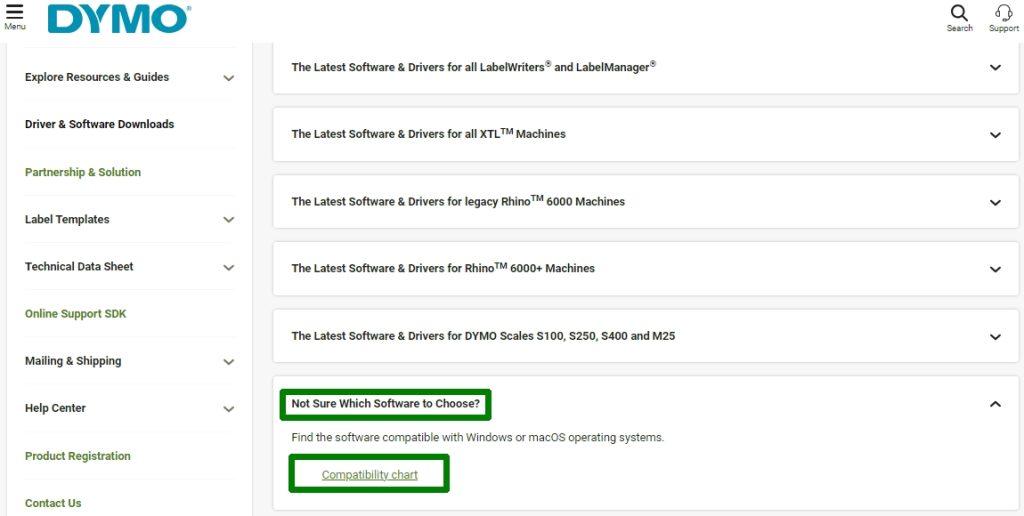
- On the new page, navigate to the latest option in the middle column Not Sure Which Software to choose?, and click the Compatibility Chart button.
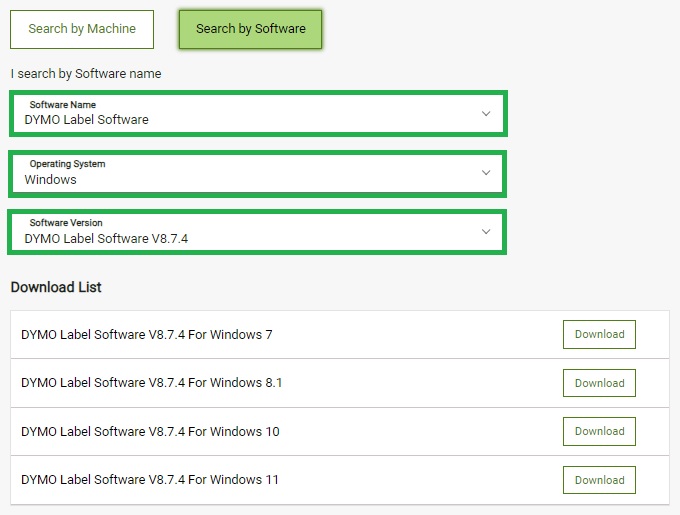
- In the next window, choose the Search by Software button.

- Select Labelwriter Software.
- Choose the operating system – Windows.
- Pick the latest version from the next drop-down menu: 8.7.4.
- Once the download completes, identify the exe file on your machine, and open it.
- When the User Account Control prompt appears, click Yes.
- Select the language of your choice, then hit OK.
- On the new window, press Next.
- Agree on the license.
- Pick Express/Custom Installation.
- In the end, click the Finish button.
Once you have installed the latest version, open and install it. Thus, you will have your printer working correctly.
Automatic Dymo Labelwriter 400 driver download for Windows 11, and 10
As you can see, the methods above take time, patience, and some skills. So, if you want to sort this issue easily, we recommend using a specialized updater. Our choice is WinRiser, which updates all the software drivers your computer or connected peripherals need.
For this:
- Download it using the button below.
download win riser
for windows 11, 10, 8.1, 8 & 7
- Once the download completes, install the software.
- Let it scan your system.

- Check the list.
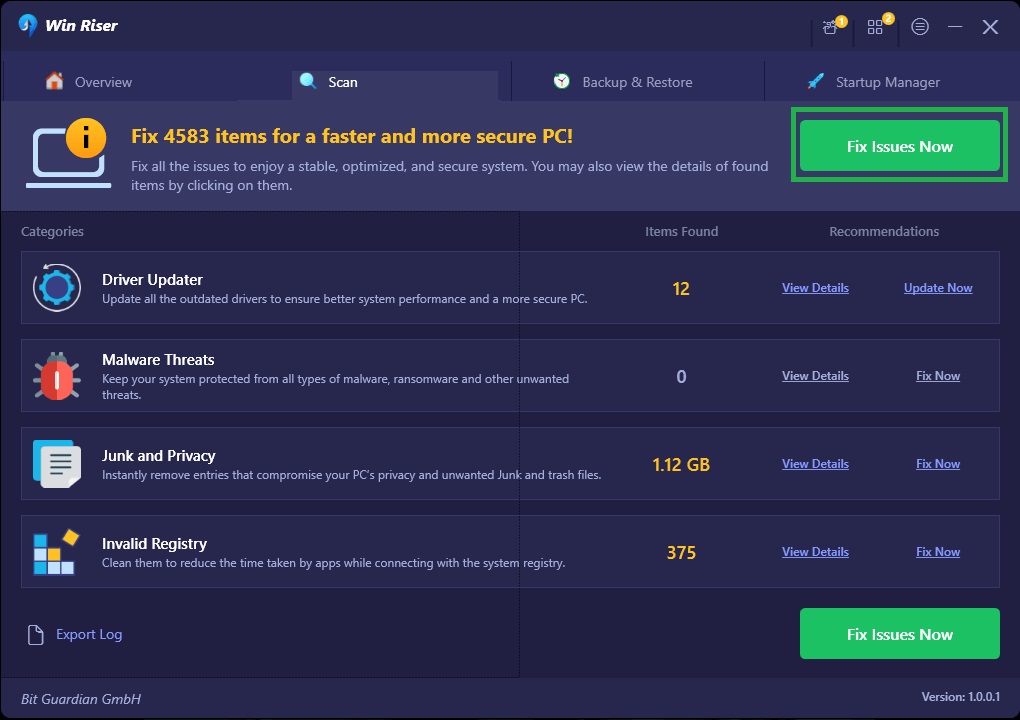
- Use the Fix Issues Now button. This will fix all the system’s issues.
In the basic version, you can update the drivers one by one. So, you can get only the Dymo Labelwriter 400 driver update for Windows 11, and 10.
Still, the premium version can download all the missing drivers and updates for the outdated or corrupted ones at once.
Steps to Have the latest driver work
Now, that you have the new driver installed, you must also set it up. For this, you have to:
- Connect the printer using to your machine.
- Use the Windows + I to open the computer’s Settings.
- Choose Devices.
- Click on Printers and scanners, in the left menu.
- Pick your Dymo device, and click the Manage button.
- Choose Printing Preferences.
- Set the right Paper size, and hit OK.
Now, you’re good to go and start printing your labels.
How to Solve Dymo Labelwriter 400 Driver Update Issues?
Some issues might occur when you try printing your labels. Here are the most common ones, and the way to solve them.
1. The printer does not print
In this case, the issue might be related to some dirt on the sensor, or problems with the label type, size, or the driver. In this case, clean the sensor, use the right type and size of label, and try reinstalling the driver.
2. The printer does not work with your Windows computer
This might mean that your Dymo Labelwriter 400 driver for Windows 10 is outdated. So, just follow the steps presented above to get the latest driver from the producer’s website, and install it using the compatibility mode.
3. Out of Paper error
If you see this error, you have to check if you did not roll the paper in the wrong way. Also, this issue might be generated by a non-functional driver.
To solve the issue, remove the printer from Devices & Printers. Also, remove the cable linking it to the computer, and cancel all the printing processes. Reinsert the label correctly, reinstall the driver and reconnect the printer.
4. Offline printer
If this error occurs, you should check if the labels are not jammed, or if the printer did not run out of paper. Moreover, make sure the USB port that connects it is working properly, by connecting another device.
5. Your computer does not recognize the printer
If your operating system lists the printer as unspecified or unknown, it means it cannot recognize it. You can sort this out following these steps:
- Go to the Device Manager
- Click View, and choose Show Hidden Devices
- Use the context menu on the DYMO driver.
- Choose the Update driver option.
Dymo Labelwriter 400 driver for Windows 11, and 10, installed
Now, you know the best ways to download and install the Dymo Labelwriter 400 driver for Windows 10, and 11. Choose the way that suits you best, and take advantage of your printer, with no hassle.
Still, you can say that manual options for the Dymo Labelwriter 400 driver download take time and skills. So, the automatic option might be the best, and Win Riser will make it as easy as possible.
You should update your Dymo Labelwriter 400 driver for Windows 11, and 10 if you already have a thermal label printer from Dymo. Although it is easy to use and has a decent price, the printer needs the latest drivers to work and help you take advantage of its features.
So, here are the best ways to get the latest Dymo Labelwriter 400 driver download. Read on and pick your favorite method.
Ways to get the Dymo Labelwriter 400 driver download for Windows
As mentioned before, you can choose from a variety of methods to get the Dymo Labelwriter 400 driver update. Some of them need more skills, and time, while others are less time-consuming and easier. So, let’s check each of them/
Use the Official Website
One option, if you need the Dymo Labelwriter 400 driver update, is to go straight to the peripheral producer’s website. It is the same with this label printer.
To get the Dymo Labelwriter 400 driver download, you need to:
- Visit the producer’s website.
- Click the Support icon, and open the Download Software option.
- On the new page, navigate to the latest option in the middle column Not Sure Which Software to choose?, and click the Compatibility Chart button.
- In the next window, choose the Search by Software button.
- Select Labelwriter Software.
- Choose the operating system – Windows.
- Pick the latest version from the next drop-down menu: 8.7.4.
- Once the download completes, identify the exe file on your machine, and open it.
- When the User Account Control prompt appears, click Yes.
- Select the language of your choice, then hit OK.
- On the new window, press Next.
- Agree on the license.
- Pick Express/Custom Installation.
- In the end, click the Finish button.
Once you have installed the latest version, open and install it. Thus, you will have your printer working correctly.
Automatic Dymo Labelwriter 400 driver download for Windows 11, and 10
As you can see, the methods above take time, patience, and some skills. So, if you want to sort this issue easily, we recommend using a specialized updater. Our choice is WinRiser, which updates all the software drivers your computer or connected peripherals need.
For this:
- Download it using the button below.
- Once the download completes, install the software.
- Let it scan your system.
- Check the list.
- Use the Fix Issues Now button. This will fix all the system’s issues.
In the basic version, you can update the drivers one by one. So, you can get only the Dymo Labelwriter 400 driver update for Windows 11, and 10.
Still, the premium version can download all the missing drivers and updates for the outdated or corrupted ones at once.
Steps to Have the latest driver work
Now, that you have the new driver installed, you must also set it up. For this, you have to:
- Connect the printer using to your machine.
- Use the Windows + I to open the computer’s Settings.
- Choose Devices.
- Click on Printers and scanners, in the left menu.
- Pick your Dymo device, and click the Manage button.
- Choose Printing Preferences.
- Set the right Paper size, and hit OK.
Now, you’re good to go and start printing your labels.
How to Solve Dymo Labelwriter 400 Driver Update Issues?
Some issues might occur when you try printing your labels. Here are the most common ones, and the way to solve them.
1. The printer does not print
In this case, the issue might be related to some dirt on the sensor, or problems with the label type, size, or the driver. In this case, clean the sensor, use the right type and size of label, and try reinstalling the driver.
2. The printer does not work with your Windows computer
This might mean that your Dymo Labelwriter 400 driver for Windows 10 is outdated. So, just follow the steps presented above to get the latest driver from the producer’s website, and install it using the compatibility mode.
3. Out of Paper error
If you see this error, you have to check if you did not roll the paper in the wrong way. Also, this issue might be generated by a non-functional driver.
To solve the issue, remove the printer from Devices & Printers. Also, remove the cable linking it to the computer, and cancel all the printing processes. Reinsert the label correctly, reinstall the driver and reconnect the printer.
4. Offline printer
If this error occurs, you should check if the labels are not jammed, or if the printer did not run out of paper. Moreover, make sure the USB port that connects it is working properly, by connecting another device.
5. Your computer does not recognize the printer
If your operating system lists the printer as unspecified or unknown, it means it cannot recognize it. You can sort this out following these steps:
- Go to the Device Manager
- Click View, and choose Show Hidden Devices
- Use the context menu on the DYMO driver.
- Choose the Update driver option.
Dymo Labelwriter 400 driver for Windows 11, and 10, installed
Now, you know the best ways to download and install the Dymo Labelwriter 400 driver for Windows 11, and 10. Choose the way that suits you best, and take advantage of your printer, with no hassle.
Still, you can say that manual options for the Dymo Labelwriter 400 driver download take time and skills. So, the automatic option might be the best, and Win Riser will make it as easy as possible.
