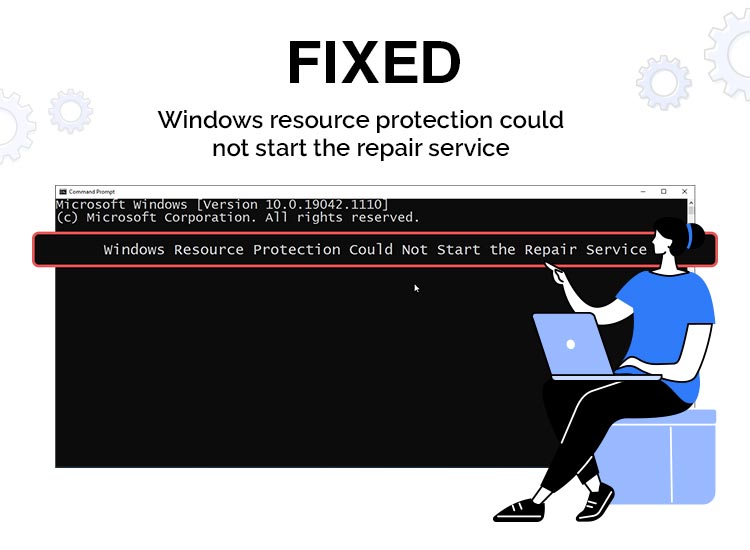
Are you trying to execute the System File Checker (sfc /scannow) but suddenly encounter the “Windows Resource Protection could not start the repair service” error message? If you are one of them, then this post is for you. Here, you will learn how to fix this error.
The System File Checker is an extremely useful tool that millions of users use to resolve system-wide problems by replacing files that have become corrupted or missing. It has the ability to automatically identify and repair system files that are causing problems for your computer. However, what should you do if the feature that is supposed to fix your problems also needs to be fixed? It seems intimidating, right?
Users all over the place have been complaining that they received an error message saying that Windows resource protection could not start repair service when they attempted to run the “sfc /scannow” command. To resolve this annoying error and successfully run the System File Checker without any issues, there are a few fixes you can try. But first, let’s understand what exactly the cause of this problem is.
Why Is the SFC Scan Not Working?
Windows comes with a built-in tool called System File Checker (SFC) that helps you replace corrupted system file versions with the right ones, solving a lot of issues. The functionality of TrustedInstaller is required for the System File Checker to operate as intended. Windows updates and other system components cannot be installed, modified, or removed without the use of TrustedInstaller.
It manages Windows Resource Protection (WRP), which guards against unauthorized changes to registry values, system files, and other data. The services that rely on the TrustedInstaller, such as SFC and WRP, stop working when they malfunction or are disabled, and you might receive the sfc /scannow windows resource protection could not start the repair service error. You can resolve this irritating error, “Windows Resource Protection could not start repair service,” by following the quick & simple steps we have provided in this blog post.
How To Fix Error “Windows Resource Protection Could Not Start the Repair Service”
There are several fixes that you can use if you are experiencing problems getting the System File Checker to function and scanning your device for missing or corrupted files. Let’s find out some of the most effective ways.
Method 1. Start the TrustedInstaller (Windows Modules Installer).
Starting the necessary service manually is the easiest way to solve this problem. It is crucial to set up the Windows Modules Installer so that it will launch every time the SFC scan is launched. To troubleshoot this error, you can follow the steps listed below.
- Use the keyboard shortcuts Windows + R to open Windows. This will launch the Run application.
- Enter services.msc, then press the OK button. The Services window will now open, and it may take some time to load completely.
- Choose Properties from the menu by right-clicking on the Windows Modules Installer service.
- Select “manual” as the startup type. Click the Start button to launch the service if it is not already running. Choose Apply, and then OK. You should have returned to the list of services.
- Try executing the “sfc /scannow” command once again after closing the Services window. Proceed to the next solution if the scan is still unsuccessful and you still encounter the Windows resource protection could not start the repair service error.
Method 2. Try to Execute the System File Checker in Safe Mode.
It is possible that the System File Checker is malfunctioning due to interference from a background program or service. In this situation, you could try just running the scan command in safe mode. When your computer boots up in safe mode, only the essential Windows components are active.
- Use the keyboard shortcuts Windows + R to open Windows. This will launch the Run application.
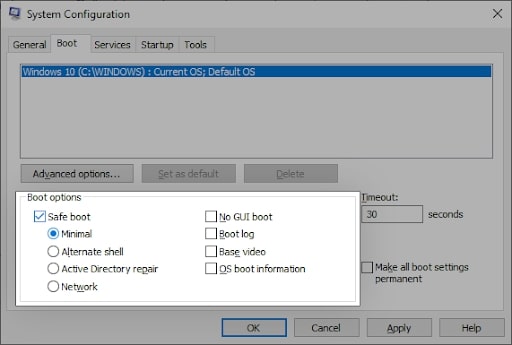
- Enter “msconfig” using the keyboard’s Enter key after typing it without the quote marks. By doing this, the System Configuration application will open.
- Navigate to the Boot tab. Click OK after selecting Safe Boot and maintaining the Minimal setting under Boot options.
- Restart the computer. All necessary services should be started during the safe mode boot, free of any third-party applications.
- Try running the sfc /scannow command in the Command Prompt to see if the SFC scan is functioning or not. If you still face the sfc /scannow windows resource protection could not start the repair service error, proceed to the next fix.
Also know: How to Set Up USB Game Controllers in Windows 11/10
Method 3. Use the Command Prompt To Start TrustedInstaller
The only difference between this method and the first is that it is executed within a command prompt. Since you require administrator permissions to make the change, there is a chance that this solution will work.
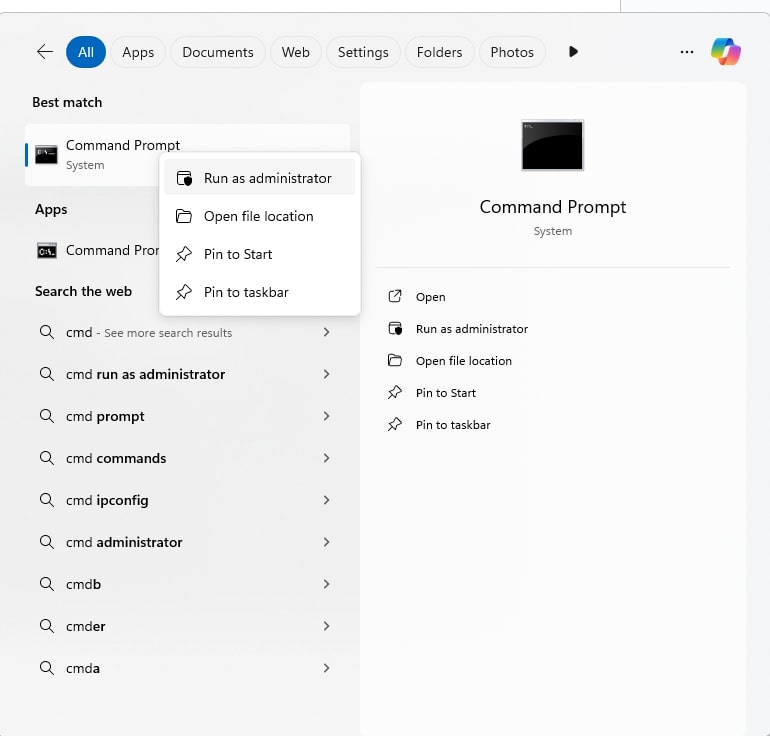
- Click the magnifying glass icon to bring up the search bar in your taskbar. Alternatively, you can use the Windows + S keyboard shortcut to open it.
- In the search bar, enter cmd or Command Prompt. Right-click on it and select “Run as Administrator” when you see it in the results.
- Click Yes to give the app administrator permissions when User Account Control (UAC) prompts you.
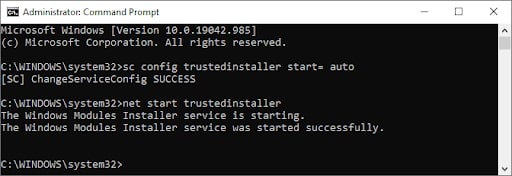
- After launching the Command Prompt window, enter the below command and press Enter to run it: sc config trustedinstaller start= auto. The SUCCESS message should appear if the command is successful.
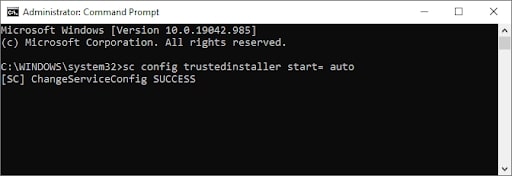
- Run the following command after that: net start trustedinstaller. There should be a message indicating that the Windows Modules Installation service has started successfully.
- Using the sfc /scannow command, you can now attempt to launch the System File Checker. If you are still having trouble running it or encountering the Windows resource protection could not start repair service error, try the alternate method listed below.
Method 4. Run the DISM Command
According to some users, the System File Checker issue was fixed by using the DISM command. To resolve issues directly related to your system image, use the Deployment Image Servicing and Management (DISM) tool to redeploy it. You can find the detailed instructions for running this scan below.
- Click the magnifying glass icon to open the taskbar search bar. Alternatively, you can use the Windows + S keyboard shortcut to open it.
- In the search bar, type Command Prompt or cmd. Right-click on it and select Run as Administrator when you see it in the results.
- If User Account Control (UAC) asks you to confirm the app’s launch with administrator rights, select Yes.
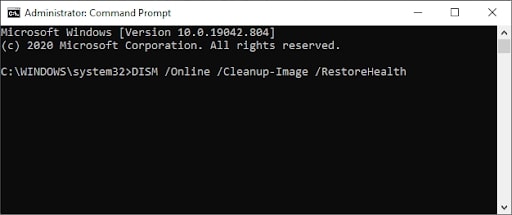
- Once the Command Prompt window has opened, enter the command and press Enter to run it: DISM /Online /Cleanup-Image /RestoreHealth
- After the scan is finished, restart your computer. Try running the SFC scan when you return to the Command Prompt to see if it now functions. If you still encounter the sfc /scannow windows resource protection could not start the repair service error, proceed to the next method.
Method 5. Manually Fixing the Registry
This method needs to be used carefully because making the wrong registry change can lead to problems:
- To open the Windows registry, press Windows + R to open the Run window, type regedit, and hit Enter.
- Navigate to the following registry link: HKEY_LOCAL_MACHINE\SOFTWARE\Microsoft\Windows\CurrentVersion\Component Based Servicing\Version:
- To edit the registry values, right-click on the relevant keys (if unsure, seek professional assistance).
- To add an Expandable String Value, right-click on the Version and select New.
- Change the value’s name to correspond with your TrustedInstaller ID. It will look something like this after renaming: 10.0.19041.1XXX.
- Double-click the newly created value, and then copy and paste the folder path found in WinSxS into the Value data field. The value data field should now resemble this:
%SystemRoot%\winsxs\amd64_microsoft-windows-servicingstack_31bf3856ad364e35_10.0.19041.1XXX_none_7e3d47227c694b34.
- Verify that you are using %SystemRoot% correctly and that the folder path does not include “C:\Windows.” To save the changes, click “OK.”
- Restart your computer now to check if the sfc /scannow windows resource protection could not start the repair service problem has been fixed.
Also know: How to Enter BIOS Setup Utility and Check BIOS Version in Windows
Windows resource protection could not start the repair service Error: Fixed
Resolving the “Windows Resource Protection Could Not Start The Repair Service” issue requires a combination of troubleshooting techniques and the utilization of built-in Windows utilities. By following the steps outlined in this article, you can successfully address this error and restore the proper functionality of their system.
It is essential to approach the resolution process systematically, ensuring that each step is carefully executed to achieve the desired outcome. Remember to always back up critical data before making any significant system changes and to seek professional assistance if needed. If you have any questions or concerns, please use the comments section to contact us.
