
The touchpad is among the most sensitive peripherals. Even minor issues can significantly impact its performance. However, a laptop touchpad not working can certainly be frustrating since the touchpad is the primary pointing and scrolling device in notebook PCs.
However, you can set aside your worries if you are struggling with touchpad issues on your laptop. Having dealt with these issues ourselves, we did thorough research to detect the causes and 100% working solutions to the laptop touchpad not working problem.
Let us begin troubleshooting by first understanding the reasons the touchpad is not working in the laptop.
Why Is the Laptop Touchpad Not Working
The top reason the touchpad on your laptop is not working is that your notebook PC does not have a compatible, correct, and up-to-date touchpad driver. The driver is a software program that your computer needs to communicate with the touchpad and execute your instructions correctly. Without the driver or if the driver is outdated, this communication breaks, causing issues like the touchpad not working in the laptop.
Other than the touchpad drivers, other factors, such as accidentally disabling the laptop touchpad, accumulated dirt in the touchpad, a frozen operating system, an external device disabling the touchpad, the touchpad being physically damaged, and certain apps or programs interfering with the touchpad’s functionality.
Since a missing or outdated touchpad driver is the top reason behind the problem you are experiencing, performing a touchpad driver download, installation, and update can be a sure-shot solution, after which you may not need to try the other solutions. Hence, let us begin with trying that first.
Note: Please note that you may need to connect an external mouse to your laptop to apply some of the solutions in this article. You can also download a third-party application that offers virtual mouse functionality if you do not have an external mouse.
However, it is also a good idea to first clean your touchpad using isopropyl alcohol sprayed on a soft cloth or cleaning wipes while keeping your laptop off to clean accumulated dirt or grease to check if it solves the problem. If the issue persists, continue troubleshooting after your laptop and touchpad are completely dry.
Download, Update, and Install Touchpad Drivers to Solve the Problem
The laptop touchpad not working problem can be solved instantly by a simple download, installation, and touchpad driver update. Hence, below is how you can perform this action on your laptop.
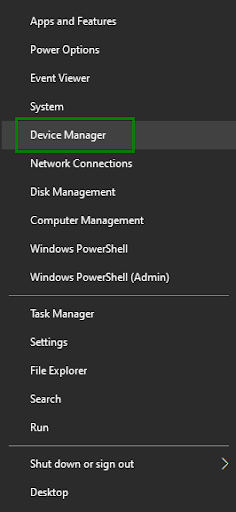
- In the first step, use the Win+X keyboard shortcut to open the quick access menu.
- Next, choose Device Manager from the Quick Access options.
- Once the Device Manager comes up, double-click on the Mice and other pointing devices category to find your touchpad.
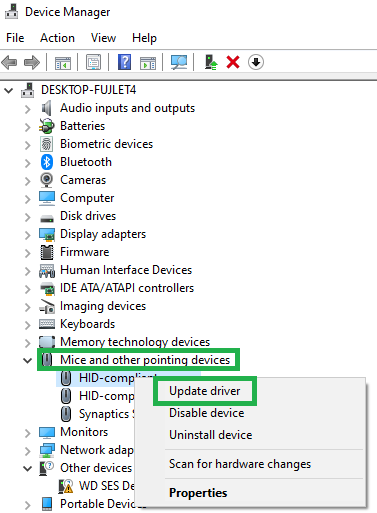
- You can now right-click your touchpad driver and choose Update Driver from the options that appear.
- In this step, choose search automatically for drivers from the available options.
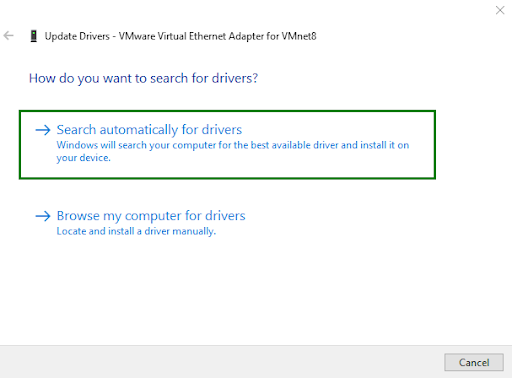
- Next, follow the instructions on your screen to install the touchpad driver.
- Lastly, restart your computer to complete the touchpad driver download and installation process.
However, even after downloading and installing the updated touchpad drivers, the touchpad is not working on your laptop; the problem may lie elsewhere. Hence, you may need to apply the solutions below to solve the problem.
Also know: Top 12 Best Free Driver Updater Tools for Windows 10 and 11 in 2025
Other Fixes for the Touchpad Not Working in Laptop Problems
If the touchpad driver download, installation, and update did not solve the laptop touchpad not working problem, you can try the fixes below.
Fix 1: Make sure the laptop is not frozen
If you have a frozen or locked-up laptop, neither your keyboard nor your touchpad will work. Hence, you can rule out the chances of a frozen laptop by using the Ctrl+Alt+Delete keyboard shortcut to open the security screen.
If the security screen does not come up, restart the computer by right-clicking the Start button, choosing Power, and then selecting Restart from the context menu.
However, if the problem persists or the security screen appears but the touchpad is still not working in the laptop, you can proceed to the next solution.
Fix 2: Enable the laptop’s touchpad
You may have accidentally pressed the key to disable the touchpad on your laptop, resulting in the touchpad not working. Hence, you can re-enable the touchpad by following the directions below.
Using the keyboard to enable the touchpad
Almost all laptops come with a keyboard button to enable or disable the trackpad. Usually, it is the function (Fn) key that enables or disables the touchpad. You can use this key combined with the F1, F2, F6, F8, F5, or other function keys to activate the click wheel.
Use mouse settings to activate the touchpad
The touchpad may get automatically disabled in your device settings. Hence, if you are experiencing the laptop touchpad not working, you can change the settings to enable your touchpad. Here is how.
- First, launch the Run utility using the Win+R keyboard shortcut.
- Second, type main.cpl in the Run box and press Enter or click OK.
- Once the mouse settings appear, navigate to the Touchpad tab and choose the Enable Touchpad option.
- Lastly, activate your touchpad by clicking the Enable Touchpad option.
Enable the touchpad from the BIOS settings
If you have executed a BIOS update recently, updating the BIOS may have disabled your touchpad. Hence, you can follow the directions below to change the BIOS settings to unlock your trackpad.
- First, restart your laptop and then wait until the manufacturer’s logo appears.
- In this step, enter the BIOS settings using the F2 or Delete key on your keyboard.
- Next, navigate to the Advanced BIOS settings using the arrow keys.
- Lastly, enable your Touchpad, Trackpad, Internal Pointing Device, or similar settings.
Also know: How to Fix Mouse Cursor Disappears on Windows 10/11
Fix 3: Disconnect the computer from external devices
If any other mouse or device is connected to your computer, it may have automatically disabled the touchpad, causing the touchpad not to work. Hence, you can follow the steps below to unplug the USB devices that may be creating conflicts with your touchpad and deactivate Bluetooth to disconnect wireless accessories.
- First, apply the Win+I keyboard shortcut to launch Settings.
- Next, launch the Bluetooth & Devices settings.
- Lastly, toggle off the button for Bluetooth.
Fix 4: Roll back the touchpad driver to an earlier version
While it is unlikely that a touchpad driver update creates problems like the laptop touchpad not working, it may happen if the driver update is incompatible with your system. Hence, if you have started experiencing problems with the touchpad after updating the driver, you may need to roll back the driver to the previous version to solve the problem. Here is how to do it step-by-step.
- First, apply the Win+R keyboard shortcut to access the Run tool.
- Second, type devmgmt.msc in the on-screen Run box and press Enter to open the Device Manager.
- In the Device Manager, double-click the Mice and other pointing devices category. You can also perform this action using the arrow keys on your keyboard.
- Next, right-click the touchpad (you can use the Shift and F10 keys to do it).
- In this step, choose Properties from the on-screen menu.
- You can now go to the Driver tab and choose the Roll Back Driver option.
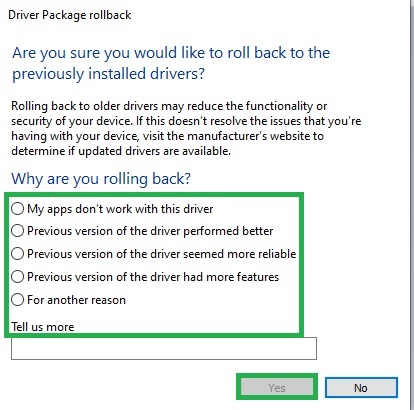
- If prompted, select any reason you wish to rollback (you can choose any reason, as it does not make any difference) and click OK/Yes.
- Lastly, wait until the rollback is complete and restart your laptop.
Fix 5: Reset the settings of your touchpad
Incorrectly configured touchpad settings are another reason why the touchpad in your laptop is not working properly. Hence, you can follow the steps below to reset your touchpad settings to fix the issue.
- First, use the Win+I keyboard shortcut to launch settings.
- Second, choose Devices from the on-screen settings.
- In this step, select Touchpad from the on-screen options and click on the Reset button.
Fix 6: Close conflicting apps or software
Some software or applications that use the touchpad can conflict with its functionality. Thus, you can follow the directions below to close these applications or programs if your laptop’s touchpad is not working properly.
- First, apply the Ctrl+Alt+Delete keyboard shortcut to launch the Task Manager.
- In the Task Manager window, find the conflicting programs. Usually, these are the software that consumes a lot of resources on your computer.
- You can now select these problematic apps and select the End Task option.
Fix 7: Update Windows to fix touchpad issues
Windows updates solve common problems, such as the laptop touchpad not working. Thus, you can follow the steps below to update Windows.
- First, open settings using the Win+I keyboard shortcut.
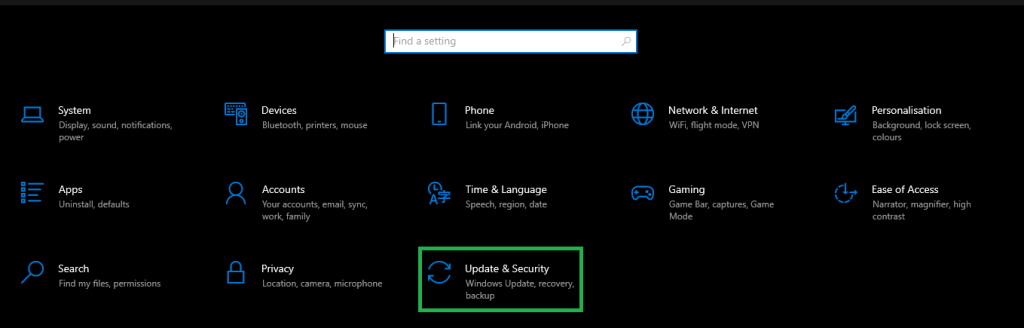
- Second, select Update & Security from the on-screen options.
- Next, choose Windows Update from the left pane of the Update & Security window and click Check for Updates.
- In this step, download and install the updates Windows detects for your operating system.
- Lastly, restart your laptop to complete the update process.
Also know: Synaptics Touchpad Driver Download and Update for Windows 10, 11
Touchpad Not Working in Laptop Issue Fixed
This article answered the question, “Why is my laptop touchpad not working, and how do I fix it?” You can download, install, and update the touchpad driver to solve the problem. If this does not fix the issue, you can try the other solutions in this article until the issue is resolved.
However, if you have any doubts/confusion, or any feedback/suggestions about this article, please let us know through the comments section.
