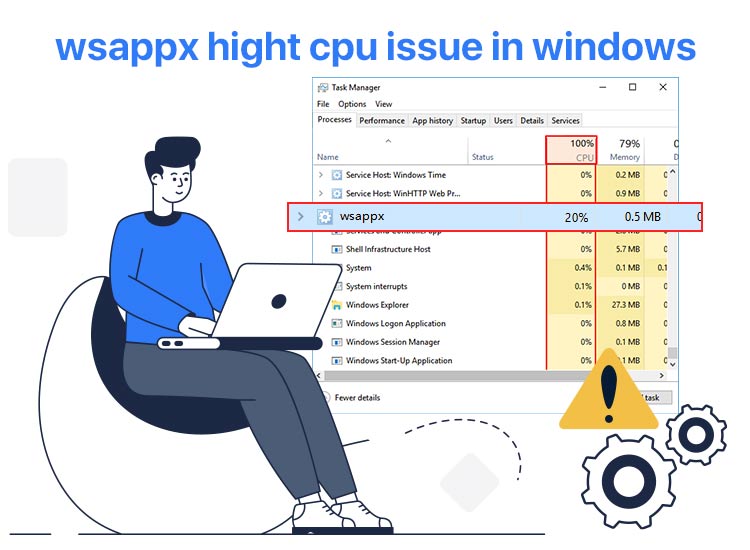
The Wsappx process, i.e., a Windows background process that manages applications downloaded from the Microsoft Store and Universal Windows Platform (UWP) apps, may be responsible for slow computer performance, system lag, and potential system instability if your PC has high Wsappx CPU and memory usage.
Hence, this article guides you through how to resolve high disk and CPU usage by Wsappx using quick, simple, and tested fixes. However, let’s first help you understand the causes of the problem so that you can solve it without any confusion.
Why Is Wsappx Using CPU
While Wsappx requires CPU to handle the Windows Store and associated application management efficiently, it may consume excessive CPU resources due to ongoing background activities, such as installing or updating Microsoft Store apps, outdated software, corrupted app data, and the following reasons.
- For Wsappx, a part of AppX Deployment Service, high memory consumption may occur due to constant installation and update of Windows Store apps.
- The Microsoft Store apps installed on your computer may be corrupted.
- There may be outdated or pending updates for Store applications.
- Your computer may be malware-infected.
- The drivers on your computer may be corrupted or outdated.
- There may be unnecessary background activity from other applications.
The above are the factors responsible for Wsappx’s high memory and CPU usage. Let’s now answer your question: How do I fix Wsappx high CPU and memory usage?
How to fix Wsappx High CPU Usage
You can fix the Wsappx AppX Deployment Service’s high CPU and memory usage with the help of a range of fixes, from simple ones like restarting your computer to the more complex ones like performing a clean boot. Below are all these fixes explained in detail. However, you do not need to try them all; you can simply start with the first solution and stop when the issue is fixed.
Fix 1: Restart your computer
Often, simple solutions like restarting the computer fix seemingly complex problems like Wsappx high CPU and memory usage. Hence, you can restart your PC before trying other solutions. Here is how.
- First, click on the Start button or Windows icon on the Taskbar, and then hover over the power icon.
- Next, click on the Power button.
- Lastly, choose Restart from the power menu.
Also know: How to Fix Windows Modules Installer Worker Using High CPU
Fix 2: Update Windows
Windows updates fix the random bugs that may have caused the Wsappx high memory and CPU usage. Thus, you can follow the directions below to update Windows.
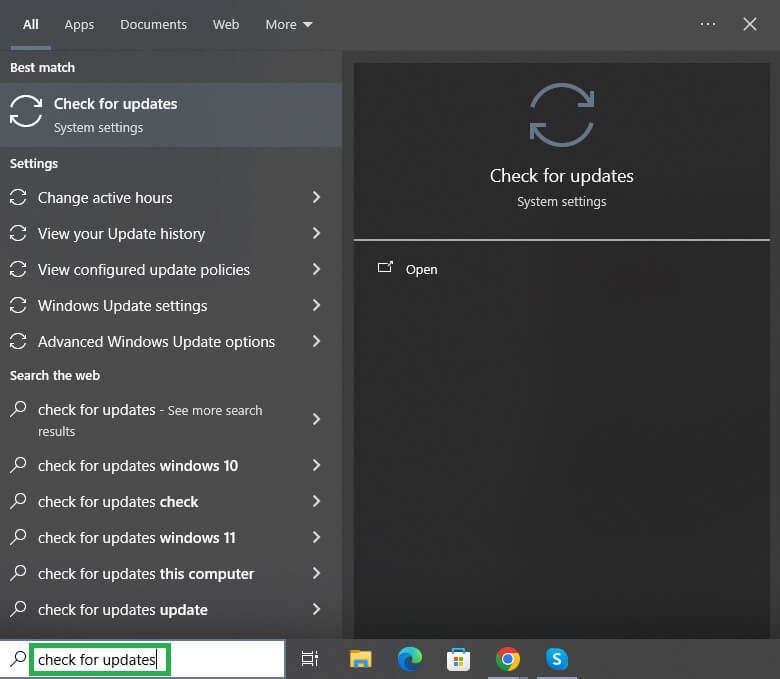
- First, click on the Windows icon or Start button on the Taskbar and then type check for updates in the search bar that appears.
- Second, click on Check for updates in the search results.
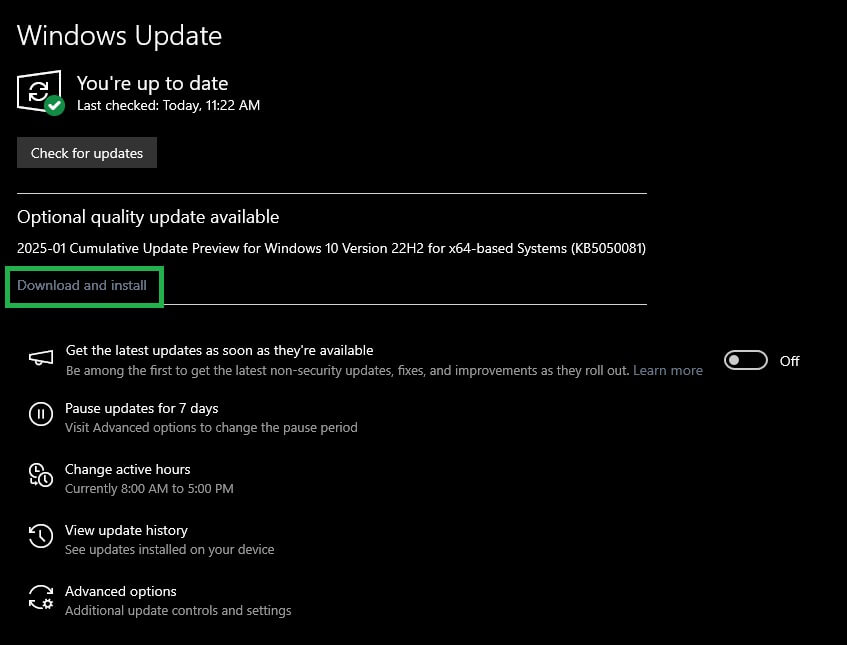
- In this step, click on the Check for updates button.
- Next, download & install the updates available for your operating system.
- Lastly, restart your computer to apply the updates.
Fix 3: Scan your computer for malware
Out of all the problems a malware infection can cause, Wsappx high CPU usage is one of them. Hence, you can run a malware scan on your computer using one of the best anti-malware software for Windows, such as Malwarebytes, iolo System Mechanic Ultimate Defense, and Bitdefender Antivirus.
Fix 4: Run recommended troubleshooters
Windows boasts a built-in troubleshooting utility to help you find and fix hardware and software issues. It can also help you solve the AppX Deployment Service high memory problem. Hence, below is how to run the troubleshooting tool.
- First, use the Windows key+I key combination to open Settings.
- Next, choose System from the on-screen option and then navigate to the Troubleshoot option (on Windows 10, this option is available in the Update & Security settings).
- In this step, choose Run automatically, then notify me from the Recommended troubleshooter preferences. This option allows Windows to perform basic troubleshooting and then notify you about the solutions and ask permission to apply them.
Fix 5: Try disabling Windows Store
Since too much Windows Store activity is another factor responsible for the Wsappx high CPU usage, disabling the Store temporarily can solve the problem. However, before proceeding with the steps below to disable the Store, please note that it may also disable the applications that depend on the Windows Store, such as Photos, Mail, Calculator, etc. If this works for you, you can proceed with the following steps.
- First, access the Run utility using the Windows key+R key shortcut.
- Second, type gpedit.msc in the on-screen Run box and click OK.
- In this step, choose Local Computer Policy and double-click on Computer Configuration.
- Next, choose Administrative Templates and then click on Windows Components.
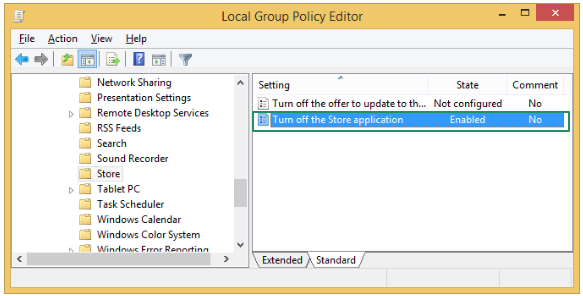
- In this step, double-click on Store and then double-click Turn off the Store application.
- Next, choose Enabled in the on-screen Turn off the Store application window.
- You can now click Apply and OK to save the changes.
- Lastly, restart your computer to complete the process.
Fix 6: Increase virtual memory
Extending the virtual memory gives programs more space, temporarily, to function smoothly, fixing issues such as Wsappx high memory usage. Hence, below is how to extend the virtual memory.
- First, click on the Start button or Windows icon on the Taskbar to access the Search utility.
- Second, type performance in the search bar and click Adjust the appearance and performance of Windows.

- In this step, choose Advanced from the Performance Options menu and then click on the Change button in the Virtual memory section.
- Next, uncheck the Automatically manage paging file size for all drives and then select your primary drive (which is generally C:).
- Choose Custom size.
- Next, fill in the Initial Size (MB) field by entering a number (in MB) equal to the size of your RAM.
- In this step, fill in the Maximum size (MB) field by entering a number in MB that is double the size of your RAM.
- Save the changes you have made by clicking on the Set and OK buttons.
- Lastly, restart your computer.
Also know: How to Fix “Antimalware Service Executable” Causing High CPU Usage on Windows 11/10
Fix 7: Perform a disk check
If you have recently started experiencing high CPU usage by Wsappx, checking and fixing the disk for errors or bad sectors can resolve the issue. Hence, below is how to check your disk.
- First, press the Windows key on your keyboard.
- Second, type cmd in the on-screen search bar.
- Next, right-click Command Prompt in the search results and choose Run as administrator from the on-screen options.
- Click Yes when the User Account Control prompt appears.
- Next, type or copy and paste the command chkdsk.exe /f /r in the on-screen Administrator Command Prompt and press Enter.
- Type Y to confirm you want to perform a disk check.
- Lastly, restart your computer.
Fix 8: Change AppXSVC’s Registry value
Changing the value of AppXSVC in the Registry can fix the Wsappx high memory and CPU usage. However, before modifying the Registry, please note that if performed incorrectly, these changes can have serious implications. Hence, back up your Registry before proceeding further and follow the steps below precisely.
- First, use the Windows key+R key combination to access the Run utility.
- Next, type regedit in the on-screen Run box and click OK to open the Registry Editor.

- In this step, navigate to Computer\HKEY_LOCAL_MACHINE\SYSTEM\ControlSet001\Services\AppXSvc
- Next, double-click Start, set the Value data to 4, and click OK.
- Lastly, restart your PC to complete the process.
Fix 9: Clean boot your computer
If all else fails, you can perform a clean boot to solve the problem you are experiencing. Below is how to clean boot your PC.
- First, click on the Windows icon on the Taskbar and type MSConfig in the search bar.
- Next, choose System Configuration from the search results.
- In this step, navigate to the General tab of the System Configuration window and select Selective startup.
- Next, select the option to Load system services and Use original boot configuration.
- Click Apply and OK.
- Next, navigate to the Services tab, choose Hide all Microsoft services, and click on the Disable all button.
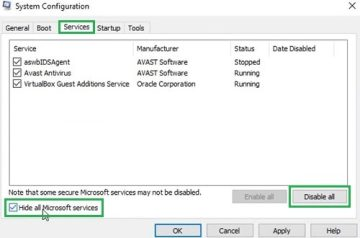
- In this step, click Apply and OK.
- Lastly, restart your PC.
Also know: Best CPU Temperature Monitoring Tools for Windows
Wsappx High CPU Issue Fixed
In this article, we explained the quick and easy solutions to Wsappx high memory and CPU usage. We hope one of the above fixes solves your problem. If it does and you like this guide, help more people by sharing it with others.
However, if you have any doubts, questions, suggestions, or feedback about this article, feel free to leave us a comment.
