Mouse acceleration is a Windows feature that changes how the cursor moves on your screen based on how fast your mouse moves. Enabled by default on all computers, many users, especially gamers, look for answers to how to disable mouse acceleration in Windows 10/11.
While Windows mouse acceleration is helpful if you start to experience problems with controlling your mouse cursor, or the games you play demand quick navigation, this feature is best turned off in shooting games requiring aiming precision.
Hence, if you are also searching for how to turn off mouse acceleration to improve your gaming experience, you may read this article. Here, we present a comprehensive guide on disabling mouse acceleration in Windows 10 and 11. Let us begin with it without wasting your precious time.
Disable Mouse Acceleration in Windows 10
Below is how to turn off mouse acceleration in Windows 10.
- First, call up Windows search using the Win+S key combination.
- Next, type mouse settings in the search box on your screen and select it from the results.
- In this step, locate and select additional mouse options from the on-screen options. Generally, this option is present at the bottom, under the related settings.
- You can now navigate to the pointer options tab.
- Next, uncheck the enhance pointer precision box to disable mouse acceleration in Windows 10.
- Lastly, click OK to save the changes you have made in the previous steps.
Also know: How to Fix Mouse Left Click not Working in Windows 11/10
Disable Mouse Acceleration in Windows 11
Below are the steps for how to turn off mouse acceleration in Windows 11.
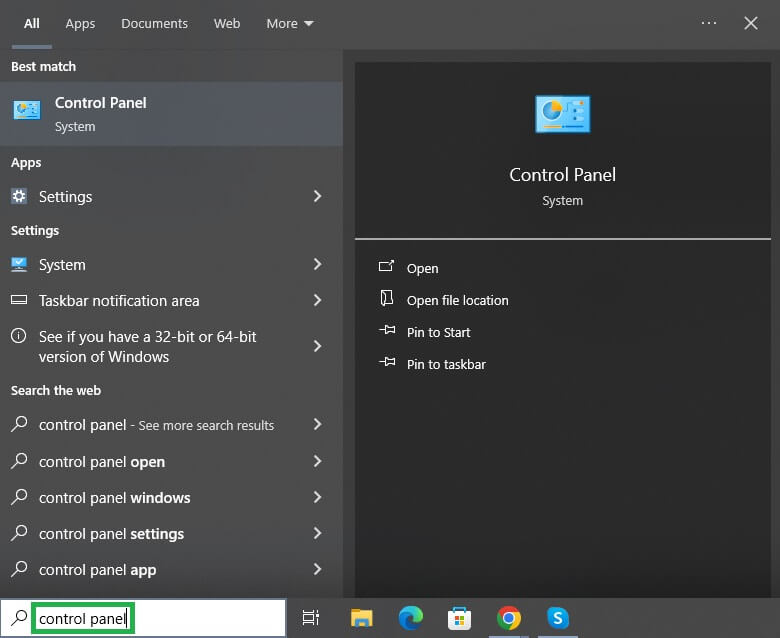
- First, use the Win+S key combination to access Windows search.
- Next, type Control Panel in the search box on your screen and choose it from the on-screen results.
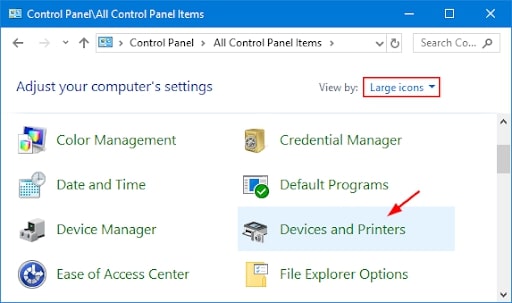
- In this step, find and click Hardware and Sound in the Control Panel options.
- This step requires you to find Devices and Printers in the Hardware and Sound options.
- Next, locate and click on the Mouse to access the Mouse Properties.
- You can now find and click on the Pointer Options tab.

- Next, navigate to the Motion section and uncheck the box next to the Enhance pointer precision box.

- Lastly, click Apply and OK to save the changes you have made to the mouse settings.
The above steps explained how to disable Windows mouse acceleration. You may need to re-enable this setting if you have limited space to move your mouse around, you have used this feature for a long time and disabling it has impacted your performance, you play games requiring fast movements, and you have a high-resolution setup. Hence, as a bonus for our readers, below is how to re-enable the mouse acceleration in Windows 10/11.
Re-enabling Mouse Acceleration in Windows 10/11
The following are the steps to re-enable Windows mouse acceleration if you wish to do so.
- First, open Windows search using the Win+S key combination.
- Next, type mouse settings in the on-screen search box and open it by selecting it from the search results.
- In this step, find and choose additional mouse options from the available options.
- Next, click on the Pointer Options tab and check the box next to the enhance pointer precision box.
- Lastly, click OK to save the new mouse settings.
Also know: How to Fix Mouse Cursor Disappears on Windows 10/11
Windows Mouse Acceleration Disabled
That is all for how to turn off mouse acceleration and re-enable it in Windows 10 and 11. While mouse acceleration is good for situations when your mouse cursor is causing problems, you are used to this feature, there are space constraints, and you need quick movement, disabling it helps in games like shooting to ensure accurate mouse movement.
You can follow the steps in this guide to disable the mouse acceleration in Windows 10/11 whenever you want. However, if you have any related questions or concerns, you can drop them in the comments section.
You can also leave valuable feedback or suggestions about this article (if any) in the comments section. We would be happy to hear from you. Also, do not forget to subscribe to our newsletter to ensure you do not miss out on our next post.
