Check your GPU temp after long gaming sessions to prevent overheating. While the normal GPU temperature ranges between 30°C and 50°C when idle and 60°C and 85°C when performing heavy tasks, such as gaming, a temperature above 85-90°C may indicate overheating.
An overheated GPU can lead to several issues, including performance drops, system instability and crashes, on-screen distortions and glitches, excessive fan noise, reduced hardware lifespan, and even irreversible damage. Hence, checking the GPU temperature regularly is unavoidable.
However, since many users are confused about how to check the GPU temperature on Windows 10/11, we compiled this detailed guide containing the quickest and easiest methods to check the GPU temp for gaming and other tasks on your computer, along with tips to prevent GPU overheating.
For the sake of clarity and to eliminate any confusion, let’s begin by understanding why GPU temperature matters and the warning signs of an overheating GPU.
Why Does GPU Temperature Matter
GPU temperature, i.e., the measurement of the heat generated by your graphics processing unit components, must be within the ideal range to prevent throttling and hardware damage.
Affected by factors such as GPU load and utilization, ambient temperatures, GPU cooling systems, and your level of hardware maintenance, the GPU temperature is a significant concern, especially with rising AI/ML workloads and tasks like gaming pushing hardware to the limit.
Thermal throttling due to rising GPU temperatures may result in performance degradation, as the GPU automatically lowers its clock speed to avoid damage, causing reduced frame rates and delayed processing speeds.
Moreover, continuously high GPU temperatures can increase fan wear, damage internal components, and degrade thermal paste (a paste that fills microscopic air gaps between your GPU and its heat sink, creating a thermal pathway that transfers heat away, prevents overheating, performance throttling, and hardware damage), shortening the lifespan of your GPU.
If the GPU temperature is extremely high, it may even cause permanent hardware failure. Hence, ensuring your PC does not cross the suitable GPU temp for gaming and other tasks is crucial before you see any warning signs of overheating.
How to Tell If Your GPU Is Overheating
You should check the GPU temperature immediately if any of the following signs appear.
- Strange noise: Loud noise coming from the GPU fans (like that of a jet engine) is a strong indicator of cooling problems.
- Degraded capability: Noticeable stutters or lag are generally a sign of thermal throttling.
- Graphical distortions: Unusual lines, colors, or textures on your computer screen may indicate overheating.
- Sudden shutdowns: Frequent system crashes or unexpected shutdowns may happen due to overheating.
If you notice any of these signs or wish to take proactive measures to prevent GPU overheating, you can follow the guide below to check the GPU temperature.
Methods to Check GPU Temperature
Below is how to check the GPU temp for gaming and other tasks to ensure your GPU is not too hot.
Method 1: Check GPU temperature using Task Manager
Windows, since its 10 May 2020 update, offers a way to check the GPU temp through the built-in tool called Task Manager. Below is how to ensure your graphics card temperature is the suitable GPU temp for gaming, i.e., between 60°C and 85°C (140°F – 185°F).
- First, right-click the empty area on the taskbar and select Task Manager from the menu that appears.
- Once the Task Manager opens, navigate to the Performance tab.
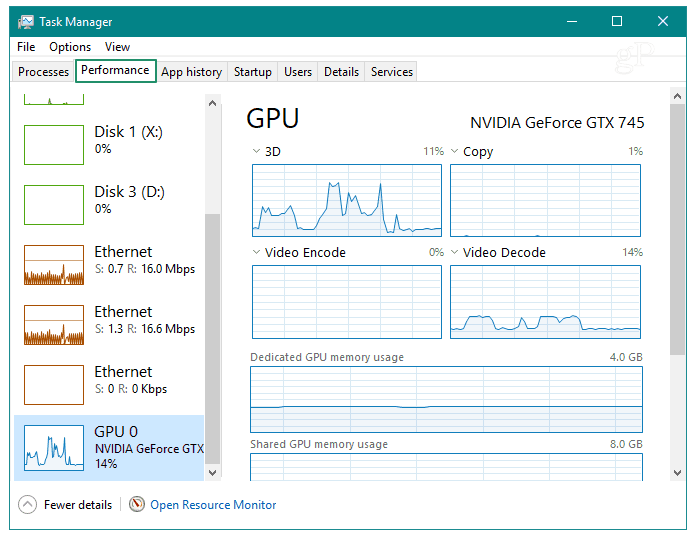
- Lastly, go to the GPU section to view its current temperature.
Also know: Best System Cooling Policy Settings for Windows 11
Method 2: Check GPU temperature using the GPU manufacturer’s software
Many graphics card manufacturers, such as AMD and NVIDIA, offer their own specialized software to manage and overclock the GPU. NVIDIA provides two main software options: NVIDIA Control Panel, which is included with all NVIDIA GPUs, and GeForce Experience, which offers additional features like game optimization and GPU temperature monitoring.
It’s important to note that the availability of certain features may vary based on the GPU model and generation. Similarly, AMD offers Radeon Software Adrenalin Edition for monitoring and optimizing its GPUs. Below is how to check the temperature for the two most popular GPU manufacturers, NVIDIA and AMD, using their respective software, GeForce Experience and Radeon Software Adrenalin Edition.
Checking the temperature of the NVIDIA graphics card using GeForce Experience
- First, open GeForce Experience on your PC.
- Next, click the settings icon in the upper-right corner of the GeForce application.
- In this step, toggle on the In-Game Overlay.
- Next, choose HUD Layout, navigate to the Performance section, and select Advanced to check your GPU temperature.
Checking the AMD graphics card temperature using Radeon software
- First, launch the AMD Radeon software.
- Next, navigate to the Performance tab to view the GPU temperature.
- If you wish to enable the in-game overlay to check the GPU temperature in real-time, choose settings from the top-right corner, navigate to the Preferences tab, toggle-on the In-Game Overlay, return to the Performance tab, click the Overlay sub-menu, and toggle on Show Metrics Overlay.
Method 3: Use a GPU temperature monitor software to check the GPU temperature
If your graphics card manufacturer does not offer a dedicated software, you find the Task Manager too basic, or you need more advanced features to manage your graphics temperature, you can use a third-party software to monitor your GPU temperature.
When choosing a temperature monitor for your graphics card to ensure the best GPU temp for gaming, i.e., between 60°C and 85°C (140°F – 185°F), prioritize features that are most relevant for gamers. Look for a real-time temperature/usage/fan speed display, which allows you to monitor performance during intense gaming sessions. Customizable fan control (curves) is crucial to manage fan speeds based on your gaming needs, ensuring optimal cooling without excessive noise.
Additionally, a customizable on-screen display keeps all important metrics at your fingertips during gameplay. While other features like data logging, low system overhead, high-end tools with alerts for thresholds, multiple GPU support, and developer APIs for integration may be beneficial, focusing on these top features will enhance your gaming experience.
The following are some software to check and monitor the graphics card temperature, with all of these or most of these features.
MSI Afterburner– Best for in-game stats
MSI Afterburner is renowned for its real-time in-game monitoring, customizable fan curves, overclocking, and support for a wide variety of GPUs.
HWiNFO– Best for extensive sensor information
HWiNFO is the best choice for those looking for detailed insight into all hardware sensors, with information such as real-time GPU temperature, clock speeds, power consumption, voltages, and utilization.
HWMonitor– Best for a simple and user-friendly interface
HWMonitor stands out for its simplicity, lightweight, and portability. You can use this software to check your GPU temperature, voltages, and fan speeds without any confusing menus if a quick check is all you want.
However, only checking the GPU temperature is not enough to ensure top-notch gaming performance. You must also take effective measures to make sure your GPU does not overheat when performing graphics-intensive tasks, such as gaming.
Also know: Normal CPU Temperature Range and Tips to Control it for PC
How to Prevent GPU Overheating
The following are some effective tips to ensure your GPU temperature stays within the desired range and does not overheat.
- Clean your PC regularly to prevent dust buildup, as this improves airflow, lowers temperatures, and enhances performance.
- Replace thermal paste with high-quality thermal paste made of silver, copper, or gold, as they last longer and conduct heat better to prevent overheating. However, be aware that replacing thermal paste can void warranties or be a tricky process. If you’re unsure, it’s advisable to seek professional help to avoid potential issues.
- Improve airflow by adding more fans and ensuring there are not many obstructions inside your PC case. Good airflow means having unobstructed front-to-back air paths, allowing cool air to flow in from the front and hot air to exit from the back or top of the case. This setup helps in efficiently managing the GPU temperature.
Play a demanding game for ten to fifteen minutes while keeping your PC case closed. Repeat the same with an open PC case. If you see a noticeable temperature difference, upgrade to a new PC case with better airflow.
- Disable GPU overclocks, as overclocking, even if it boosts performance, increases the temperature.
- Try switching to a liquid cooling system, as it cools down the GPU faster than traditional fan-based cooling systems.
Checking the GPU Temperature: The Conclusion
That’s all for how to check the GPU temperature and prevent overheating to ensure the temperature remains within the normal range, i.e., 30°C and 50°C when idle and 60°C and 85°C when gaming.
The way fever, i.e., an overheating body, impacts our performance, the GPU fever, i.e., temperature above 85-90°C, affects the PC performance. Hence, it is crucial to maintain the correct temperature.
Hopefully, you find this information useful. However, if you have any questions, please leave them in the comments. We will be happy to address your queries.
