2004 brought the world together in a book, the social network Facebook. Within a few years of its inception, Facebook grew by leaps and bounds, becoming a crucial part of lives and one of the best ways to stay connected with friends, new and old. However, the past few years saw a steep decline in Facebook’s popularity as better platforms emerged, making many users search for how to delete a Facebook account or deactivate it.
If you are also considering deleting or deactivating your Facebook account, as you enjoy some other platform more, are concerned about your privacy, have time constraints, or wish to go on a digital detox to protect your well-being, this article is for you.
In this article, we acquaint you with the step-by-step process that you can follow on your iPhone, Android, or web browser to delete or deactivate your Facebook account.
However, before moving further, it is crucial to clarify that deleting your Facebook account is not the same as deactivating it.
While deactivating the account is a temporary action that only hides your profile (you can log back into your account in the future), deleting your account wipes it out permanently (it completely deletes your data, photos, messages, and profile, making the account irrecoverable).
Is it better to delete the account or deactivate it? Let us answer this question next before learning how to do it.
Should You Deactivate or Delete Your Facebook Account
Below is when you should delete your account and when you should deactivate it.
- Deactivate your Facebook account: You should consider deactivating your account if you do not wish to part ways with it permanently. Deactivating the account only keeps your profile hidden while saving your data, photos, messages, and profile. You can retrieve the account by simply logging into it.
- Delete your Facebook account: You can delete your account if you do not wish to use it. Deleting the account wipes out all traces of it.
However, even if you delete your Facebook account, Facebook gives you a grace period of 30 days from deletion in case you change your mind. Within these 30 days of deleting the account, you can log back in to cancel the deletion. However, the account becomes irrecoverable after the said period of 30 days.
Have you made up your mind about deactivating or deleting the Facebook account? Then, you can go through the guide below to learn how to do it.
How to Deactivate the Facebook Account
You can follow the steps below to deactivate your Facebook account.
From the iPhone app
- First, open the Facebook application.
- Next, tap the three horizontal bars (menu) in the lower right.
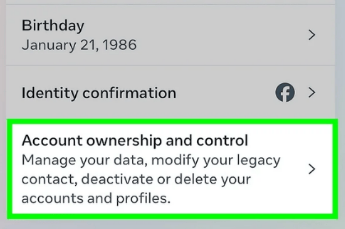
- In this step, tap personal details and navigate to the account ownership and control.
- You can now tap on deactivation or deletion.
- Next, tap on the reason you wish to deactivate the Facebook account, and then tap Deactivate Account.
- Lastly, tap on Continue and follow the on-screen directions to confirm the account deactivation.
From the Android app
- First, open the Facebook application on your Android device.
- Second, tap on the three horizontal bars (menu) in the top-right of the application.
- In this step, tap on personal details and then select account ownership and control.
- Next, tap deactivation or deletion and select a reason for deactivating your Facebook account.
- Lastly, tap Continue and follow the on-screen directions to complete the account deactivation.
From the web browser
- First, sign in to your Facebook account on a web browser.
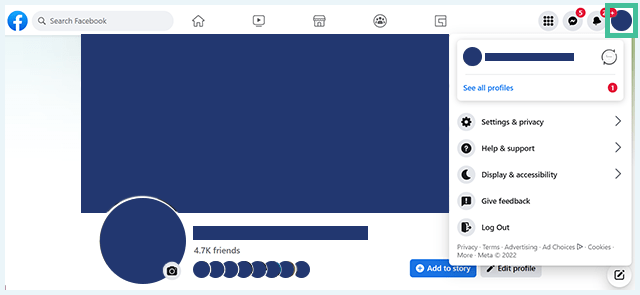
- Next, click your profile picture in the top-right corner and select Settings & Privacy from the on-screen menu.
- In this step, click on Settings and then navigate to the Accounts Centre.
- You can now choose Personal Details and then click on Account Ownership and Control.
- Next, click on Deactivation or Deletion, and then choose the account you wish to deactivate.
Also know: How to Delete Instagram Account: A Complete Guide
How to Delete a Facebook Account
Below are the detailed steps for how to delete a Facebook account on an iPhone, Android, or web browser.
From the iPhone app
- First, open the Facebook application on your iPhone.
- Next, tap the three horizontal bars in the lower right of the Facebook screen.
- In this step, tap on Settings & Privacy and then choose See More from the Accounts Centre.
- You can now tap on Personal Details and then choose Account Ownership and Control from the available options.
- Next, select the account you wish to delete and then tap on Delete Account.
- Lastly, tap on Continue and follow the on-screen directions to confirm the account deletion.
From the Android app
- First, launch the Facebook application on your Android device.
- Second, tap three horizontal lines (menu) in the upper right.
- Next, tap on the Settings & Privacy option and then choose the Accounts Centre.
- In this step, tap on Personal Details, choose Account Ownership and Control, and then tap Deactivation or Deletion.
- Next, select the account you wish to delete and then tap Delete Account.
- Lastly, tap Continue and follow the on-screen instructions to confirm the Facebook account deletion.
From the web browser
- First, sign in to your Facebook account on your web browser.
- Second, click on your profile picture in the upper-right corner.
- In this step, select Settings & Privacy from the menu on your screen, then choose Settings.
- Next, choose the Accounts Centre, click on Personal details, and then select Account Ownership and Control.
- In this step, click on Deactivation or Deletion, then choose the account you wish to delete.
- Next, click on Delete Account and then click Continue.
- Lastly, follow the on-screen directions to confirm the Facebook account deletion.
Also know: Scams on Facebook
Facebook Account Delete/Deactivate: The Conclusion
The guide above explained in detail how to delete a Facebook account and how to deactivate the Facebook account for better time management, to protect your privacy, protect your well-being, or simply if you have lost interest in this platform.
You can deactivate your account (if you plan to use it later) or delete it (if you have no plans to use it later) by following the steps in the guide above. However, if you have any doubts, questions, suggestions, or feedback about this article, please do not hesitate to share them in the comments section.
