Windows, while being a fast and efficient operating system, occasionally runs into problems like no sound, slow internet, or printer errors. To diagnose and fix these issues, you can run a troubleshooter for PC issues in Windows.
A Windows troubleshooter is a built-in utility to detect and fix common PC problems. It scans your system to detect issues, such as network or update errors, and then fixes them automatically.
The troubleshooter works in the background to test each PC component for issues. When issues are detected, it applies appropriate fixes. It is a completely automatic process to fix various issues.
Though it cannot repair physical damage, such as a broken screen, miss out rare or uncommon errors, and is limited to known Microsoft solutions, it helps save time in troubleshooting, is a free and easy way to solve problems, can handle multiple problems, keeps you informed at every stage of troubleshooting, and gives a detailed report of the problem, its solution, and how to prevent it in the future.
The only thing you need to do is run the Microsoft troubleshooter tool. This guide explains easy methods to do it.
How to Run Windows Troubleshooter for PC Issues
You can run the troubleshooter in Windows using Settings, Control Panel, Get Help App, or specific troubleshooter commands. Running the troubleshooter through Settings is best for non-tech-savvy users who want clean, simple, and easy-to-navigate menus. Advanced users can run a troubleshooter using the Control Panel to get more comprehensive options and legacy troubleshooters. The Get Help App offers easy access to troubleshooters for Windows 11 users who prefer a guided approach with built-in assistance. Specific troubleshooter commands are best for users comfortable with command-line tools, such as Command Prompt or PowerShell, or for those troubleshooting remotely or with limited access to regular menus.
As a quick guide: use Settings for general and quick fixes, Control Panel for access to legacy and specialised troubleshooters, the Get Help App for step-by-step help (especially on Windows 11), and command-line tools for advanced control or when other methods are unavailable. This helps you choose the method that best fits your experience level and situation.
No matter what method you choose to run the Microsoft Windows troubleshooter tool, you must fulfill a few requirements before running the troubleshooter.
Prerequisites to run a troubleshooter for PC issues in Windows
- Ensure you save all your important files, such as documents and photos, before making any changes to prevent data loss.
- Close other running apps to prevent them from interfering with the troubleshooting process.
- Update Windows first to fix trivial problems that Windows updates can fix. To update Windows, search for Check for updates, click the first search result, click Check for updates, download & install the available update, and then restart your PC.
- Note your existing system settings to restore them later if changes don’t fix the issue.
- Ensure you have admin rights for full system access and to make the required system changes.
Once you have met the above conditions, you can apply any of the following methods, depending on your convenience, to run a troubleshooter for PC issues in Windows.
Method 1: Use Settings to run the troubleshooter
To run the available troubleshooter for your problem through Settings, follow the steps below.
- Press Windows + I to open Settings.
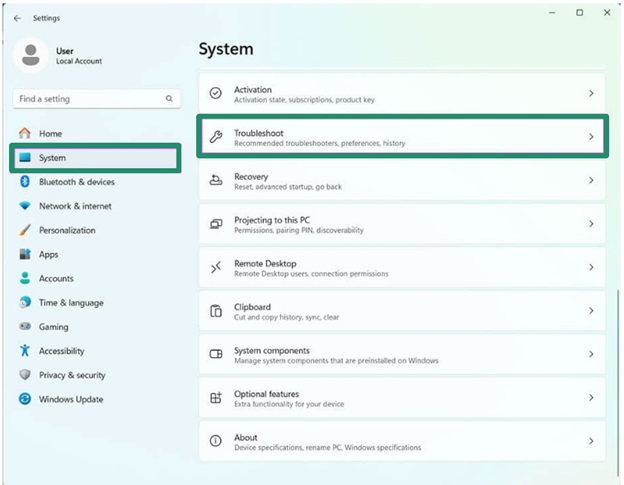
- Click System in the Settings menu.
- Next, click Troubleshoot in the System menu.
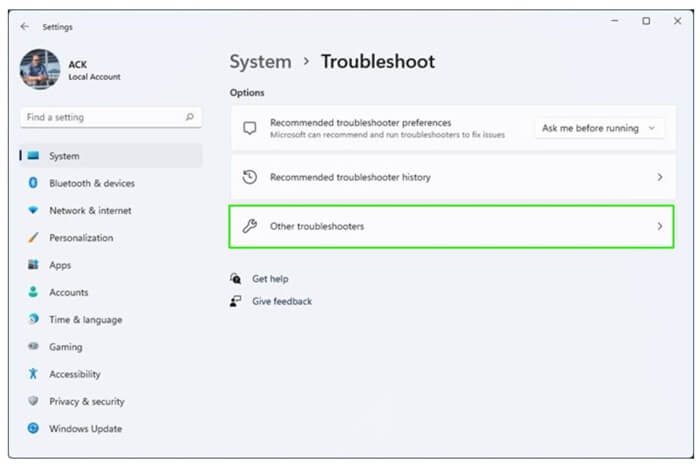
- Click Other troubleshooters in the Troubleshoot menu.
- Find the troubleshooter that corresponds to your issue, for example, printer if the printer is not working, and then click Run next to the troubleshooter.
Pro Tip: Allow Windows to recommend the appropriate troubleshooter when it detects a problem to save you time and effort. You can access these automatic troubleshooting options in Windows 11 by going to Settings, then clicking System, and selecting Troubleshoot. Next, click on Recommended Troubleshooters to find and manage options such as Run automatically, don’t notify me (to run the appropriate troubleshooter automatically in the background without displaying a notification to fix the issue), Run automatically, then notify me (the troubleshooter runs without notifying you, fixes the issue, and informs you of the solution), or Ask me before running (prompts you to run a recommended troubleshooter). This will help you let Windows handle certain problems automatically or choose your preferred level of control.
Also know: How to Lock Your Windows PC Automatically in Windows 11
Method 2: Run the troubleshooter using Control Panel
If you want more legacy troubleshooters (for example, hardware and devices, program compatibility, search and indexing, network adapter, power, system maintenance, shared folders, and incoming connections) or detailed troubleshooting options, you can run the Windows troubleshooter through the Control Panel. Here is how.
- Press Windows + R to access the Run utility.
- Type Control in the Run box and press
- Click Troubleshooting in the Control Panel menu.
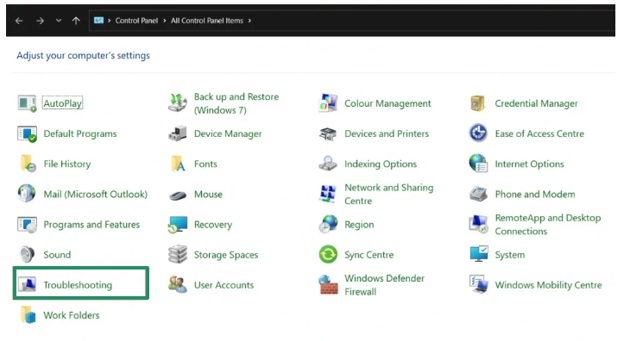
- In the Troubleshooting window, click View all at the top left.
- Click the troubleshooter that best fits your problem.
- Lastly, follow the troubleshooter wizard to detect and solve any problems.
Method 3: Run the troubleshooter in Windows using the Get Help App
Windows Get Help App is another easy way to run a troubleshooter for PC issues in Windows. The following are the steps to run the troubleshooter through the Get Help App.
- Click the Start button.
- Type help in the search bar.
- Click Get Help in the search results.
- In the Get Help App, search the name of the troubleshooter you need to run. For example, to fix Windows Update problems, search Windows Update.
- If present, click the troubleshooter name.
- Click Yes to give the troubleshooter permission to run.
- Follow the instructions that appear on your screen to run the troubleshooter.
Method 4: Apply a troubleshooter command to run the troubleshooter
If you are comfortable with tools like Command Prompt or PowerShell, you are helping someone remotely, or your Settings app is not working, you can launch a troubleshooter instantly with its command. The following are the steps to do this.
- Right-click the Start button.
- Click Windows PowerShell (Admin).
- In the Administrator PowerShell, enter the msdt.exe command followed by the pack ID of the desired troubleshooter.
The following are the troubleshooter commands for the most common problems.
Troubleshooter commands for common issues
| Issue | Command |
| Windows Update | msdt.exe /id WindowsUpdateDiagnostic |
| Internet connection | msdt.exe /id NetworkDiagnosticsWeb |
| Bluetooth | msdt.exe /id BluetoothDiagnostic |
| Hardware and devices | msdt.exe -id DeviceDiagnostic |
| Printer | msdt.exe /id PrinterDiagnostic |
| Audio playback | msdt.exe /id AudioPlaybackDiagnostic |
| Power | msdt.exe /id PowerDiagnostic |
Simply copy and paste the troubleshooter command in PowerShell and press Enter to run the troubleshooter.
However, not all troubleshooters may be available, as Windows has discontinued many older troubleshooters or moved their functions into other troubleshooters. Some prominent discontinued Windows 11 troubleshooters include devices and printers, connection to a workplace using DirectAccess, hardware and devices, HomeGroup, incoming connections, Internet Explorer performance, Internet Explorer safety, keyboard, power, search and indexing, speech, system maintenance, shared folders, and Windows Store Apps.
Apart from this, some troubleshooters are commonly available in both Windows 11 and 10.
Common Troubleshooters in Windows 11 and 10
The following are the common troubleshooters available for Windows 11/10 and the problems they solve.
| Troubleshooter | Issue Fixed |
| Internet connection | Network and WiFi issues to restore internet access or fix slow speeds |
| Windows Update | Update download issues; fixes stuck updates |
| Audio | Sound and speaker problems |
| Bluetooth | Pairing failures, missing Bluetooth options, Bluetooth connection issues |
| Printer | Printing and scanner problems to restore the communication between your printer and PC |
| Power | Battery and sleep settings optimization |
| Hardware | Missing, malfunctioning, or outdated drivers |
| Apps | Microsoft Store and app problems; apps not opening, crashing, or failing to install |
However, if the troubleshooter does not work, you can check the guide below to fix various troubleshooter issues.
Also know: How to Enable the Automatic Device Locking Feature in Windows
How to Fix Troubleshooter Problems
To fix various issues, such as the troubleshooter opening but freezing, saying ‘Could Not Be Loaded,’ not being available, running but not fixing the issue, and an empty Other Troubleshooters page on Windows 11, you can take the following steps.
- Press Windows + R, type services.msc, ensure Diagnostic Policy Service is set to Automatic and is running. Restart the service if it is not running.
- Click the Start button, search for Command Prompt, open Command Prompt as Administrator, and then run the sfc /scannow command to scan and repair your system files.
- If the troubleshooter is not available and you have a work or school-managed device, your system administrator may have restricted the troubleshooter access. Contact the system administrator for help.
- If the troubleshooter runs but the issue persists, update the related driver. For example, if the internet connection troubleshooter did not work, update the WiFi or network adapter driver manually.
- If the Other Troubleshooters page does not show anything, press Windows + R, type msdt.exe -id WindowsUpdateDiagnostic in the Run box, and press Enter to restore the Other Troubleshooters.
Next, we have answered a few common questions about running a troubleshooter for PC issues in Windows to clear up any confusion you may have.
Frequently Asked Questions
Q1. How to check if my PC is having issues?
To check if your PC is having problems, run a Windows Health Check, check the hard drive’s health, and test the memory.
Q2. How to force a PC to troubleshoot?
To force your PC to troubleshoot, enter the Windows Recovery Environment. In the Windows Recovery Environment (WinRE), follow the path Troubleshoot > Advanced options > Startup Repair > Restart.
Q3. What are the 7 steps of computer troubleshooting?
The 7 steps of PC troubleshooting are to detect the problem, identify its probable cause, test if the cause is correctly identified, make a plan to fix the issue, apply the solution, check if the solution worked, and then note what went wrong and how you prevented it for the future.
Hopefully, the comprehensive guide above helps you run a troubleshooter for PC issues in Windows to ensure an error-free and smooth experience. If you have any persisting questions or confusion, feel free to comment with your queries or feedback about this article.