If you know how to enable the Windows automatic device locking feature, called Dynamic Lock, you can keep your data secure whenever you step away from your computer, even if it’s just for a moment. Dynamic Lock is useful for any short break, whether you’re grabbing a coffee, attending a quick meeting, or leaving your desk for several hours, so you don’t have to worry about manually locking your PC each time.
This feature keeps your work and files open while also preventing people from accessing them when you are away. A more convenient option for short breaks, unlike shutting down the computer, it does not close running applications or clear the RAM so that you do not have to wait longer for your programs to load, restart your documents, projects, or browser tabs when you resume work. Let’s explore the Dynamic Lock feature in more detail in this guide.
What Is Windows Dynamic Lock
Dynamic Lock is a Windows 11 feature that locks your computer when a Bluetooth-paired device, for example, your smartphone, remains out of Bluetooth range for at least thirty seconds.
If you have Dynamic Lock enabled, you no longer have to take the pressure of remembering to press Windows key + L every time you move away from your desk. Moreover, it protects your information from snoopers and is seamless and effortless to configure.
However, there are a few conditions you must meet before you can enable the automatic device locking feature. Failing to meet these requirements means you would need other ways to lock your Windows PC automatically in Windows 11.
Automatic Dynamic Lock Device Locking Prerequisites
You must fulfill the following requirements for the Dynamic Lock feature to work on your computer.
- Depending on the method you choose below, you will need access to just one of the following tools with administrator rights: Command Prompt, Registry Editor, PowerShell, or Group Policy Editor. You do not need to use all these tools—each method only requires one.
- Make sure you have a Bluetooth-enabled smartphone that you can pair with your Windows 11 computer.
- Ensure both your PC and smartphone are discoverable through Bluetooth and are near each other.
If you fulfill all of the above conditions, you can enable Dynamic Lock in Windows 11.
How to Enable Windows Dynamic Lock Automatic Device Locking
You can enable the automatic device locking feature in Windows 11 using Windows settings, Registry Editor, Command Prompt, Group Policy Editor, or PowerShell. Windows settings are the best way to turn Dynamic Lock on for non-tech-savvy users. Registry Editor is the best approach for advanced users or IT administrators. Using Command Prompt to toggle Dynamic Lock is best for IT administrators wanting to apply this setting via batch scripts. Group Policy Editor is best for enterprise or school environments and domain-joined systems. PowerShell works best for login scripts and changing the settings remotely. For all these methods to work, a Bluetooth connection must always be active between your PC and smartphone. Below is each method explained in detail.
Method 1: Use settings to enable the Windows automatic device locking feature
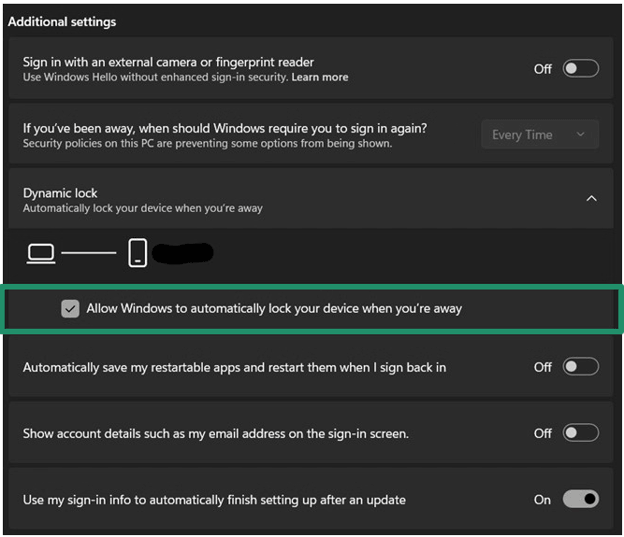
Enabling the automatic device locking feature in Windows via Settings is as simple as ticking a checkbox. Here is how to do this.
- Press Windows + I to open Settings.
- Click Accounts in the Settings panel.
- Next, click Sign-in options in the Accounts menu.
- Scroll down to Additional settings.
- Click Dynamic Lock.
- Next, click Allow Windows to automatically lock your device when you’re away. If you want to disable the Dynamic Lock later, you can uncheck this same box.
Also know: How to Change My Default Browser on Windows
Method 2: Turn on automatic device locking in Windows using Registry Editor
If you want to enable Windows’ automatic device locking feature via a script or manual settings, you can use the Registry Editor. However, you must have administrator privileges and be sure of what you are doing. Editing the Registry is a complex process, and unintended effects can occur if anything goes wrong. Hence, back up the Registry before applying the steps below to activate Dynamic Lock. To back up your Registry, press Windows + R, type regedit, click OK, follow the path File > Export, select All in the export range, choose a save location, and click Save. Close the Registry and then apply the following steps.
- Press Windows + R.
- Type regedit in the Run box and press
- In the Registry Editor, follow the path HKEY_CURRENT_USER\Software\Microsoft\Windows NT\CurrentVersion\Winlogon
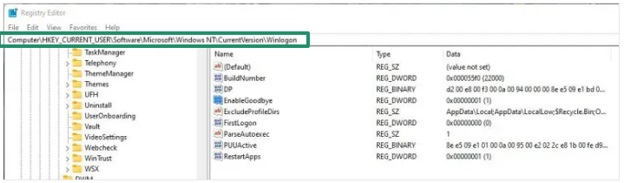
- Double-click If this key does not exist, right-click on the right pane, select New > DWORD (32-bit) Value, and name the key EnableGoodbye.
- Set 1 as the EnableGoodbye key’s Value data to enable Dynamic Lock. To disable the Dynamic Lock, change this value to 0.
- Click OK and exit the Registry Editor.
- Lastly, restart your PC to complete the process.
Method 3: Use Command Prompt to enable the automatic device locking feature in Windows
If you want to enable the Dynamic Lock across multiple computers through batch scripts and have administrator privileges, you can use Command Prompt. Here is how.
- Click the Start button.
- Type cmd in the search bar.
- Right-click Command Prompt in the search results.
- Click Run as administrator.
- In Administrator Command Prompt, copy and paste the following command and press
reg add”HKCU\Software\Microsoft\Windows NT\CurrentVersion\Winlogon”/v EnableGoodbye /t REG_DWORD /d1/f
- If you want to disable Dynamic Lock, you can use the command: reg add”HKCU\Software\Microsoft\Windows NT\CurrentVersion\Winlogon”/v EnableGoodbye /t REG_DWORD /d0/f
- Lastly, close the Command Prompt and restart your PC.
Method 4: Enable automatic device locking using Group Policy Editor
If you want to turn on Dynamic Lock in a managed school or enterprise environment and your computer runs Windows 11 Pro, Enterprise, or Education edition, you can use the Group Policy Editor. The following are the steps to do this.
- Press Windows + R.
- In the Run box, type msc and press Enter.
- Navigate to the path Computer Configuration > Administrative Templates > Windows Components > Windows Hello for Business
- Double-click Configure Dynamic Lock factors in the right pane.
- To enable the Dynamic Lock, click To disable it, click Disabled. To allow users to enable or disable it manually, click Not Configured.
Also know: Solved: Application Unable to Start Correctly 0xc0000142 Error
Method 5: Use PowerShell to enable Dynamic Lock
You can also use PowerShell to enable the Windows automatic locking feature if you have admin privileges. Here is how.
- Right-click the Start button.
- Click Windows PowerShell (Admin) in the menu that appears.
- In Administrator PowerShell, copy and paste the following command and press Enter to enable Dynamic Lock.
Set-ItemProperty -Path “HKCU:\Software\Microsoft\Windows NT\CurrentVersion\Winlogon” -Name “EnableGoodbye” -Value 1
- If you want to disable Dynamic Lock, you can use the command: Set-ItemProperty -Path “HKCU:\Software\Microsoft\Windows NT\CurrentVersion\Winlogon” -Name “EnableGoodbye” -Value 0
If the Dynamic Lock is not working or this feature is unavailable, you can ensure your phone is connected to your PC via Bluetooth, and if this does not work, use the Event Viewer to check the Windows event logs, as explained below.
Troubleshooting Dynamic Lock Problems
To enable the automatic device locking feature in Windows if it is not working, first check if your phone is paired with your computer. Here is how.
- Press Windows + I.
- Navigate to Bluetooth & devices.
- Check if your phone is connected.
- If your phone is not listed as connected, click + Add device.
- Click Bluetooth in the window that appears.
- Wait for your PC to search for nearby devices.
- Ensure your phone’s Bluetooth is active and it is discoverable.
- Click your phone in the list on your computer to start the pairing process.
- Lastly, confirm the PIN on both devices to complete the pairing process.
If the Dynamic Lock is still not working or is greyed out:
- Click the Start button.
- Type Event Viewer in the search bar and open it.
- Follow the path Applications and Services Logs > Microsoft > Windows > AuthZen.
- Search “Operational” logs. These logs show the Dynamic Lock success or failure-related events, which are internally called Authentication Zen, to help you find and fix deeper problems.
If you have more questions about the Dynamic Lock feature, you can find their answers below.
Frequently Asked Questions
Q1. What does Dynamic Lock do in Windows 11?
Windows 11 Dynamic Lock automatically locks your PC screen if you move away from it with your mobile phone. If the PC detects the phone is around 30 feet (10 meters) away, it locks the screen.
Q2. Is Dynamic Lock necessary?
Dynamic Lock is helpful if you work in an office or a shared space, take frequent breaks, and want additional security. However, it may not be very valuable if you rarely leave your PC unattended.
Q3. How to disable Dynamic Lock in Windows 11?
To disable Dynamic Lock, press Windows + I, click Sign-in options, click Dynamic Lock, and uncheck the automatic locking box.
That’s all for the guide to enable the automatic device locking feature in Windows. Hopefully, this helps protect your data and privacy with Dynamic Lock. If you have any persisting doubts or suggestions to improve this guide, you can leave them in the comments.