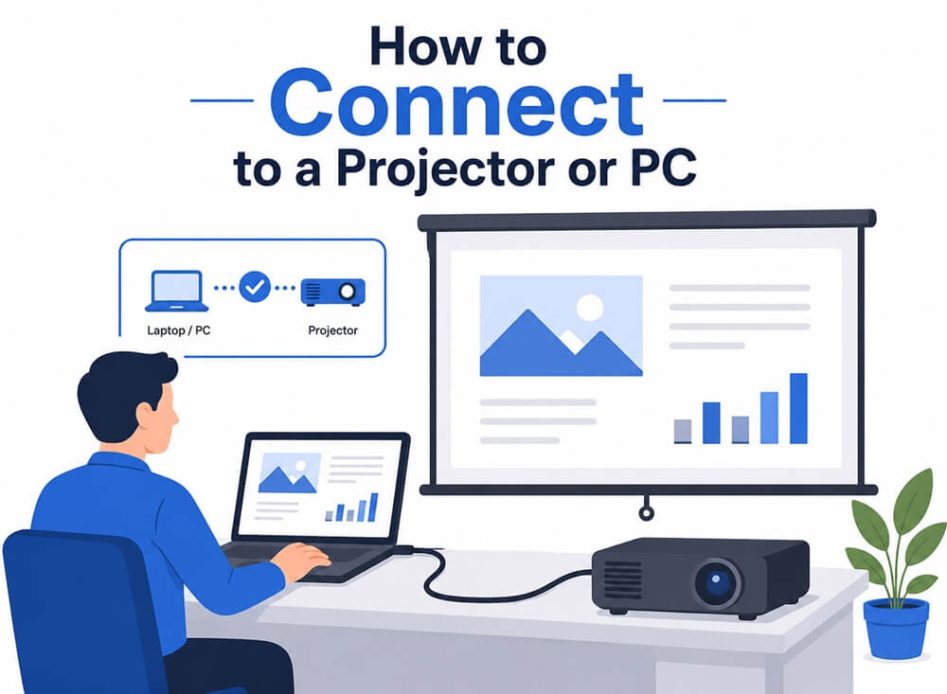
Knowing how to connect to a projector or PC helps when you want to share your screen for meetings, classes, or improve your entertainment experience at home. Hence, this article walks you through easy step-by-step ways to connect to a projector or Windows PC.
You can connect to a projector or Windows 10/11 PC easily through your device ports, i.e., a wired connection or wirelessly. Let’s explain all the methods step-by-step in the following sections of this guide.
How to Connect to a Projector via a Wired Connection
If you want a wired connection to the projector, you can use HDMI (High-Definition Multimedia Interface), USB-C, or VGA (Video Graphics Array). HDMI connection is the most common way to connect to a projector or PC on devices made after 2010. USB-C cable connection works best on modern laptops and tablets. The VGA connection is generally found on older PCs and projectors. Here are all these methods in detail.
Method 1: Use a wired HDMI connection to connect to a projector
Most common on desktops, laptops, TVs, monitors, and projectors, an HDMI connection is the simplest choice to connect a projector for presentations and screen sharing with both video and audio. Available in standard, mini, and micro sizes, HDMI is a rectangular port with an angled corner. The following are the steps to connect the projector using an HDMI port.
- Power on your projector and wait for a moment for it to warm up.
- Plug one end of the HDMI cable into the computer’s HDMI port. It is usually on the back or side of your computer.
- Plug the other end of the HDMI cable into the HDMI port of the projector. The HDMI port on the projector is generally on the back or side panel.
- You can use the Input, Source, or Menu buttons on the projector to select the appropriate HDMI port, such as HDMI 1 or HDMI 2.
- Wait for 5-10 seconds for the projector and PC to detect each other.
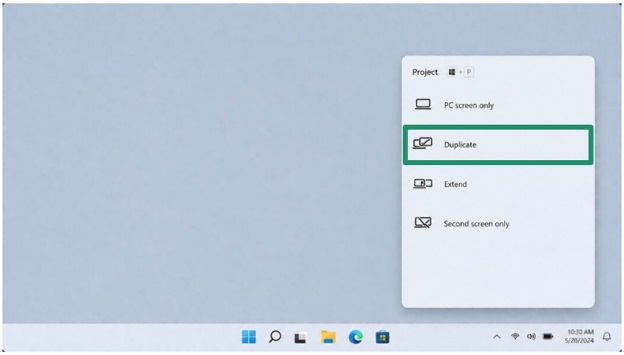
- If nothing appears, you can press Windows + P to get the PC screen only, Duplicate (same on both screens), Extend (separate workspace), and Second screen only projection options.
Pro Tip: Choose a high-quality HDMI cable that is long enough to reach from your PC to the projector, supports the latest HDMI version (currently HDMI 2.2), and has high bandwidth to handle your PC’s resolution and refresh rate to prevent connection issues.
Method 2: Use a USB-C cable to connect to a projector
USB-C port connection is ideal for modern PCs, phones, and tablets. However, not every USB-C port can support video output. To check if your USB-C port can transmit video, look for labels like Thunderbolt 3, Thunderbolt 4, DisplayPort Alt Mode, or a small display icon near the USB-C port. You can also check your device specifications online or in the user manual, or consult the manufacturer’s website for confirmation. The USB-C port is a small oval port on your device. Below is how to use it for connecting a projector.
- Power on the projector and wait for a minute for it to warm up.
- Plug one end of the USB-C cable into the projector’s USB-C port.
- Plug the other end of the USB-C cable into the computer’s USB-C port.
- If your projector has HDMI but the PC only supports USB-C, you can use a USB-C hub with HDMI output or a USB-C to HDMI adapter. Plug the adapter into the computer first and then connect the adapter’s HDMI cable to the projector.
Note: If your projector has a VGA port but the PC only has a USB-C port, use a USB-C to VGA adapter.
- Wait for 5-10 seconds until the projector and PC connect.
- If nothing appears, try another USB-C port.
Method 3: Connect the projector using a VGA connection
VGA is a blue trapezoid port with 15 pins found on many old PCs and projectors. It supports only a video connection and needs a separate 3.5 mm audio cable or an external speaker if you need sound. Being an older connection technology, it has analog signals and somewhat lower quality than other digital connection options. If this works for you, below is how to use VGA to connect to a projector.
- Connect the VGA cable to both your PC and projector. Make sure the screws on the connector tighten to ensure stability.
- If you want sound, plug in a 3.5 mm audio cable.
- Power on the projector and choose VGA input.
- Wait for a couple of seconds for the PC to detect the display.
- If nothing appears, navigate to the display settings and extend or duplicate the screen.
- If you want to adjust resolution, right-click empty desktop space, click Display settings, and then choose Resolution.
If wired connections seem complicated, you can also connect the projector without chaotic cables, i.e., wirelessly.
Also know: How to Fix Second Monitor Not Detected in Windows 11 and 10
How to Connect to a Projector Wirelessly
You can connect the projector wirelessly by downloading Miracast, a dedicated wireless adapter, or Chromecast, Google Cast, or a browser. Before you start, check your device compatibility: Most Windows 10 and 11 PCs and many newer projectors support Miracast. Chromecast or Google Cast requires a Chromecast device or a projector with built-in Chromecast support, and a compatible browser like Chrome or Edge for casting. Dedicated wireless adapters are useful if your projector does not have built-in wireless features. The following sections explain these methods in detail.
Method 1: Connect the projector using Miracast on Windows
Miracast is a common wireless connection method on many Windows laptops and business projectors. It usually does not need an internet connection and creates a direct wireless display link to connect to a projector. Here is how to set up a wireless projector connection with Miracast.
- Press Windows + K on your computer to access the casting panel.
- Select the projector, PC, or display from the list that appears.
- If prompted, confirm the PIN displayed on your projector or receiving PC.
- After being connected, press Windows + P to select whether you want to duplicate the screen, extend it, or use a second screen only. Duplicating the screen displays the same content on your PC and the projector. Extending the screen converts the projector into your second desktop to multitask or present notes. The second screen only option sends the display output only to your receiving screen or projector.
Method 2: Use a dedicated wireless adapter, if available
If available, you can also connect the projector using a dedicated wireless adapter. The following are the steps to do this.
- Plug the adapter into your projector’s HDMI port.
- If required, install software on your computer.
- The adapter creates a wireless network. Connect to this network.
- Follow the pairing instructions that appear on your screen to complete the process.
Method 3: Connect the projector using Chromecast, Google Cast, or your browser
If you want to connect wirelessly to a projector or PC for full-screen desktop sharing, browser tabs, or streaming apps, you can connect through Chromecast, Google Cast, or your browser. Here is how.
- Connect the Chromecast or a compatible projector to the same WiFi network as your PC.
- In Microsoft Edge or Chrome, open the menu and click
- Choose whether you want to cast a file, tab, or the complete screen.
Pro Tip: For smoother playback on apps like YouTube or Google Sheets, use their own cast button.
You can also project to another PC; i.e., another Windows PC can also function as a wireless display if that PC supports this feature. Let’s explain how.
Also know: Fix the Computer Screen Flickering Issue in Windows 11 and 10 Systems
How to Connect to a Windows PC
You can link another computer to your computer to transfer files, share screens, and expand your workspace through HDMI or DisplayPort, the projecting to this PC setting, a remote desktop, or a direct Ethernet cable. Below are all these methods explained in detail.
Method 1: Use HDMI or DisplayPort to connect to a PC
To connect to a Windows PC wirelessly, you can use an HDMI or DisplayPort if one computer supports video input. Video input compatibility is rarely available on standard PCs; if your PC has it, you can follow the steps below.
- Verify the receiving computer supports video input, not only output.
- Connect a cable between PCs.
- Change the receiving computer to input mode. You can usually perform this action using a function key.
Method 2: Connect to a PC using the built-in projecting to this PC setting
Windows has a built-in projecting to this PC network connection setting for screen sharing. Below is how to use it to connect to a Windows PC wirelessly.
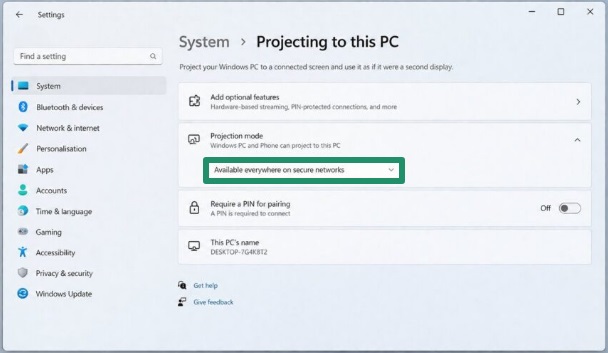
- On the computer you want to view, follow the path Windows + I > System > Projecting to this PC.
- Choose Available everywhere or Available everywhere on secure networks from the Projection mode options.
- On the other computer, press Windows + K.
- From the list that appears, select your first PC.
Method 3: Connect to a Windows PC using Remote Desktop
You can enable Remote Desktop on the host computer to connect to the PC wirelessly. Here is how to do it step-by-step.
- Press Windows + I on the host PC, click System, and then select Remote Desktop.
- Note the PC name displayed on the screen.
- Search for Remote Desktop Connection on your second PC.
- Enter the host PC name you noted in the previous steps.
- Lastly, log in with your credentials to connect to the PC.
Method 4: Use an Ethernet cable to connect to a PC
A direct Ethernet cable is the fastest method of physical file-sharing connection. Below is how to connect to a Windows PC through an Ethernet cable.
- Connect both computers using an Ethernet cable.
- On the first PC, search for and open Control Panel, click Network and Sharing, and then click Change adapter settings.
- Right-click Ethernet, click Properties, and then click Internet Protocol Version 4.
- Set 168.1.1 and 255.255.255.0 as the IP address and subnet, respectively.
- Repeat the above three steps on the second PC, but set the IP address as 168.1.2.
However, if you experience connection issues, you can check the guide below for fixes.
How to Fix Projector or PC Connection Issues
When you connect to a projector or PC, issues like no signal or a black screen, poor image quality or wrong resolution, audio not working through HDMI, flickering or intermittent connection, and “No Signal” on the projector are common. Below is how to solve these problems.
- To fix the no signal or black screen problem, ensure the cable sits firmly on both ends, the display is on, you have selected the right input source, and the cable is not damaged. If all looks fine and you still experience problems, press Windows + P and cycle through different display modes, update the graphics and projector drivers, and, if available, try another port.
- To fix poor image quality or an incorrect resolution, right-click the empty desktop space, click Display settings, click the external display, change to recommended (native) resolution, and then adjust scaling if the text is too small. For VGA connections, you can use the monitor’s built-in button to make automatic adjustments.
- If audio is not working through HDMI, right-click the volume icon, click Sounds, go to the Playback tab, choose HDMI/DisplayPort output, and then set it as the default device.
- To fix flickering or intermittent connection, replace with a certified cable, clean ports, use locking screws or VGA to secure the cable, update drivers using the best driver updater software, and set both displays to the same refresh rate in the device’s display settings.
- If the projector shows “No Signal,” verify the projector is not in standby mode, use the remote to cycle through input sources, turn the PC’s display off and then on, restart the PC with the projector connected, and then check whether the projector needs specific input mode activation.
- If the screen is too large or cut off, adjust the PC’s scaling settings and, if available, disable overscan on the projector.
- To solve sound problems on the projector, select the HDMI, wireless display device, or DisplayPort as the audio output.
To ensure no confusion remains, we have compiled and answered some common questions about connecting to a projector or Windows PC below.
Also know: No DP Signal From Your Device Dell Monitor
Frequently Asked Questions
Q1. Can I connect my PC to a projector?
Yes, you can connect your PC to a projector. To connect the PC and projector, plug one end of an HDMI cable into your computer’s video output and the other end into the projector’s input, turn on the projector, select the appropriate input source, and then press Windows + P to select how you want the screen to display. For details and more effective methods, check the guide above.
Q2. Can I use a projector as a computer screen?
Yes, you can use your projector as a computer screen. To use the projector as a monitor, use an HDMI cable to connect your PC to the projector and then set the display settings to duplicate the screen or extend the desktop.
Q3. Can I connect a laptop to a PC to use the PC as a monitor?
You can use a laptop as your PC monitor by connecting them wirelessly through Windows’ built-in “Projecting to this PC” setting or Remote Desktop. For details, you can refer to the guide above.
Q4. How do I connect my screen to another computer instead of a projector?
To connect your screen to another computer, on the PC you would like to project to, press Windows + I, select System, click Projecting to this PC, select Optional features from under Add the “Wireless Display” optional feature to project to this PC, click View features next to add an optional feature, enter “wireless display,” select the check box next to Wireless Display, click Next, and click Install. After installing the “Wireless Display,” click the Back arrow to manage your preferences on the Projecting to this PC page, and then search for and launch the Wireless Display. On the PC you are projecting from, press Windows + K and then select the PC you want to connect to.
Hopefully, this answers all questions you may have about how to connect to a projector or PC. However, if any questions remain unanswered, feel free to comment with your doubts or suggestions to improve this guide.