Imagine a situation where you power on your computer, but the Windows operating system does not load, you experience a boot failure, or Windows does not start at all. This is what happens when there is no Windows Boot Manager.
Without Windows Boot Manager enabled on your system, the computer won’t know how to locate and execute the necessary Windows files to load your operating system, resulting in an error message, such as BOOTMGR is missing, or a blank screen.
Hence, it is essential to have the Windows Boot Manager activated to find the Windows operating system files, load the Windows kernel and start the operating system, and display the boot menu to allow you to select which one to boot.
While you do not download the Windows Boot Manager as a separate application, it is a core Windows component that comes preinstalled with Windows. You can access it with the F8 key or Windows installation media, and enable or disable it using the Command Prompt tool. There is more on that in the later sections of this article.
First, let’s begin with a deeper understanding of Windows Boot Manager, i.e., the first software that runs when you turn on a Windows PC.
What Is Windows Boot Manager
As stated above, Windows Boot Manager is the first program your computer runs when you power it on. This program links your computer’s firmware (BIOS or UEFI) to the Windows operating system.
The primary function of this software is to read the Boot Configuration Data (BCD) to present a menu of operating systems installed on your computer, load the one you choose, and pass control to the selected operating system.
All in all, Windows Boot Manager manages the startup process, displays the boot menu if you have a dual-boot setup, and provides access to the troubleshooting tools for recovery.
Let’s now answer the next question, i.e., how to “download” Windows Boot Manager?
Download Windows Boot Manager
As we mentioned, downloading Windows Boot Manager as a separate application is not possible, as it is already a component installed on your Windows operating system. However, you can access it by pressing a key like F8 during boot or using a Windows installation media to access the Startup Repair options. Here is how.
Accessing the Windows Boot Manager through the keyboard key
- First, restart your computer.
- As soon as your computer begins to boot (when you see the manufacturer’s logo), repeatedly press the function key for your specific model. Common keys to access the Windows Boot Manager include F8, F11, F12, and Esc.
- Continue pressing the key until you get the Advanced Boot Options menu or Boot Menu.
Also know: Fixed: “Windows has stopped this device because it has reported problems. (code 43)”
Accessing the Windows Boot Manager through the Windows installation media
- First, download the Windows Media Creation tool for your operating system from the official Microsoft website.
- Second, run the MediaCreationTool.exe you downloaded in the previous step.
- Read and agree to the license terms by clicking the Accept button.
- Once you arrive at the What do you want to do? page, choose the option to Create installation media for another PC and then click Next.
- Next, select the language, edition, and architecture of your Windows operating system.
- In this step, choose whether you want to use a USB flash drive or an ISO file to create the installation media.
- Follow the on-screen wizard to complete the installation media creation.
- Next, connect your Windows installation media to the computer.
- In this step, restart your computer.
- When the computer starts, press the key (often Esc, F11, F12, or Delete keys) to launch the boot device selection menu.
- From the on-screen boot menu, choose the option to boot from your DVD or USB drive.
- Next, choose your language and keyboard layout and click Next.
- In this step, choose Repair from the bottom left corner.
- Next, select Troubleshoot from the “Choose an option” screen.
- In this step, choose Advanced options.
- Next, select Command Prompt from the on-screen tools.
- You can now use Bootrec or Bcdboot commands in the Command Prompt to perform troubleshooting.
Since the confusion around “downloading” the Windows Boot Manager is now clear, let’s walk you through how to enable or disable it.
How to Enable Windows Boot Manager in Windows 11
You can follow the steps below to get Windows Boot Manager enabled in Windows 11.
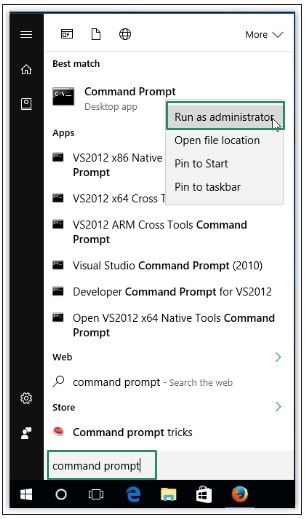
- First, click on the Windows icon on the taskbar.
- Second, type cmd in the on-screen search bar.
- Next, right-click on the first search result (Command Prompt) and choose Run as administrator from the on-screen options.
- After the Command Prompt appears, type or copy and paste the following commands and press Enter after each command.
bcdedit /set {bootmgr} displaybootmenu yes
bcdedit /set {bootmgr} timeout 30
The timeout in the above command determines the duration of the boot manager. You can change the timeout depending on your requirements.
Also know: How to Fix bootrec /fixboot Access is denied Error in Windows 11
How to Disable Windows Boot Manager in Windows 11
You can disable Windows Boot Manager by following the steps below.
- First, click on the Windows icon and type cmd in the search bar that appears.
- Next, right-click the first search result and choose Run as administrator from the on-screen options to open the Administrator Command Prompt.
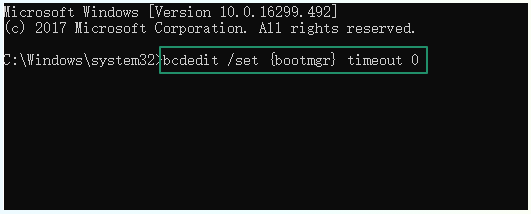
- Once the Command Prompt window appears, type/copy-paste the following command and press Enter.
bcdedit / set {bootmgr} timeout 0
Windows Boot Manager: The Conclusion
That is all for Windows Boot Manager, the first program necessary to run all other programs, as without it, nothing would be possible on your computer. We hope you find this guide helpful.
However, if you have any doubts, questions, or suggestions, please feel free to leave us a comment. Also, be sure to subscribe to our newsletter to receive more useful tech information for free in your mailbox (no spam, only valuable technology!).
