For those who tinker with different operating system versions, a virtual machine platform or Hyper-V is essential.
Hyper-V is a native hypervisor in the Windows operating system. This hardware-based hypervisor allows you to run multiple operating systems on your computer. Moreover, it lets you create and manage virtual machines on your system.
Since Hyper-V runs each virtual machine in its own separate environment, you can run multiple virtual machines on a single hardware platform hassle-free.
If you are searching for how to download Hyper-V on your computer, it is important to understand that it is not a standalone “download” like traditional programs; it is a built-in feature that you can enable on Pro, Enterprise, or Education editions of Windows 10 or 11.
You must ensure that your computer is compatible with Hyper-V before trying to enable this feature.
What Are the Requirements for Hyper-V
Your computer must meet the following system requirements for Hyper-V before you can enable it.
Operating System: Windows 10 Professional or Enterprise, Windows 11 Professional or Enterprise
Processor: A 64-bit processor with second-level address translation (SLAT)
Memory: At least 4 GB of RAM
Additionally, you need administrator privileges for your computer and support for BIOS-level hardware virtualization.
To enable virtualization in BIOS settings, restart your computer, and during the boot process, press a key to enter the BIOS setup (the key varies depending on the device manufacturer; it could be Del, F2, F10, F12, or Esc; the correct key is displayed during boot). After entering the BIOS setup, look for the CPU Configuration section, Advanced or Security settings, and search for virtualization options, such as Virtualization Technology (VT-x), Intel Virtualization Technology, AMD-V (for AMD processors), and SVM Mode (for AMD processors). Select the virtualization options and change them to Enabled. Lastly, follow the directions that appear to Save and Exit.
If virtualization is greyed out in BIOS, you can update your BIOS and power-cycle your computer. To check for available BIOS updates and instructions on how to update, visit your PC manufacturer’s support website, where you can usually enter your device model to find detailed guidance. To power-cycle your device, shut down your computer completely. Unplug the PC from power for ten to fifteen seconds, restart, and then re-enter the BIOS.
How to check for Hyper-V compatibility
You can follow the steps below to check whether your system meets the requirements for Hyper-V.
- First, click the Start button on your Taskbar, type cmd in the search bar that appears, right-click the first search result, and choose Run as administrator.
- In the Administrator Command Prompt, type Systeminfo.exe and press Enter.
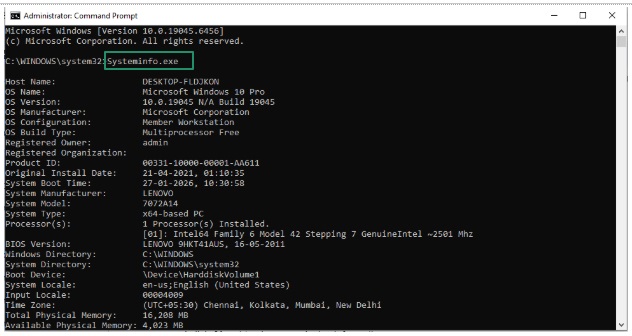
- Lastly, scroll down to the Hyper-V requirements section. If all the listed values for Hyper-V requirements have a Yes, you can enable Hyper-V for Windows 11/10.
To cross-check the operating system your computer runs, processor, and memory details, open settings using the Windows+I shortcut, navigate to the System settings, and click About to view your device information.
If your computer meets all the conditions for Hyper-V, you can proceed to enable it.
How to Enable Hyper-V for Windows 11 and 10
You can deploy Hyper-V on Windows 10 or Windows 11 through the graphical interface of the Control Panel, Settings, or command line tools; PowerShell, or Command Prompt.
Though you are free to choose the methods that seem fit for you, we recommend the graphic interface for users with little to no command-line experience.
Method 1: Enable Hyper-V from the Control Panel
Below is how to download the Hyper-V feature through the Control Panel.
- First, click on the Start button, type Control Panel in the search bar, and double-click the first search result.
- In the Control Panel, click the View By dropdown and choose Large icons.
- Select Programs and Features from the Control Panel menu.
- Choose Turn Windows features on or off from the left pane of the Programs and Features window.
- Select Hyper-V from the Turn Windows features on or off options. Make sure to check all boxes under Hyper-V, including Hyper-V Management Tools and Hyper-V Platform. This ensures that all essential components are installed.
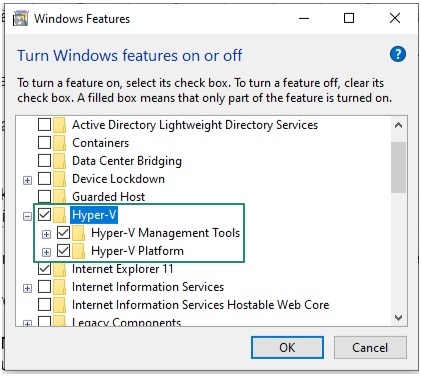
- Click OK and wait until the Hyper-V installation is complete.
- Lastly, click Restart Now when Windows completes the requested changes.
Also know: Best and Easiest Ways to Take a Screenshot in Windows 11 and 10
Method 2: Enable Hyper-V via the Settings app
Below is how to download Hyper-V or activate this built-in feature through the Settings on your computer.
- First, use the Windows+I shortcut to open the Settings application.
- Choose Apps, navigate to the Optional Features, and then select More Windows features. In some versions, Options Features are available in the “System” settings. Windows 11 users can find “More Windows features” at the lower part of the “Related settings” section.
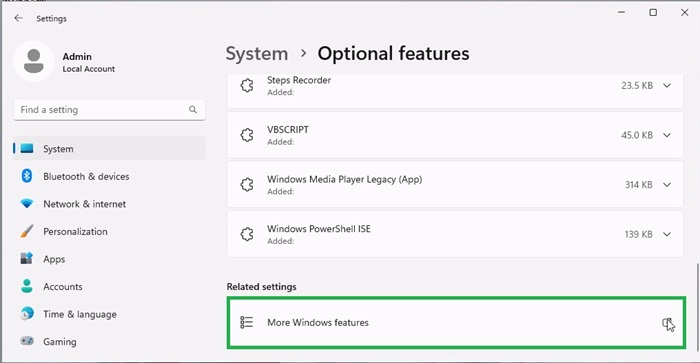
- Scroll down to find and check the box next to Hyper-V in the Windows Features.
- Ensure you select both Hyper-V Management Tools and Hyper-V Platform. The Hyper-V Management Tools include the Hyper-V Manager, an essential tool to manage a Hyper-V virtual machine on Windows 10. The Hyper-V Platform provides the required management and services for virtual machines, such as CPU scheduling, memory allocation, and hardware I/O requests for VMs.
- Click OK to begin the Hyper-V installation process.

- Lastly, restart your computer after the Hyper-V installation is complete.
Method 3: Enable Hyper-V through PowerShell or Command Prompt
Another way to download Hyper-V is by using the command-line tools. You can follow the steps below to enable this feature via Windows PowerShell or Command Prompt.
- First, right-click the Start button and select Windows PowerShell (Admin) from the menu that appears.
If you wish to use Command Prompt, click the Start button on your Taskbar, type cmd in the search bar that appears, right-click the first search result, and choose Run as administrator.
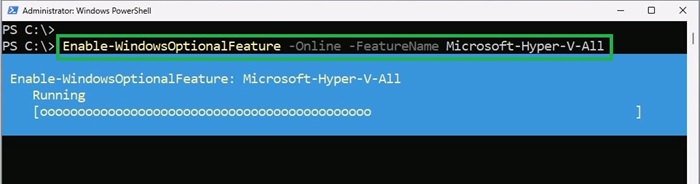
- In the Administrator Windows PowerShell, copy and paste the below command and press Enter.
Enable-WindowsOptionalFeature -Online -FeatureName Microsoft-Hyper-V -All
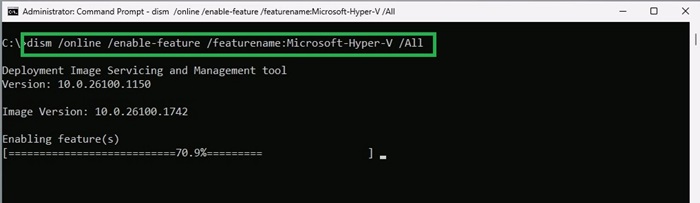
If you are using Command Prompt, copy and paste the following command and press Enter.
DISM /Online /Enable-Feature /All /FeatureName:Microsoft-Hyper-V
- Lastly, restart your computer after the process is complete.
Also know: Fix the Infinite Loop of “Preparing Automatic Repair” on Windows 10
The above was how to enable Hyper-V for Windows 11/10.
As mentioned before, Hyper-V is officially supported only on the Professional, Enterprise, or Education editions of Windows.
While some users use batch scripts to enable Hyper-V for Windows 7 or Windows Home editions, we do not recommend it. Using unofficial workarounds, such as batch scripts, means you will not receive support from Microsoft if anything goes wrong.
Moreover, modifying system files to enable an unsupported Hyper-V feature can lead to system instability and Windows update failure. Additionally, it may expose your system to potentially malicious code that compromises the system’s security, in addition to violating the Windows End User License Agreement (EULA) on Windows Home by running Hyper-V without a Pro license.
However, if you still want to use Hyper-V on unsupported systems, a better alternative is to use safe and trusted virtualization applications, such as Oracle VirtualBox and VMWare Workstation Player, that support Windows Home editions or upgrade to Windows Pro.
That said, if you enabled Hyper-V on the supported Windows versions, but it is not showing up in Windows search, you can press the Windows+R shortcut to access the Run box, type virtmgmt.msc in the Run box, and press Enter to open the Hyper-V Manager.
If that does not help, open the Control Panel, select Programs & Features, navigate to Turn Windows features on or off, check all Hyper-V boxes, and restart. If Hyper-V is still missing, ensure virtualization (VT-x/AMD-V) is enabled in BIOS.
Once available, you can use and manage Hyper-V on your computer easily to run multiple operating systems smoothly. However, if you experience any Hyper-V-related issues, you can always contact Microsoft support for expert assistance.
