Trying to take a screenshot on a Dell laptop can be so easy if you know the right way. The different versions of Windows have their own methods to take screenshots on a Dell laptop or any other.
Here in this article, we will talk about the different methods of taking a screenshot on a Dell laptop and with the different versions of Windows.
How to Take a Screenshot in a Dell Laptop Windows 11
There are different ways to take a screenshot on a Dell laptop, but they differ according to the Windows versions, and the question arises, ‘How to screenshot on Dell Laptop Windows 11?’
Hence, here are some ways to take a screenshot on a Dell laptop in Windows 11.
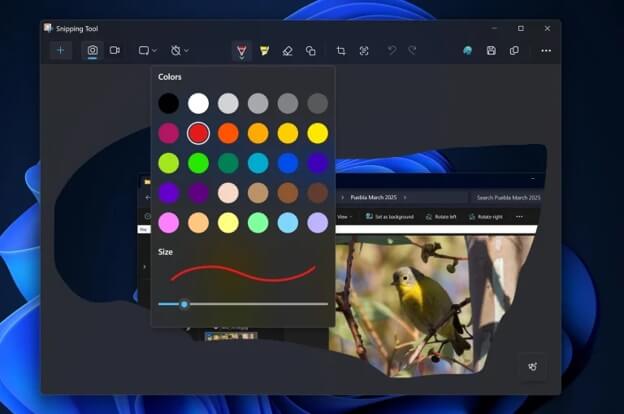
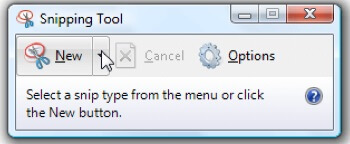
Method 1: Using Snipping Tool
You can use the snipping tool to take a screenshot on Dell laptop because it automatically copies the image you just took, and then you can easily paste it wherever you want it. There is no need to manually go to the image and then paste it somewhere else. And here are the steps for you to use a snipping tool to take a screenshot on a Dell laptop in Windows 11.
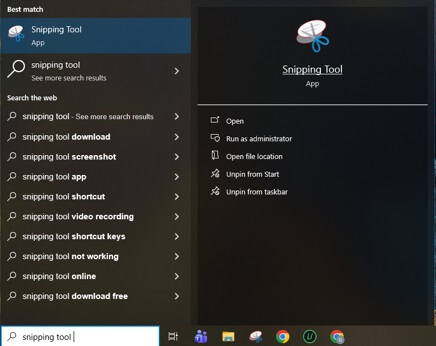
Step 1: Search for ‘Snipping tool’ in the search bar from the taskbar.
Step 2: Then select the area you want to take a screenshot of, and it will automatically be copied to your clipboard.
Step 3: Go to the ‘Snipping Tool’ if you want to perform any kind of edit, like adding a background or adding arrows and boxes, and many more options are there. Or else you can directly paste it wherever you need that screenshot. And you can also clear up the Monitor Ghosting as well if you see any.
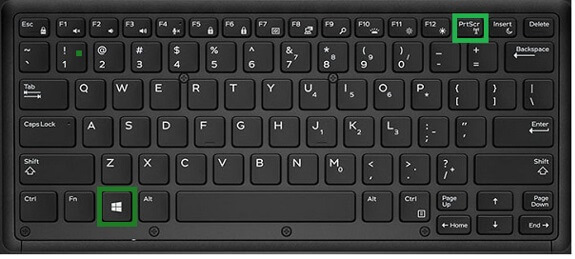
Method 2: Using Keyboard
To take a screenshot on a Dell laptop in Windows 11, you can use some keys as well.
You just need to press ‘PrtScn + Win’ together. And you can easily capture the screenshot on a Dell laptop in Windows 10.
Now if you your question is ‘How do I screenshot on a Dell laptop with Windows 10?’ Then for that you need to continue reading for your answers.
Also know: Best and Easiest Ways to Take a Screenshot in Windows 11 and 10
How to Screenshot on a Dell Laptop Windows 10
To take a screenshot on Dell laptop, there are different ways in different versions of Windows. Here we will understand the methods to take a screenshot for Windows 10.
Method 1: Full Screenshot
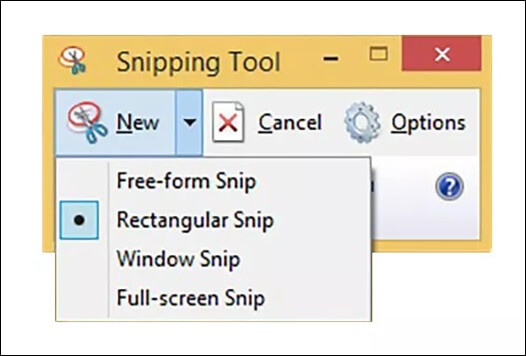
If you want to take a full screenshot, then you can simply use some of the keys on your keyboard. And to take a full screenshot on a Dell laptop for Windows 1 press ‘Win + Shift + S.’ There you will find 4 options to take the screenshot, if you want to edit the size of the screenshot: a rectangular Snip, a Freeform Snip, a Windows Snip, and a Full Screen Snip.
- If you select the Rectangular Snip, then you can select a particular area to screenshot. You just need to drag the mouse on your screen to define the area you want to be shot.
- If you select the Freeform snip, you must do the same process to define a particular area from the screen.
- If you select the Fullscreen snip, then it will automatically select the entire desktop and screenshot it and save it directly in your system.
Method 2: Using Snipping Tool
The following are the steps for you to take a screenshot on a Dell laptop with Windows 10:
Step 1: Go to the search bar in the taskbar and search for ‘Snipping Tool’ and open it.
Step 2: And click on the new option, as shown in the figure.
Step 3: Now click the screenshot you want to keep.
Step 4: The clipboard will automatically save it; you just need to paste it wherever you want.
Method 3: Screenshot Using Keyboard
Although this method is used in all the versions of Windows, this is the easiest method to screenshot using the hotkeys. You just need to press the ‘PrtScn’ key on your keyboard.
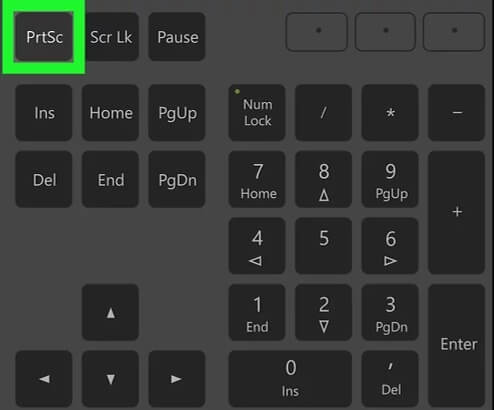
The ‘PrtScn’ key copies the screenshot you just captured to your clipboard, and you can then paste the image, wherever you want. And to paste that image you need to press the keys Ctrl + V together.
Also know: Top Image Resizing Software for Windows PC
How to Screenshot on a Dell Laptop Windows 7 & 8
To screenshot on a Dell laptop in Windows 7 & 8, there are also ways like using keys and using tools. But there are some different steps added to the following methods you need to keep in mind. Windows 7 & 8 are a bit slower in functioning than Windows 10 & 11, so you need to apply the image manually, and here are some methods mentioned below.
Method 1: Using Snipping Tool
You can use the Snipping tool in your Windows 7 & 8 as well, but there are a few things you need to keep in mind before using it to take a screenshot on a Dell laptop.
The following are the main steps for you to help to take a screenshot on Dell laptop with Windows 7 & 8:
Step 1: Go to the ‘Start’ option in the bottom left corner of the screen.
Step 2: And type ‘Snipping tool’ in the search bar. And go to the ‘Snipping Tool.’
Step 3: Go to the ‘New’ option, and there you will find options to take a screenshot. Select the option however you want to select the image. You can select between freeform snip, rectangular snip, Windows snip, and full screen snip.
Step 4: Now that you have taken the screenshot, you need to go to the ‘File Explorer.’
Step 5: Go to pictures and then select the screenshot you just took.
Step 6: And select the image, then press ‘Ctrl + V’ and paste the image where you want.
Method 2: Using Keyboard
To take a screenshot on a Dell laptop in Windows 7 & 8, the capturing of the image is a little faster for these versions. These versions of Windows save the screenshot you just captured in the system; you need to manually take the image from there and paste it wherever you want.
To do so, here are the steps for you:
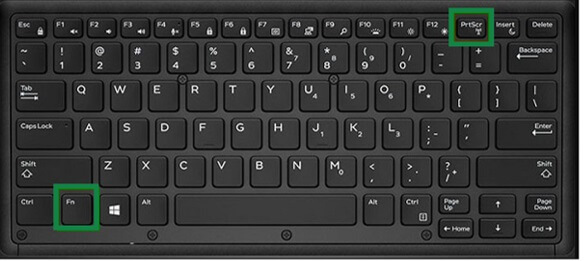
Step 1: Press ‘Win + PrtScn’ on your Dell laptop, or you can also use ‘Fn + Win + PrtScn’ together to take the screenshot. You will find the shuttering of the camera that indicates the screenshot was captured.
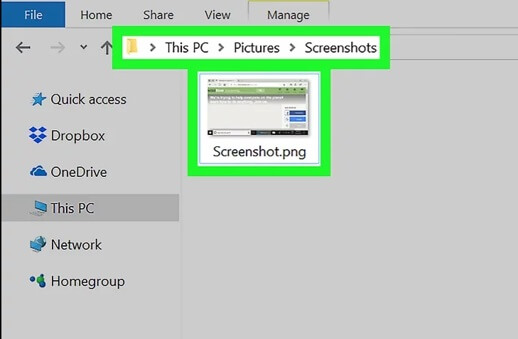
Step 2: Now that the screenshot has been captured, it is automatically saved in the system. And you will find it in the ‘File Explorer.’ And there you will find ‘Pictures.’
Step 3: In Pictures, go to ‘Screenshots’ and find the image you just captured.
Frequently Asked Questions (FAQs)
Q1. Which versions of Windows support snipping tool to take a screenshot on a Dell laptop?
Ans. Almost every version of Windows supports the snipping tool to screenshot on a Dell laptop, and that includes Windows 7, 8, 10, and so on.
Q2. How do I take a screenshot on a Dell laptop with Windows 7?
Ans. You can take a screenshot on a Dell laptop with Windows 7 or any other version of Windows in several ways. Like using a snipping tool or using keys on your keyboard.
Q3. How do I edit the screenshot on a Dell laptop?
Ans. You can easily edit the screenshot in a snipping tool, or also by method, paste the screenshot in ‘Paint,’ and you can edit that image there.
Trying to take a screenshot on a Dell laptop can be so easy if you know the right way. You need to just be sure about the version of Windows you are currently using in your system. You can either use the tool or manually do it by using the keyboard keys, depending on your comfort.
