
Oculus Quest 2, now known as Meta Quest, is a popular VR headset that offers users an immersive experience without external hardware. However, its complete potential unlocks when connected to a PC. When you connect the Oculus Quest 2 to a PC, it opens a vast VR content library, advanced graphics, and better experiences.
This detailed guide walks you through the whole process to connect Oculus Quest 2 to a PC wirelessly and using a cable. However, before moving ahead with the Oculus Quest 2 PC connection, ensure you have the updated Oculus drivers and Meta Quest app on your PC. If you don’t have it on your computer, you can check its system requirements and how to download it below.
Meta Quest PC App System Requirements
Your PC must satisfy the following minimum system requirements for the Meta Quest PC app.
| Component | Minimum Specifications |
| Processor | Intel i5-4590 / AMD Ryzen 5 1500X or greater |
| Graphics Card | Nvidia 970-series and higher/AMD 400-series and higher |
| Memory | 8 GB+ RAM |
| Operating System | Windows 10, Windows 11 |
| USB Ports | 1x USB port (USB 3.0) |
To verify if your PC meets the above Oculus Quest 2 PC requirements, follow the path Windows + I key > System > About. In the About window, you can view your PC specifications and take the necessary steps (for example, upgrading the GPU) if they don’t match the Meta Quest’s system requirements to connect Oculus Quest 2 to a PC.
If your PC meets the system requirements, you can proceed to download the Meta Quest app.
How to Download the Meta Quest App for PC
To download the Meta Quest application for PC, you can follow the steps below.
- Go to Meta’s official website.
- Click Download app to download the application setup.
- Save the application file on your computer.
- Double-click the downloaded file and follow the instructions to install the app.
- After completing the app installation, register with Meta to use the app using your email address or Facebook account.
Once you have registered with Meta, you can proceed to connect the Oculus Quest 2 to a PC wirelessly or with a cable.
How to Connect Oculus Quest 2 to PC Wirelessly
You can connect the Oculus Quest 2 to SteamVR and other content access wirelessly through Air Link or Virtual Desktop. Here is how.
Use Air Link to connect Oculus Quest 2 wirelessly to a PC
Air Link uses your WiFi network to stream content to your Quest 2 from your PC wirelessly. Please note that while wireless connections offer greater flexibility than wired connections, they can cause stability problems or latency depending on your network. If you are fine with this, below are the steps to use Oculus Quest 2 Air Link.
- Ensure you have Oculus Quest 2 with 28 or higher firmware versions. The Oculus PC app’s version is 28 or higher. Your WiFi network is stable, preferably on the 5 GHz band. For best performance, you have a gaming PC connected through Ethernet.
- Go to the Meta Quest PC application.
- Click Devices and then click Add Headset.
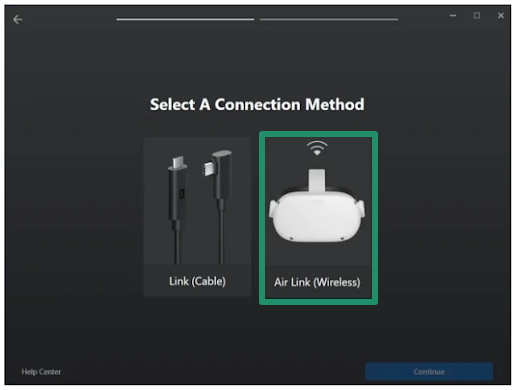
- Next, select your headset and then choose Air Link (Wireless) as the connection method.
- Put on your headset.
- Hover over and click the clock on the left of the navigation bar to access Quick Settings.
- Click the gear icon in the upper-right corner of the on-screen window to open the full settings menu.
- Select the System box from the on-screen options.
- Toggle on the Quest Link.
- Select your PC from the available PCs on your network.
- Take off the headset and make sure the code appearing in the headset matches the code on your PC’s screen.
- Once you have matched the code, click Continue to complete headset pairing.
Also know: How to Fix Spotify No Internet Connection Issue
Perform Oculus Quest 2 wireless PC connect via Virtual Desktop
Virtual Desktop is a third-party app on the Oculus Store to stream PC VR content wirelessly. Below is how to connect the Oculus Quest 2 to the PC using Virtual Desktop.
- Go to the Meta Quest Store.
- Search the Meta Quest Store for Virtual Desktop Streamer.
- Download and install the Virtual Desktop You can also download the Streamer app from the official website of Virtual Desktop.
- Open the Virtual Desktop Streamer app and enter your Oculus account credentials.
- Put on your headset and open Virtual Desktop.
- Lastly, connect to your computer via the app.
How to Connect Oculus Quest 2 to PC with a Cable
If you want an Oculus Quest 2 PC cable connection, you can use Oculus Link. Oculus Link allows your Quest 2 to work as a PC VR headset to connect Oculus Quest 2 to Steam via a USB cable. This method ensures minimum latency with the best performance. Below are the steps to connect your headset in this way.
- Ensure all firmware and software are up-to-date. To update your Quest 2, turn on the device, navigate to Settings, go to About, and ensure it is running the latest firmware. To update your Oculus PC software, download and install the latest Oculus application from the official website. Update graphics drivers to prevent compatibility problems.
- Get a USB-C cable. If your PC has a USB-C port, you can use a USB-C to USB-C cable. Otherwise, you can use a USB-C to USB-A cable. Ensure the cable is long enough to allow movement, as this method restricts your movement.
- Turn on your headset.
- Open the Meta Quest app and select
- Click the Add Headset
- Select your headset from the on-screen options and then click
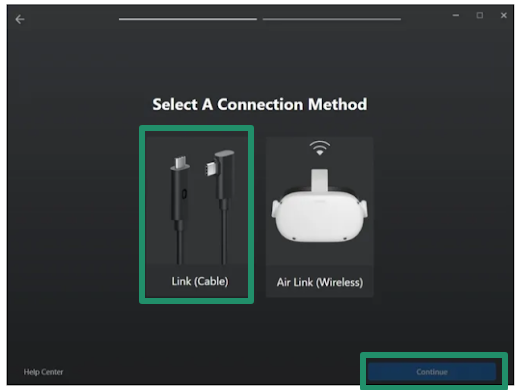
- Select Link (Cable) as your connection method and click
- Plug one end of the cable into your headset and another end into your PC.
- Click Continue to move to the next step.

- Lastly, test your connection or click Continue to complete the process and connect Oculus Quest 2 to Steam on your PC.
That’s how you can connect Oculus Quest 2 to your PC wirelessly or through a cable connection. For the best experience, connect your computer to the router through a wired Ethernet connection, ensuring a clear line of sight between the router and Quest 2. This prevents blurry graphics, choppy gameplay, and other problems. If connecting using Quest Link, ensure you have a high-quality cable connected to your computer while you are playing. Experts recommend a wired connection for seated gameplay and a wireless connection when you need freedom of movement.
Below, we answer a few common questions about connecting Oculus Quest 2 to a PC. If any questions or concerns remain unanswered, you can write us a comment.
Also know: How to Use Phone Link to Connect A Smartphone to a Windows PC
Frequently Asked Questions
Q1. How do I switch between wired and wireless Oculus Quest 2 to PC connections?
To switch between a wireless and an Oculus Quest 2 PC cable connection, unplug the cable for Air Link or plug in for Oculus Link. You can make settings adjustments in the Quick Settings panel to switch between the two options easily.
Q2. Why is my Oculus Quest 2 not connecting to my PC?
An incompatible cable, outdated graphics or Oculus drivers, a conflict with Air Link settings, or pending computer software updates may be reasons your Oculus Quest 2 does not connect to your PC.
Q3. How to fix Oculus Quest 2 not connecting to PC?
To troubleshoot the Oculus Quest 2 connection issues on your computer, restart the Oculus software and your PC, reinstall the Oculus software, and update the firmware for your Quest 2. Additionally, ensure you have updated GPU drivers, disable unnecessary background apps, and optimize the graphics and VR settings. For the smoothest experience, ensure high cable quality and compatibility, use a 5 GHz WiFi network optimized for wireless connections, and keep your PC wired using Ethernet.
