Do you find certain background processes and AI tools disruptive in Windows 11? Do you want to disable background tracking, telemetry, and other web-connected features to protect your privacy? Do you like a clean and ad-free Windows environment? Then, you can debloat Windows 11.
Windows 11 comes with many pre-installed applications that may not be useful for everyone. These programs also consume significant resources, making your system slower and vulnerable.
Debloating Windows 11 means identifying, removing, and preventing bloat. Bloat is anything unnecessary on your computer that is not of much use but consumes space and resources. These include software, settings, and background activities that you do not need, especially those that came preinstalled with your computer or were added during a Windows update.
To identify Windows 11 bloatware you need to remove, look at your system resource usage to spot unnecessary and resource-hungry apps. You can do this easily using Task Manager: press Ctrl + Shift + Esc to open Task Manager, then check the Processes tab to see which background apps are using memory above 4-5 GB, as well as which services are consuming more than 10% CPU. To analyze disk usage, click the Disk column in Task Manager to sort and identify programs causing heavy disk I/O.
Also, review the total number of running background processes in Task Manager; having more than 150 background processes with no open user applications can indicate too many unnecessary services and accumulated scheduled tasks. To check for scheduled tasks, open Task Scheduler (type “Task Scheduler” in the Start menu search bar), then count the number of active tasks listed. Bloated systems often have over 80 scheduled tasks from OEM utilities, trial software, or telemetry services that you did not request or have forgotten to remove.
The bloatware can cause performance degradation, may become a vulnerability attackers can exploit, and system instability. Hence, you can remove the applications or programs you no longer need and those consuming excessive system resources to maximize your device’s performance.
Before proceeding to the best ways to debloat Windows 11 in this article, you need to do some preparations.
Prepare Your PC for Windows 11 Debloat
Before you can remove Windows 11 bloatware, it is important to prepare your Windows installation. Removing apps, disabling services, or running a debloat script is usually safe. However, mistakes in debloating can affect sign-in, printing, Microsoft Store, drivers, and Windows update features. Hence, create a restore point. To create a restore point, follow the path Start > Create a restore point > Your system drive > Configure > Create > Name the restore point. If anything goes wrong after debloat, you can use this point to restore your system to its working state.
Also, back up your important files, install pending Windows and driver updates, and make a list of what you wish to remove (for example, games, software, media players, etc.).
Once you have done all the necessary preparations, you can perform Windows 11 debloat.
How to Debloat Windows 11: The Best Methods
Method 1: Use PowerShell to remove Windows 11 bloatware
PowerShell allows you to control built-in Windows 11 apps. You can use this utility to remove bloatware systematically in Windows 11. Here is how.
- Right-click the Start button.
- Click Windows PowerShell (Admin).
- In Administrator Windows PowerShell, copy and paste the following command and press
Get-AppxPackage | Select Name, PackageFullName
- Review the packages to identify bloatware. The bloatware examples include Xbox utilities, Spotify, gaming apps, social media app installer links, OEM utilities like Dell SupportAssist, trial software like McAfee, unnecessary Microsoft services like Teams, and entertainment apps like Netflix installers.
- Use targeted commands, such as Xbox-related packages: Get-AppxPackage xbox | Remove-AppxPackage, to remove applications.
Pro Tip: For safe debloating and to ensure easy recovery if things don’t go as planned, remove consumer applications first, then telemetry, and then optional UI tweaks. Reboot your computer and test after removing each group.
Method 2: Debloat Windows 11 with Win11Debloat
Win11Debloat debloats Windows 11 without you having to modify settings. The tool is open-source, widely used, and trusted by the Windows community for safe debloating. It removes a wide range of apps, including third-party and built-in apps, such as applications from manufacturers. For your safety, always download Win11Debloat only from its official website or GitHub repository. The following are the steps to use Win11Debloat.
- Right-click the Start
- Click Windows PowerShell (Admin).
- In Administrator Windows PowerShell, copy and paste the following command and press
& ([scriptblock]::Create((irm “https://debloat.raphi.re/“)))
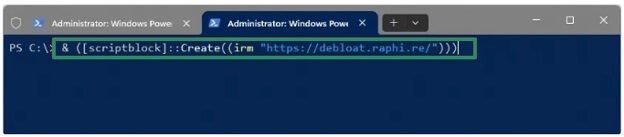
- The Win11Debloat menu will appear with many options.
- Once Win11Debloat appears, type 1 and press Enter to choose Default mode. The default mode removes common Windows bloatware, such as telemetry, suggestions, tips, and annoying ads, while ensuring essential device functionality remains unchanged.
Note: You can choose the Custom mode if you want a more aggressive bloatware removal on Windows 11.
- Review the changes.
- Press Enter to confirm and begin the cleaning process.
- Lastly, restart your PC so all the changes can take effect.
Also know: Fix: The Local Device Name Is Already in Use in Windows 10, 11
Method 3: Use a Windows debloater to bulk uninstall unwanted apps
You can use debloat utilities, such as Chris Titus Tech’s Windows Utility and Tiny11 Maker, to disable scheduled tasks, remove bundled apps, clean up Windows features faster, and adjust privacy settings. These tools help perform advanced Windows 11 cleanup, especially after a fresh installation or a major update.
However, to ensure PC and data safety, download these tools from reputable sources, such as a well-known and trusted GitHub repository with clear documentation, visible code, issue discussions, and recent updates. Also, do not download random ZIP files, one-click optimizers, shortened links, or scripts without source code.
Method 4: Remove bloatware from Windows 11 through Group Policy
The Group Policy for Windows 11 Pro, Enterprise, and Education prevents the installation of built-in Microsoft Store applications when you create a new account. Windows 11 Home users can still use this option by following the steps below.
- Click
- Type gpedit in the search bar and then click Local Group Policy Editor in the search results.
- Navigate to the following path.
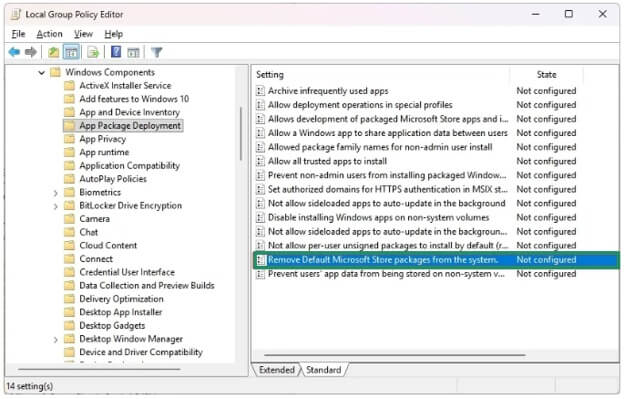
Computer Configuration > Administrative Templates > Windows Components > App Package Deployment
- Double-click Remove the Default Microsoft Store packages from the system.
- Click the Enabled
- Under the Options section, check all the apps you want to remove.

- Lastly, click Apply and OK to complete the steps.
Method 5: Debloat Windows 11 using DISM
The DISM command in Windows can help you remove unnecessary applications that you do not need. You can follow the steps below to use this command.
- Right-click the Start button.
- Click Windows PowerShell (Admin) from the available options.
- In the Administrator Windows PowerShell, copy and paste the following command and press
DISM /Online /Get-ProvisionedAppxPackages | select-string Packagename
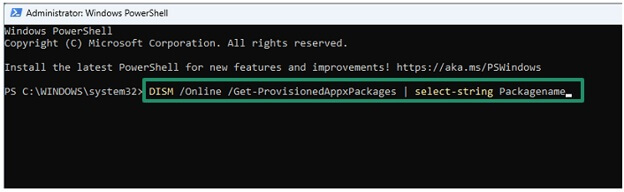
- Go through the packages installed on your system and see which apps you would want to delete.
- Once you find the application that you would like to delete, highlight the app and press CTRL + C on the keyboard.
- Copy the script and ensure you use the package name you want to remove at the end.
- Press Enter to successfully remove the apps from your PC. Repeat the above process to delete all the applications you want to remove.
However, be careful when removing apps, as some applications should not be removed.
Windows 11 Apps You Can Remove
It is generally safe to remove the following common apps.
- Trial antivirus software: You can safely remove trial security software, such as Norton, McAfee, etc., especially if you intend to use another paid antivirus software or the built-in Microsoft Defender.
- Entertainment applications: If you do not find entertainment or streaming apps, such as Spotify or Netflix, useful in your day-to-day workflow, you can remove them.
- OEM promotional tools: Many users can safely remove vendor stores, registration popups, deal apps, branded assistant apps, and warranty offer apps they do not use.
- Office trials: You can remove the trial installer of Microsoft 365 or promotional Office hubs if you use a Microsoft Office alternative or have a full installation.
- Duplicate tools: Software that overlaps with the applications you already prefer, such as extra PDF readers, screenshot tools, note apps, cloud storage clients, or photo apps, is safe to remove.
Windows 11 Apps You Should Not Remove
While the answer to your question, “Should I debloat Windows 11?” is yes, you should be careful with the following.
- Drivers: A driver is software that helps a hardware device, such as a monitor, communicate with the operating system. Without the driver, the associated hardware may not function correctly. Hence, you should not remove drivers unless they are faulty.
- Hardware control apps: On prebuilt desktops and laptops, some manufacturers provide apps to manage keyboard lighting, battery charging limits, BIOS updates, fan profiles, audio enhancements, fingerprint readers, hotkeys, touchpads, and other features. Be careful with these apps and do not remove anything unless you are sure about what it does. If you are confused about an app, you can search for its exact name with your PC model before taking any action.
- Security-related tools: While you can remove security apps if you have more than one or use the built-in Microsoft Defender, you should always review them before disabling them. Also, make sure to review before disabling apps such as password managers, VPN clients, and backup apps.
If you are a beginner at debloating Windows 11, here is the most beginner-friendly way to debloat Windows 11.
Also know: Snipping Tool Not Working in Windows 11,10,8,7 [FIXED]
Beginner-Friendly Windows 11 Debloat Order
Below is how to debloat Windows 11 as an absolute beginner.
- Follow the path Windows + I > Apps > Installed Apps > App you want to remove > Uninstall to remove obvious promotional apps and third-party trials.
- Restart your computer and confirm that sound, WiFi, display brightness, shortcuts, keyboard, printing, and webcam still function normally.
- Uninstall optional Microsoft Store applications you do not use from the Installed apps list or Start menu.
- Open Microsoft Store, go to Library, and update the remaining applications so Windows cannot retry failed updates for deleted packages.
- Follow the path Settings > System > Storage > Temporary files to empty the temporary files once you complete debloating satisfactorily.
Pro Tip: Debloat in small batches. First, remove only a few applications, reboot and test your computer, and then continue. It gives you a clear idea of the changes and makes recovery easier if anything goes wrong.
That’s all for how to debloat Windows 11 easily and safely. Hope this helps you remove bloatware from Windows 11 hassle-free for a fast and smooth PC. If you have any related questions or concerns, you can check the section below to find the answer or write us a comment.
Frequently Asked Questions
Q1. Can you fully debloat Windows 11?
Yes, you can fully debloat Windows 11 using PowerShell and other best methods in the guide above. However, you should be careful when debloating Windows 11, as over-tweaking can cause system instability and interfere with essential OS features.
Q2. How to get rid of bloat on Windows 11?
To debloat the current user profile, click the Start button, right-click the offending bloatware, and then click Uninstall. You can remove bloatware from Windows 11 for all user profiles through PowerShell, Win11Debloat, a Windows debloater, Group Policy, and the DISM utility. You can check the guide above for details of these methods.
Q3. Is it safe to use Windows debloater?
Windows debloaters are generally safe if you use a reputable, open-source tool and understand what it does. To ensure safety, backup your data, create a restore point, and avoid random batch files or unknown executables from unreliable forums.
