Is your Onikuma headset mic not working on a Windows PC? Don’t worry, try these effective and simple solutions to fix the problem quickly. Continue reading!
Onikuma is a one-stop shop for gaming headsets and other peripherals. It provides a wide range of devices from keyboards to headphones and other necessary peripherals for gaming. Talking about one of the best-selling products, then Onikuma headsets or headphones are popular among gamers worldwide.
Onikuma has a good range of options to offer, especially when it comes to headphones. However, we have seen numerous users complaining that their Onikuma headset mic is not working properly or becoming completely unresponsive. There could be multiple reasons why your Onikuma headset mic not functioning correctly including an outdated audio driver, misconfigured privacy settings, and more. The issue is frustrating, but the good news is that you can fix the issue. According to many users, performing microphone driver download and update for Windows 10 from time to time is a sure-shot way to avoid issues with your headset.
Below you will find a few workable solutions to fix the Onikuma gaming headset mic not working on Windows 10, 11. After reading this troubleshooting guide, you will be able to get your headset mic back to normal working.
How to Fix Headset Mic Not Working on Windows PC
Before trying the tactics below, you should rather perform some basic troubleshooting in order to test the hardware failures and connection problems.
- Check if the microphone is not physically damaged by using it on another system.
- The loose connections will stop your mic from functioning normally. If that is the case, then consider re-plugging your headset to the computer firmly and also try testing another audio jack.
- Make sure that the mute switches on your microphone are disabled.
Following are a few tried and tested fixes for the Onikuma headset mic not working on Windows 11, 10, 8, 7.
Also Read: Realtek Audio Console Download and Update for Windows 10, 11
Fix 1: Check the Privacy Settings
In order to make sure that your Onikuma gaming headset mic works as intended, you should let the system and apps access it. You can do this by adjusting the privacy settings. To do so, follow the steps below:
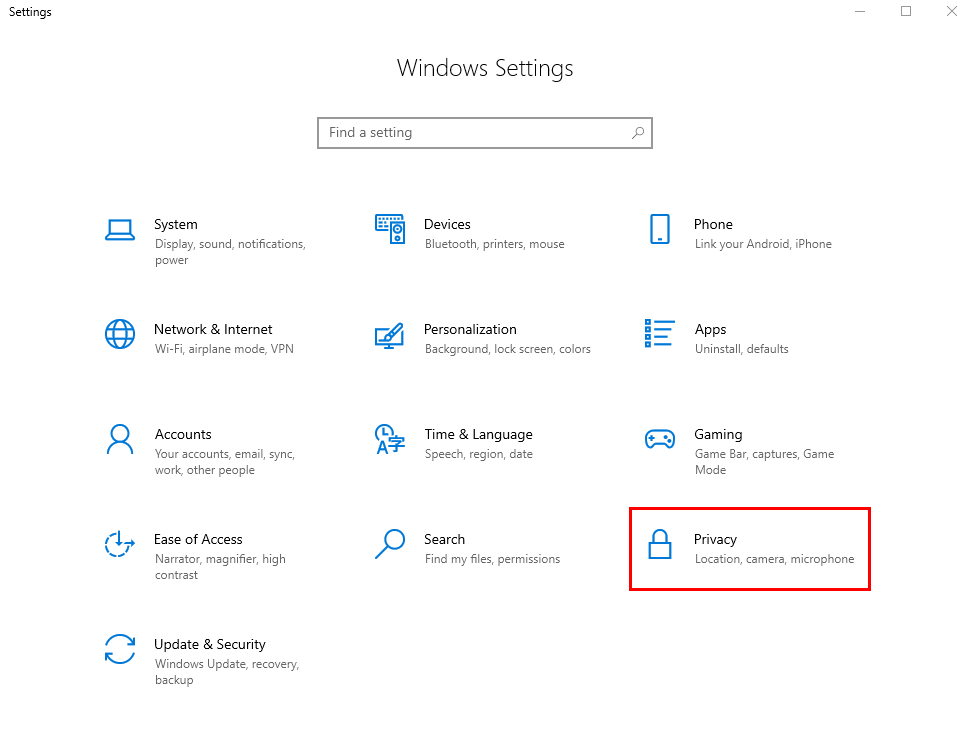
- Press the Windows + I keys together and choose Settings from all available options.
- Choose Privacy.
3. On the left menu pane, head to the Microphone tab and click on the Change button. Then, enable the microphone access.
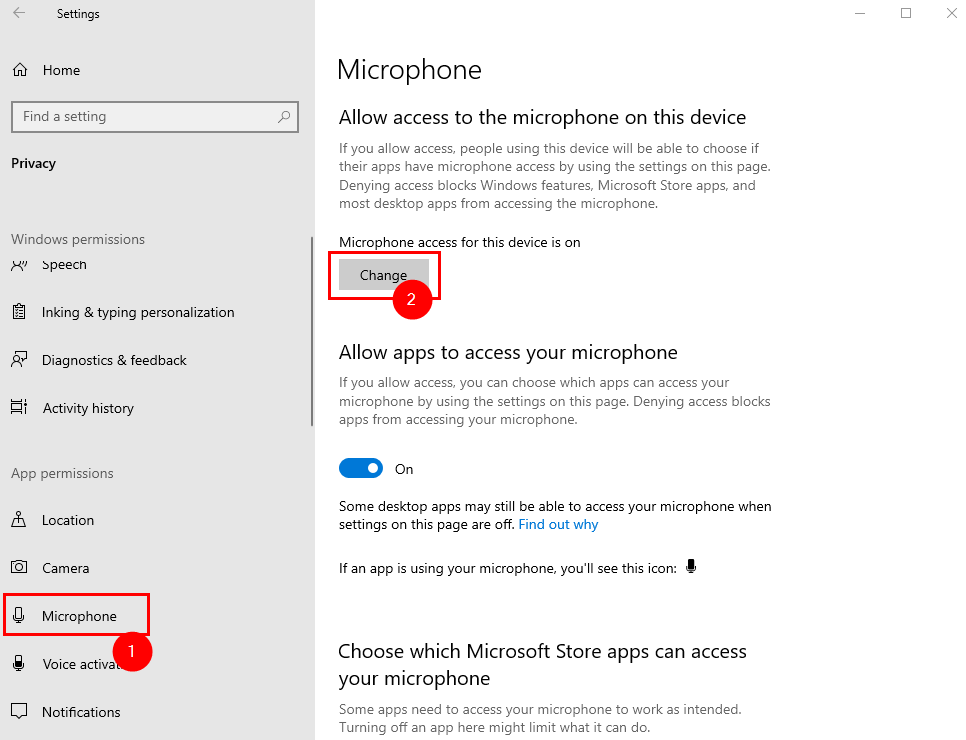
4. Under the Allow apps to access your microphone option, toggle on the button.

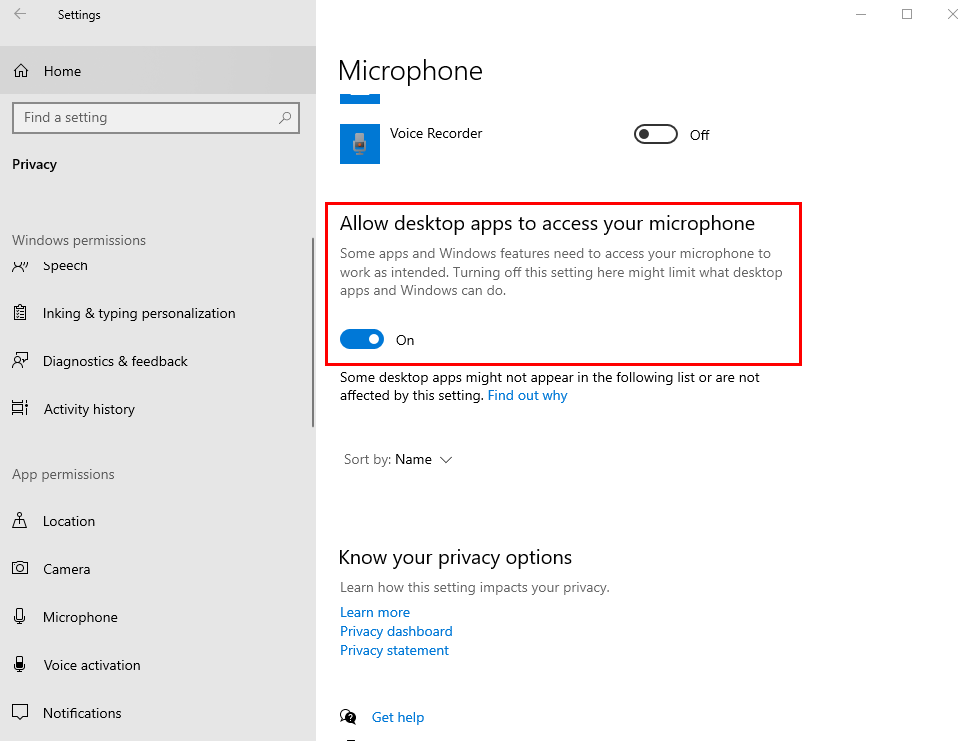
5. Scroll down to find Allow Desktop apps to access your microphone option and then enable the option.
Now, you should try to access your Onikuma headset mic to test the issue. If still your Onikuma gaming headset mic not working on Windows 10/11, then use another solution.
Fix 2: Run the Windows Audio Troubleshooter, to fix Onikuma Headset Mic Not Working
Microsoft Windows provides a set of different troubleshooters to help you quickly find and fix device glitches. So, if you are experiencing issues with your Onikuma gaming headset, then you can use Windows built-in audio troubleshooter to identify the potential causes of the problem. Below is how to run the audio troubleshooter to fix Onikuma headset mic not working on Windows 10:
- Launch Windows Settings by pressing the Windows Logo + I keyboard keys simultaneously.
- On Windows Settings, look for the Update & Security option, then click on it.
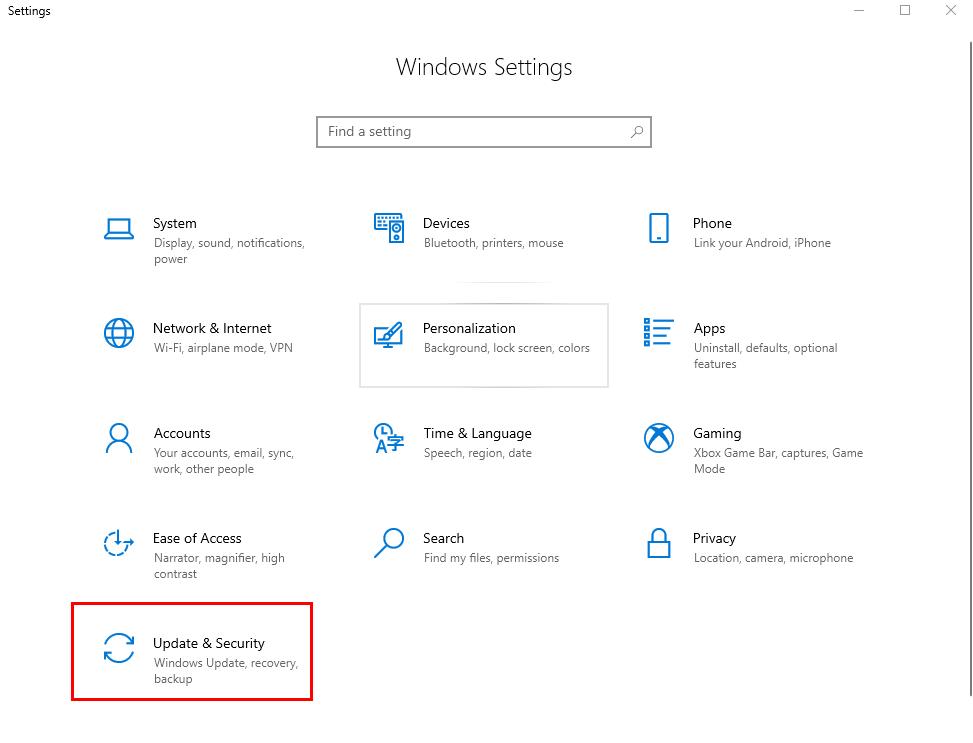
- Then, select Troubleshoot from the left pane.
- Now, scroll down until you see the Recording Audio option. After that, choose it and click on Run the troubleshooter option.
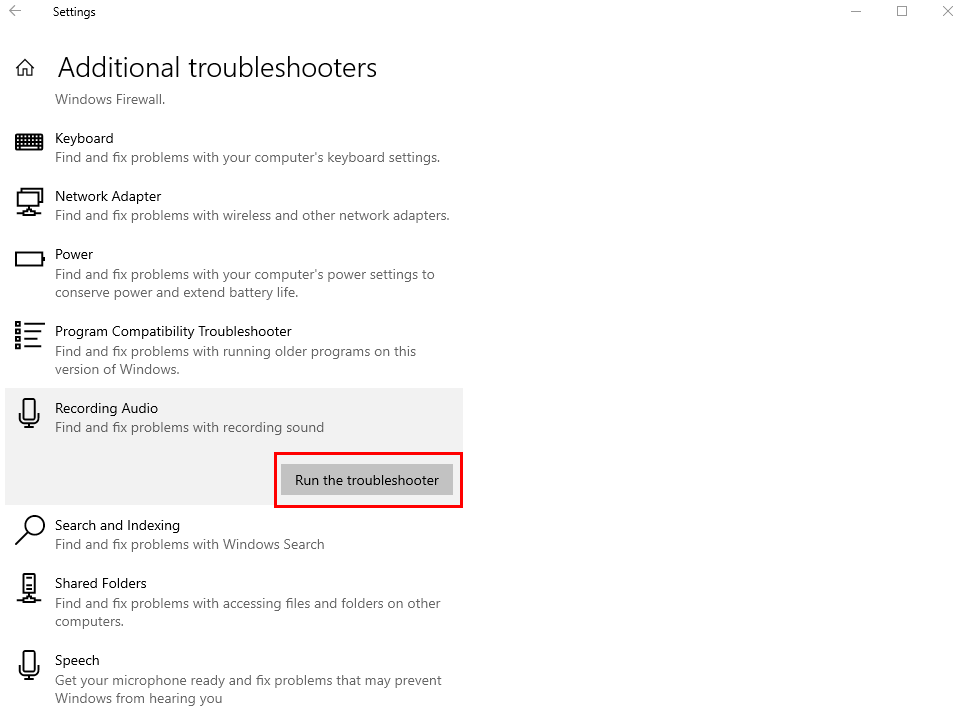
- Be patient, this process may take some time to identify the issues.
Once done, simply follow the instructions on your screen to fix the detected issues. In case, the audio troubleshooter fails to fix the issues with your Onikuma headset, then proceed with the solutions below to fix the Onikuma headset mic not working on a Windows PC.
Also Read: HyperX Cloud 2 Mic Not Working on Windows 10: Fixed
Fix 3: Update Outdated Audio Driver
An outdated, missing, or corrupt audio driver is majorly responsible for issues like the headset mic not working and other audio-related issues on Windows PCs. Therefore, you must have the latest version of the audio driver installed on your computer to avoid glitches. You can get the latest driver on the official website of your audio card manufacturer, however, to manually download the driver you should have complete knowledge about your operating system and your audio card device. This could be time-consuming and error-prone.
Hence, we suggest you quickly download the driver using the auto-detect driver updater like Win Riser Driver Updater.
Win Riser is the globally recognized driver updating software that automatically detects your system, scans it for outdated drivers, and finds the necessary drivers.
Unlike other driver updaters, Win Riser comes with an auto backup-restore wizard that creates a backup of currently installed drivers before updating so that you can easily restore them if required. Furthermore, it has the ability to detect and remove any malware or other threats on your PC. With Win Riser, you can install the latest version of all PC drivers in one click. For this, you should upgrade to the pro version. In addition to this, the pro version provides round-the-clock technical assistance and helps you unlock the full potential of utility.
Now, have a look at the steps below to perform the Onikuma headset driver download for Windows 10, 11 with Win Riser:
- Firstly, download Win Riser from the button below.
- Run the executable file and follow the setup wizard to complete the installation.
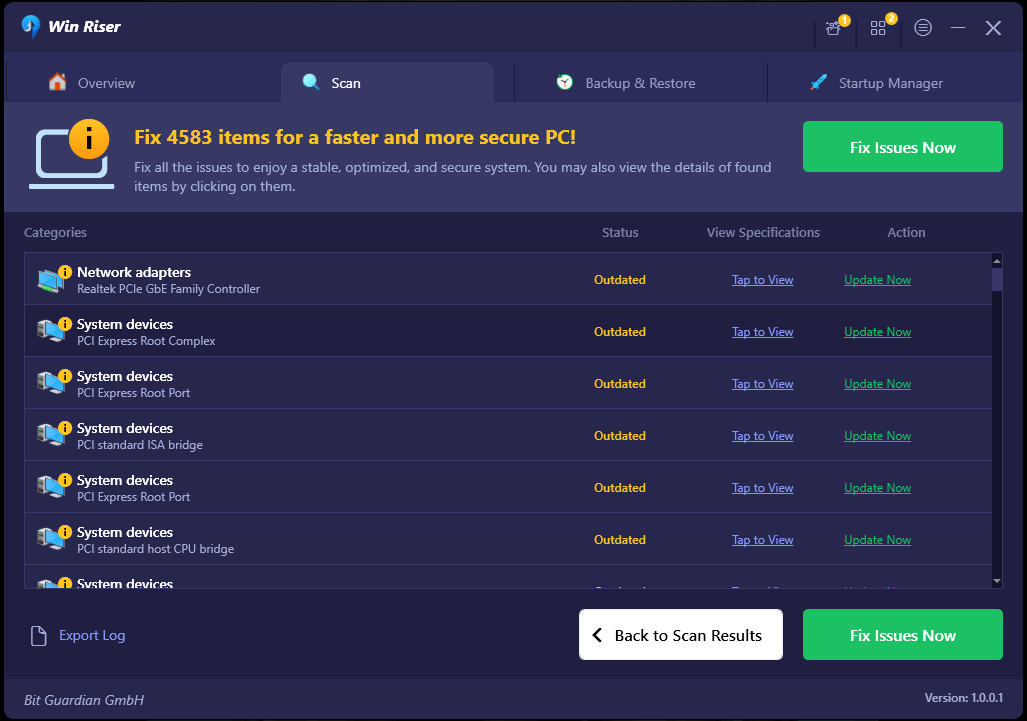
- After installing, launch Win Riser on your PC and wait for it to scan your system for outdated drivers.
- Once scanning is complete, check the results and click on the Fix Issues Now option. As mentioned earlier, this will install all available driver updates in one go including the audio driver.
5. Lastly, restart your computer to apply new drivers.
That’s it! See how simple and quick it is to get the genuine and latest driver updates for Windows operating systems.
After performing the Onikuma headset driver download on Windows 11 and installing the latest drivers, try to access your Onikuma headset in order to check if the Onikuma headset mic not working is resolved. Unfortunately, if not, then move on to the next fix.
Fix 4: Check for System Updates
Windows releases the latest updates, performance improvements, bug fixes, and security updates to resolve issues. So, you can check to see if any updates are available to resolve the Onikuma headset mic not working on the PC. To do that, follow these steps:
- Open Windows Settings by pressing the Windows + I keys at a time.
- Locate and click on the Update & Security option.

- Check if the Windows Updates is selected from the left panel. Then, click on the Check For Updates option.
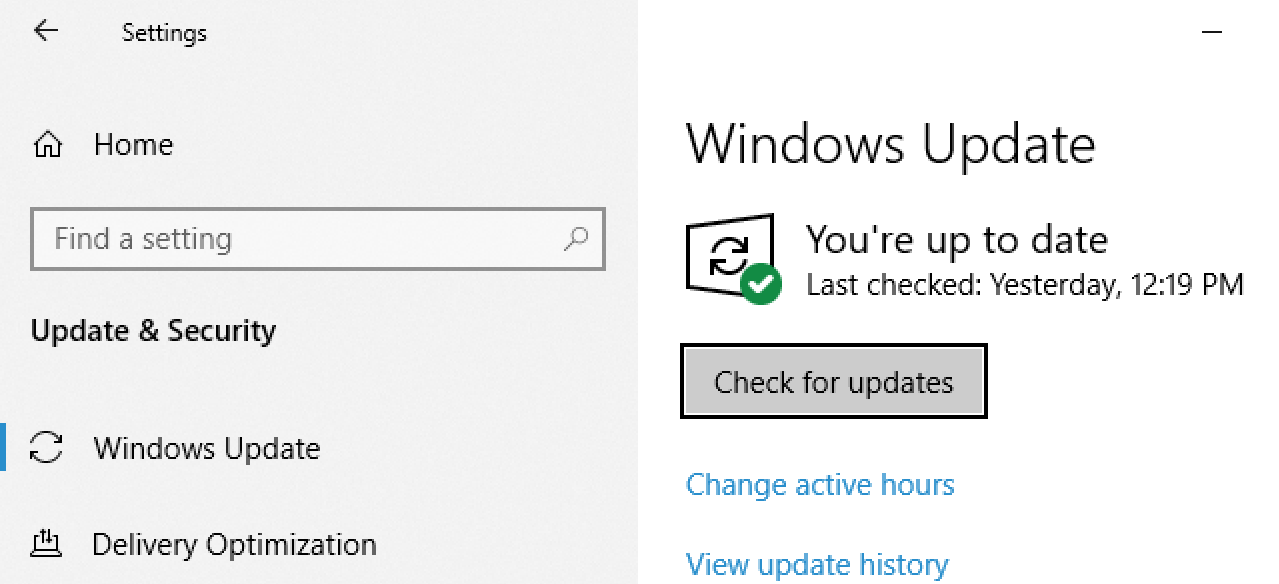
- Now, Windows will look for new updates and will automatically download and install the pending updates.
Hopefully, this will help you resolve the issues with your Onikuma headset. If not, try our last resort to fix the Onikuma gaming headset mic not working on Windows 10/11.
Also Read: Display Driver nvlddmkm Stopped Responding and Has Successfully Recovered (FIXED)
Fix 5: Set Onikuma Headset As your Default Device
None of the above tactics worked to fix Onikuma mic not working on Windows 11,10? Don’t panic, try setting the Onikuma headset as your default playback device. This will definitely help you fix the problem and get the thing back on the right track. Here is how to set the headset as the default device:
- Press the Win + R keys to open the Run dialog box.
- Then, type control in the Run box and press the Enter key from your keyboard.
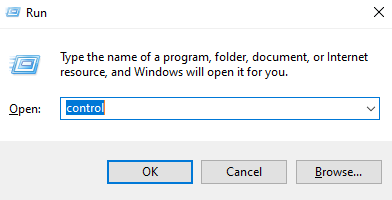
- This will open the Control Panel on your screen. Here set View by as Small Icons and then choose Sound from all available options.
- Now, switch to the Recordings tab and right-click on your microphone, then choose Set as Default Device.
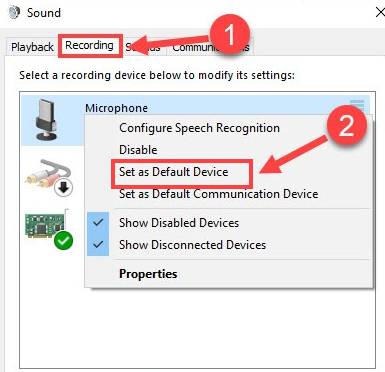
- Next, click on Apply and OK.
This should solve your Onikuma mic not working issue on Windows 11, 10, or older versions.
How To Fix Onikuma Headset Mic Not Working on PC: Explained
So, the above shared were some of the effective solutions to find and fix issues with the Onikuma headset. We hope the aforementioned tactics help you solve the problem. If all suggested fixes fail, then we recommend contacting Onikuma support for further assistance. Luckily, Onikuma provides excellent technical support and a 1-year warranty. So, you can simply visit the official website of Onikuma and contact an IT expert for help.
In case, if you have any better tips & tricks than what we have listed here, do tell us in the comments section below. Additionally, if you have any questions regarding this tutorial, please feel free to tell us in the comments below.

1 Comment