Here is a comprehensive guide to help you fix the nvlddmkm display driver stopped responding error effortlessly.
You turn on your computer with high hopes of a seamless experience. However, what appears on your screen is an annoying “Display driver nvlddmkm stopped responding and has successfully recovered” error message in Windows 11/10.
Sounds like the problem you are struggling with? If yes, now that you have found this article, you can put all your worries aside. We understand dealing with this Black or sometimes Blue Screen of Death error is challenging. However, we researched this problem to its lengths and breadths and found its solutions.
Before discussing these solutions in the coming sections of this article, it is crucial to learn what may have sparked this problem to solve it better.
Causes of “Display Driver nvlddmkm Stopped Responding” Error
The following factors may have contributed to the display driver problem resulting in the screen flickering or the display going black.
- Your display driver is outdated
- There is a problem with the power supply
- A program on your computer is using too much CPU resources
- The GPU of your PC is overheating
- Malware has infected your device
- Your computer has a pending BIOS update
In the above section, we discussed the possible reasons your “Display driver nvlddmkm stopped responding and has successfully recovered.” Let us now walk you through this problem’s most suitable solutions.
Fixes for “Display Driver nvlddmkm.sys stopped responding” Issue
You can apply the following solutions to drive the nvlddmkm Blue or Black Screen of Death error away from your computer.
Fix 1: Check your PC’s power supply
Your video card not getting enough power can be a reason you are experiencing the Windows 11 “Display driver nvlddmkm stopped responding and has successfully recovered” error. Hence, you should check and change your computer’s power supply settings. You can follow the below directions to do it.
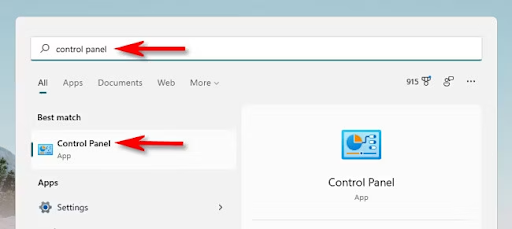
- Firstly, you are required to open the Control Panel. You can open it using Windows search. Use the Win+S hotkey to access the search utility, input Control Panel in the on-screen search box, and select the Control Panel from the on-screen search results.
- After opening the Control Panel, change the view to Large icons and select Power Options from the options available in the control panel menu.
- You will now get the Power Options on your screen. Select the Change plan settings option next to the High Performance power plan. If your current power plan is not High Performance, first, select it to set it as your power plan.
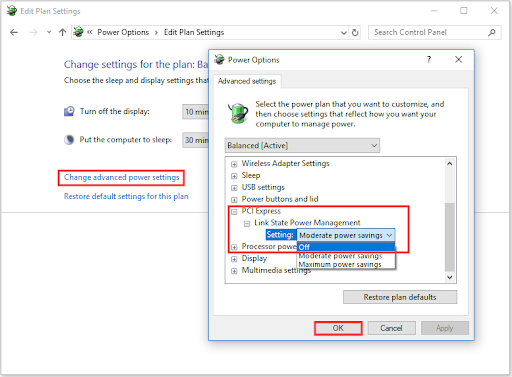
- The next step is to select the option to Change advanced power settings.
- Next, click on the PCI Express section to expand it.
- After expanding the PCI Express section, click on the Link State Power Management.
- Turn Off the Setting option under the Link State Power Management.
- Next, click on the OK and Apply buttons to save the changes.
- Lastly, get your computer restarted to complete the above process.
Also Read: Halo Infinite Crashing on Windows PC: Fixed
Fix 2: Disable the device’s hardware acceleration
Disabling the hardware acceleration in the web browser and other connected background applications (apps that run in the background when you play games on Discord) has solved the problem for some users. Hence, you can also try this solution. Though the process to disable hardware acceleration slightly varies from browser to browser, they generally remain the same. We share them below.
- To begin the process of disabling the hardware acceleration, open your browser and navigate to the browser’s Settings.
- After opening the browser settings, use the search bar to find the hardware acceleration setting.
- You can now toggle off the hardware acceleration.
Note: After performing the above steps, you also need to disable the hardware acceleration in Discord (if you have it installed on your computer). You can do so by opening the Discord application, going to Settings, selecting the Advanced tab, and then turning off the Hardware Acceleration.
Fix 3: Disable GPU overclocking
An overclocked GPU, no doubt, offers high performance. However, it can also stress the GPU and lead to overheating. High temperature is another factor causing the “Display driver nvlddmkm.sys stopped responding” problem. Hence, you can disable overclocking by underclocking the GPU using software like MSI Afterburner.
Also Read: How to Fix Bluetooth Missing From Device Manager
Fix 4: Boot your Windows PC in safe mode
Safe mode is an operating system environment that diagnoses and fixes significant problems, such as the issue you are experiencing. Hence, you can boot your PC in safe mode by following the below steps.
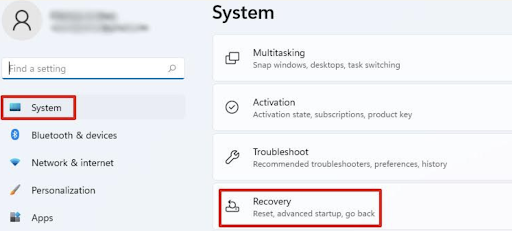
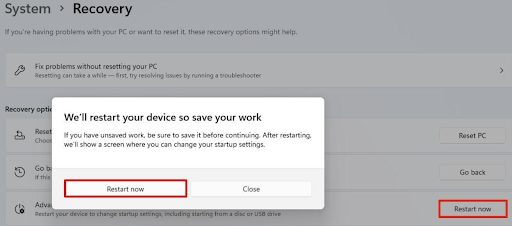
- Firstly, use the Win+I shortcut to access your computer’s Settings.
- Secondly, choose System from the right pane of the Settings window.
- Next, scroll down to the Recovery option and click on it.
- You can now click on the Restart now button next to the Advanced Startup option.
- Click on the Restart Now button.
- You can now choose Troubleshoot from the options on your screen.
- In this step, you need to select Advanced Options.
- Choose Startup settings from the options you have on your screen.
- Next, click on the Restart button.
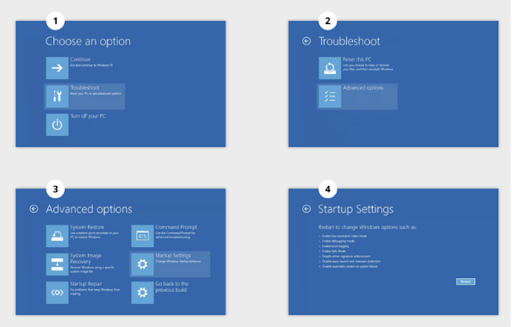
- You can now use the 4 or F4 keys to start your computer in Safe Mode.
Fix 5: Update the graphics driver
The graphics driver helps your video card and the operating system communicate with each other. It translates your instructions into a series of codes called binary codes so the computer can understand and execute your commands correctly. If the driver is outdated, this communication breaks, leading to many problems (the “display driver nvlddmkm stopped responding” and the “Unexpected Store Exception” error being the most common issues). Hence, updating the graphics card driver is one of the sure-shot solutions to the problem you are trying to solve.
Check the List of Best Free Automatic Driver Updater for Windows 10, 11 PC
You can update your graphics and all other problematic drivers automatically using Win Riser. Moreover, Win Riser optimizes your computer’s performance with outstanding features, such as junk cleaning, invalid registry cleaning, malware identification and removal, cleaning and optimizing your RAM, an option to roll back the drivers to their earlier versions to solve update-related problems, and a lot more. You can follow these quick and simple steps to experience the magic of Win Riser on your computer.
- The first step is downloading the Win Riser software. You can download it from the link below.
- After downloading the software setup, double-click on the setup file and follow the easy instructions to install Win Riser.
- You can now relax for a couple of seconds until Win Riser finds outdated drivers and all other issues on your computer.
- Click on the Fix Issues Now button to update all problematic drivers and solve all other issues with a single click.

- Lastly, restart your computer to allow the changes to take effect.
Fix 6: Update the BIOS
BIOS is the first software that starts when you start your computer. It ensures the hardware and software are in sync with each other. Hence, your PC’s BIOS should be up-to-date to prevent issues like the one you are struggling to fix. However, not many users update the BIOS regularly. If you are also one of those users who have not updated the BIOS for a long time, you can follow the below steps to update your BIOS.
Note: The way of updating the BIOS slightly differs from one motherboard to another. Below is a general overview of the steps. As an example, we have taken the screenshot from HP.
- Firstly, navigate to the manufacturer’s official website.
- Secondly, go to the product support page.
- You can now choose your product.
- After opening the support page for your product, select your computer’s OS and OS version.
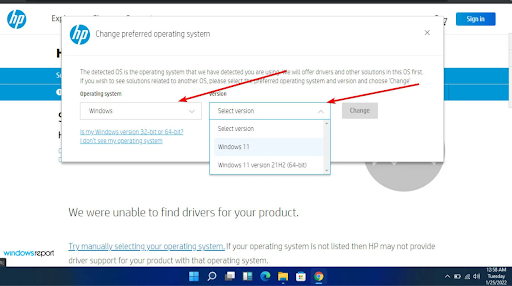
- You can now go to the BIOS drivers.
- Now, click on the Download button to get the driver setup downloaded to your computer.
- Double-click on the downloaded file and follow the directions on your screen to install the BIOS update.
- Lastly, allow your computer to restart to complete the above steps.
Also Read: How To Fix Undoing Changes Made To Your Computer in Windows 10, 11
Fix 7: Clean boot your computer
Interference from third-party applications can also cause the issue in the question. Hence, you can perform a clean boot to solve the problem if it is caused by any third-party software. The following are the directions to do it.
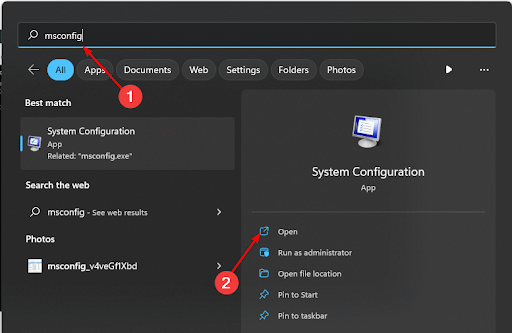
- Firstly, open Windows search using the Win+S hotkey.
- Secondly, input msconfig in the search box.
- You can now choose to Open the System Configuration settings.
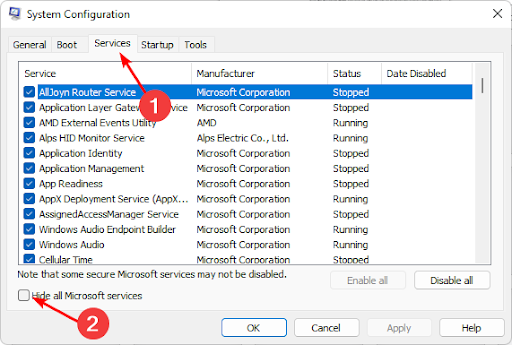
- Navigate to the Services tab and choose the option to Hide all Microsoft services.
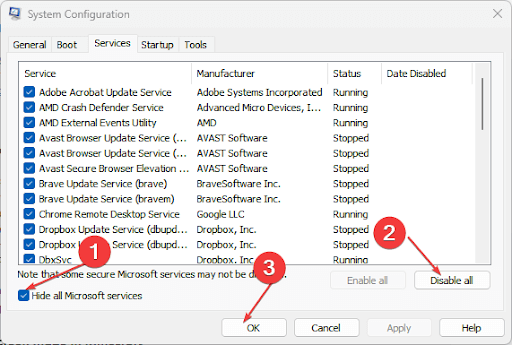
- After hiding all Microsoft services, click on the Disable all option.
- Select Apply and OK to save the changes.
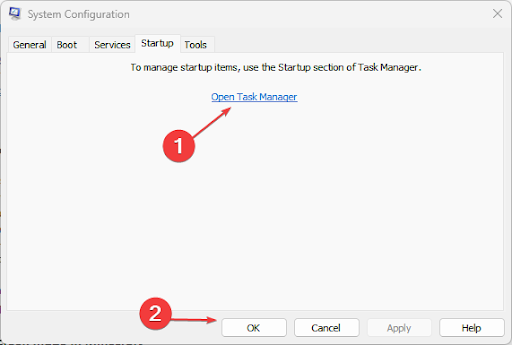
- Next, choose Startup from the System Configuration menu, Open Task Manager, and click on the OK button.
- Navigate to the Task Manager’s Startup tab and select the option to Disable all the items.
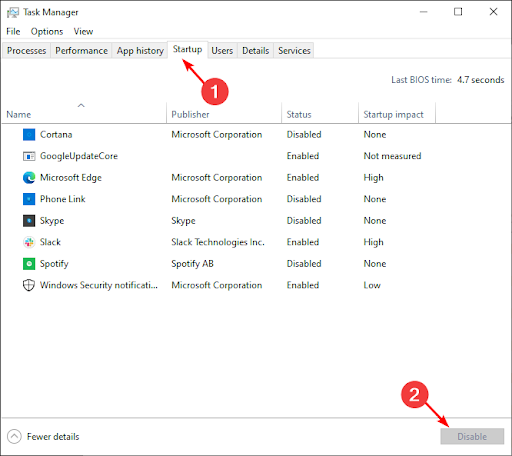
- Lastly, exit the Task Manager and restart the PC.
Fix 8: Check your PC for malware infection
Computers often behave erratically if they are virus or malware-infected, causing display driver issues and other problems. Thus, you can scan your computer for malware using Win Riser or any other safe and robust software of your choice to protect your computer and solve related issues.
Also Read: Fix: ViewSonic Monitor No Signal Issue (Easily & Quickly)
Wrapping Up
This article guided you through various effective ways to fix the “Display driver nvlddmkm stopped responding and has successfully recovered” Windows 11/10 error. We hope one of the above fixes helps you get rid of the problem. However, if the problem persists for some reason, you can get a new graphics card or contact the graphics card manufacturer for assistance. Let us now wave you goodbye with the promise of returning soon with another helpful guide.

1 Comment