In the coming sections of this article, you will learn the quick and easy solutions to resolve the HyperX Cloud 2 mic not working issue on your Windows 11/10 PC.
Sound is what makes your gaming sessions exciting. Without thrilling sounds, even the most fascinating games lose their charm. Hence, there are many gaming-focused headsets to offer you the best sound experience when playing games on your computer. HyperX Cloud 2 is one such microphone with features, such as passive noise cancellation, virtual 7.1 surround sound, and memory foam cushion, making it a popular choice among gamers across the globe. However, unfortunately, the HyperX Cloud 2 mic is not working for many users.
Are you also struggling with a similar issue? If yes, this article is going to be your favorite for the day. Here, we share the tried and tested solutions for HyperX Cloud microphone problems curated after researching the case deeply. However, before discussing the fixes, it is on point to discuss the probable culprits behind the problem you are experiencing to help you fix it better.
Why is My HyperX Cloud 2 Mic Not Working
The following factors may be a reason your HyperX Cloud headset has become dysfunctional.
- The game/app with which you are trying to use the microphone does not have permission to use the mic
- You have not enabled the headset
- The drivers for your microphone/audio are outdated
- HyperX Cloud is not set as the default microphone on your computer
- Your Windows audio service files have become corrupted
After understanding the factors that may have contributed to the HyperX Cloud 2 headset mic not working issue, we are in a position to solve this problem. Hence, let us walk you through the most suitable fixes for the microphone issue without wasting your priceless time.
Top Fixes for Windows 11/Windows 10 HyperX Cloud 2 Mic Not Working Problem
You can apply the following solutions to get rid of the HyperX Cloud 2 wireless mic not working problem on your computer.
Fix 1: Ensure your mic is connected to the computer correctly
Sometimes microphone connection problems can also cause your microphone to not work. Hence, you should check your headset’s connection before going deep into troubleshooting. If all connectors are seated correctly, you can plug the USB cable into any other USB port or use the 3.5mm audio jack in the place of the USB to connect the microphone to your computer. If this does not solve your problem, you can proceed with the following solutions.
Also Read: USB 3.0 Driver Download and Update for Windows 10, 11 PC
Fix 2: Make sure you have enabled the microphone
The HyperX Cloud 2 mic may not be working on your PC if the microphone is disabled. Hence, you can follow the below directions to enable the headset to make it work.
- Firstly, you are required to open your computer’s Control Panel. You can access the Control Panel by searching for it through the Windows search and selecting it from the search results.

- After opening the Control Panel, click on View by and select Large icons from the drop-down menu on your screen.
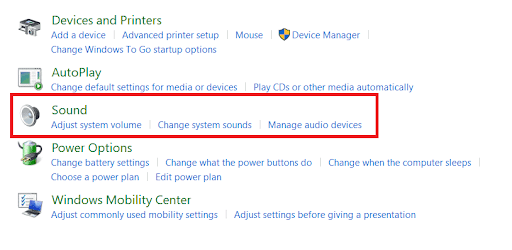
- The next step is to select Sound from the options available in the Control Panel menu.
- You can now choose Recording from the available options.
- Next, right-click the empty space and select the option to Show Disabled Devices.
- Right-click your microphone and choose the option allowing you to Enable it from the context menu.
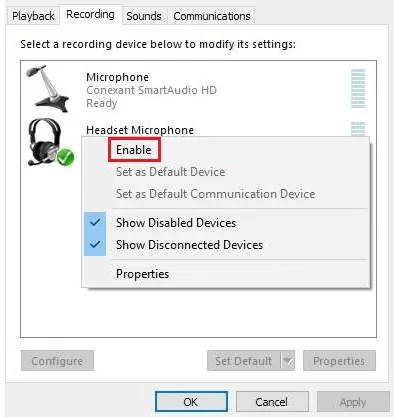
- Lastly, click on the Apply and OK buttons to let the changes take effect.
Fix 3: Set HyperX Cloud 2 as your computer’s default microphone
If the headset you are currently using is not the default microphone device, you may end up with problems such as the HyperX Cloud 2 mic not working on Windows 11/10. Thus, you can follow the below steps to set the mic as your default device to fix the issue.
- To get started with the process of setting your HyperX Cloud 2 as the default microphone, open the Control Panel.
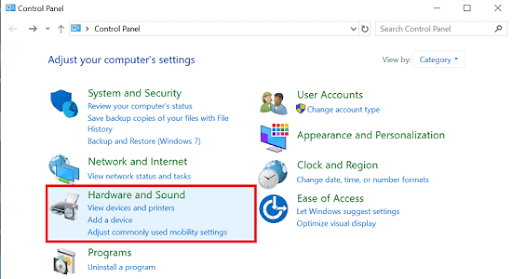
- After the Control Panel appears on your screen, choose Hardware and Sound from the available menu.
- You can now select Sound from the option available in the Hardware and Sound menu.
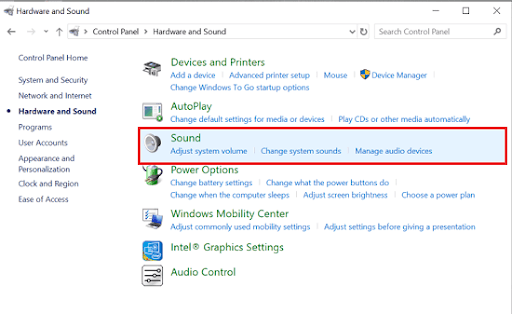
- Right-click on your HyperX Cloud 2 microphone and choose the Set as Default Device option from the on-screen context menu.
- Lastly, you can save the changes by clicking on the Apply and OK buttons.
Also Read: How to Fix Computer Freezes Randomly in Windows 10, 11?
Fix 4: Allows apps/games to use the microphone
The applications or games on your computer may not be allowed to access the microphone, resulting in the HyperX Cloud 2 wireless mic not working issue. Hence, you can follow the below instructions to grant the apps and games permission to use the microphone.
- Firstly, access the Windows search utility using the Windows+S hotkey.
- Secondly, input Microphone privacy settings in the on-screen search box and press Enter.
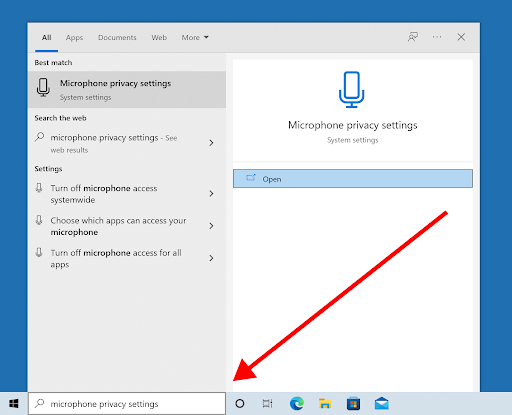
- Ensure the Microphone access for this device is On.
- Next, toggle on the option to Allow apps to access your microphone.
- You can now toggle on the apps for which you want to allow microphone access.
Fix 5: Unmute your microphone
Hearing sound from a muted microphone is practically impossible. Hence, you should ensure the microphone is not muted if the Windows 11 or Windows 10 HyperX Cloud 2 mic is not working. You can go along the following path to unmute the microphone.
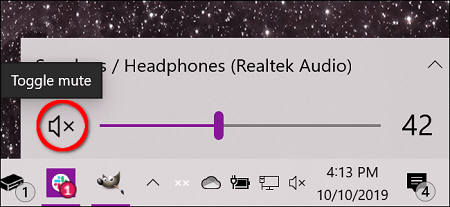
- Firstly, right-click the speaker icon on your taskbar.
- Secondly, check if the microphone’s mute toggle is on or off.
- Lastly, click on the mute toggle to turn it off to unmute your headset.
Fix 6: Reset your Windows audio service
Since corrupted Windows audio service files are another reason you may experience the HyperX Cloud 2 mic not working problem, you can reset the service to fix the issue. Here are the steps to do it.
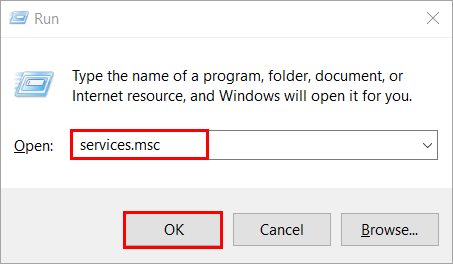
- To begin the process of resetting the Windows audio service, use the Win+R hotkey to access the Run utility.
- Secondly, input services.msc in the box on your screen and click OK.
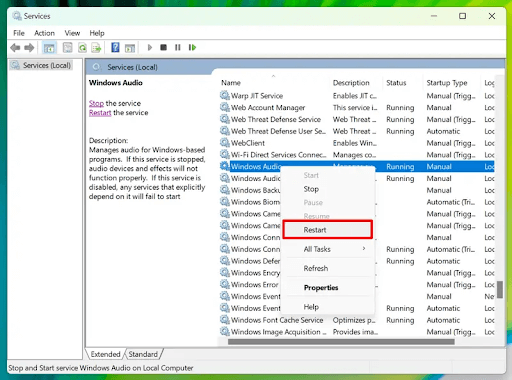
- You can now scroll down the list of services to locate the Windows Audio service.
- Check whether or not the Windows Audio service’s status is running.
- If the service is not running, right-click on it, and choose the Start option.
- If the service is running, right-click the service, and select the option to Restart it.
Also Read: No DP Signal From Your Device Monitor (Dell): FIXED
Fix 7: Use the built-in Windows troubleshooter
Windows computers come with a troubleshooting tool to fix issues, such as the HyperX Cloud 2 mic stops working on your Windows 10/11 PC. You can follow these steps to check if the troubleshooter can solve your problem.
- Firstly, right-click the speaker icon on the taskbar and select the option to Troubleshoot sound problems from options in the context menu.
- Lastly, you can follow the on-screen directions to troubleshoot the problem.
Fix 8: Update Microphone/Audio drivers with Win Riser
Outdated or corrupted drivers encourage issues like the one you are trying to fix. Moreover, out-of-date can result in many serious problems, such as system crashes. Hence, you should always have updated drivers installed on your computer to eliminate the HyperX Cloud 2 headset mic not working and other issues.
You can update drivers in two ways. Either you can update the microphone drivers manually through the Device Manager (which is a highly technical, time-consuming, and daunting process) or you can use specialized software like Win Riser to get the drivers updated automatically (the approach we recommend).
Check out the Top List of Best Free Driver Updater Software to Use
Win Riser is a renowned driver update and PC performance optimization tool with junk and invalid registry cleaning, fast detection and elimination of malware, single-click driver updates, an option to roll back to the earlier drivers to dodge update-related problems, 24*7 customer support, and many other incredible features. You can follow the below quick and simple steps to use this software.
- Firstly, click on the link below to download the Win Riser program on your computer.
- Secondly, you can follow the instructions on your screen to complete the software installation.
- You can now take a small break of two to three seconds to sit back and relax until Win Riser scans your PC thoroughly to detect outdated drivers, malware, faulty registries, and other problems.
- After Win Riser completes the scan, you can go through the results and select the Fix Issues Now option to update drivers and drive all the problems away from your computer automatically.

Wrapping Up
So, the previous section of this guide elaborated on the most effective methods to fix the HyperX Cloud 2 mic not working problem on your Windows 10/11 PC. After applying these solutions, your microphone will start working perfectly. However, if for some reason, the problem persists, you can contact the manufacturer to request a replacement (if your microphone is new and under warranty), as the headset may be faulty or broken. You can also leave a reply in the comments section if you have any doubts, questions, or suggestions about this article.

3 Comments