Suddenly a message pops up on your screen that says, ‘A device which does not exist was specified’ and you have no clue why it happens and where to move forward, do you? Not to worry anymore, because there are several ways to use, which you can simply fix this issue without any professional intervention.
The solutions to the issue ‘A device which does not exist was specified Windows 10 & 11’ do not differ a lot in them. There are methods that can be easily used in both of them.
Now, let us understand what the reason behind this kind of error is and what all the methods are that you can use to resolve and fi this kind of issue on your own.
What Is the Cause of This Error?

There are many reasons you can clear errors like ‘A Device Which Does Not Exist Was Specified’ with any professional interference.
Here is the list of some of the causes for the error ‘A Device Which Does Not Exist Was Specified’:
- Unstable Connections
- No permission or less permission for accessing the drive
- Incompatible drive letters
- Expired motherboard drivers
- Malicious sectors of hard disks
- Error in hard disks
- Drive not accessible
- Issues in motherboard’s header
- Damaged USB ports
- Outdated drivers
Now let us understand various methods to fix the error of ‘A Device Which Does Not Exist Was Specified’ in easy ways without any professional intervention.
How to Fix This ‘A Device Which Does Not Exist Was Specified Windows 11 & 10’
There are several ways to fix the error of ‘A device which does not exist was specified Windows 10 & 11.’
Here are some of the methods in detail to fix your issue permanently and on your own.
Method 1: Restart and Reinstall
The basic and the primary method one should use for these kinds of errors is to check for the physical discrepancies in your system. These physical discrepancies can be like restarting the system, making sure of all the connections, and many others because it can resolve a lot of internal glitches on its own.
The following is the list of some physical damage or errors that can cause issues like this.
- Make sure all the physical connections are secure and stable and use the different drive if you have used one previously.
- If one port is not supported, then try to change it repeatedly; your port might be damaged but not the drive.
- If you are not sure about the USB drive or the SSD drive you are using it, then try some other different drive to confirm if that is working or not.
- And always make sure you are using the correct port that supports the drive you are connecting. For instance, if you are using a USB 3.0 or 3.1 to drive with an old port, then it might not support it.
And even after restarting the system, if you are unable to fix the issues, then you can uninstall and then reinstall the drive, and you can do it easily on your own by following these steps:
Step 1: Go to the taskbar and search for ‘Device Manager’ and click to open it.
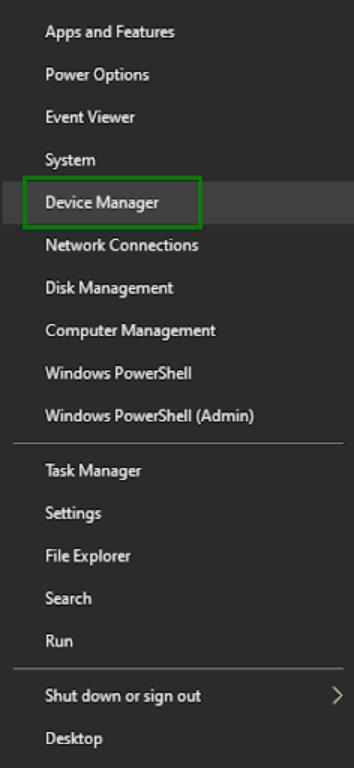
Step 2: Look for ‘Disk Drive’ and click on the (>) sign to expand it. There you will find the option of ‘Uninstall’ right click on it from the drop-down menu.
Step 3: Once the previous step is done, a pop-up will appear on your screen. Again, click on ‘Uninstall’ and your drive will be uninstalled.
Step 4: Then turn off the computer and remove the CPU case and discard the hard drive and reconnect it with your system.
Now recheck if your drive is properly connected to your system and restart the PC and see if the drive is working and the issue has been fixed.
Also know: How to Fix Night Light Not Working in Windows
Method 2: Permission to Access Drive
Due to less or no access to the drive, it can also create issues like ‘A Device Which Does Not Exist Was Specified.’
These are the steps to completely access your system and the drive you connect:
Step 1: Open the ‘File Explorer’ in your system and go to the hard drive that is showing an error.
Step 2: Right-click on the ‘Properties’ in the drop-down menu and go to the ‘Security’ tab. Then click and open the option ‘Edit.’
Step 3: You will find the ‘Permission for Authenticated Users’ section; click on the check box for the ‘Full Control’ option. Click on ‘Allow’ and then ‘Apply’ under the ‘OK’ option.
After completing the above-mentioned process, you can find the drive and see if the issue is fixed or not.
Method 3: Change the Drive Letter
To fix the issue of ‘A Device Which Does Not Exist Was Specified,’ you can also reassign or change the drive letter in your system.
And the steps to reassign the drive letter are given below; continue reading.
Step 1: Press ‘Windows + X’ altogether. And go to the ‘Disk management’ option.
Step 2: Go to the problematic drive, then right-click on it and select the ‘Change Drive Letter and Paths…’ option.

Step 3: Select any unique and different drive letter. And then click on ‘OK’ and ‘Confirm.’
Step 4: After following the above-mentioned steps, go to ‘File Explorer’ and check if the drive letter appears correctly in your system.
Even after following the given steps, the issue of ‘A Device Which Does Not Exist Was Specified’ remains unresolved; you can try other methods as well, which are mentioned below.
Method 4: Update and Reinstall the Disk Drivers
Sometimes, the outdated or malicious disk drives can also cause issues like ‘A Device Which Does Not Exist Was Specified.’ You can simply update and reinstall those drivers using Device Manager, a built-in driver updater, and fix this issue on your own.
And for that, here are the steps given for you to update the disk drivers:
Step 1: Go to the Device manager.
Step 2: Right-click on the ‘Disk Drive’ section and expand it and then search for your drive name.
Step 3: Click on it and then select the ‘Update Driver’ option. And search manually for your drivers.
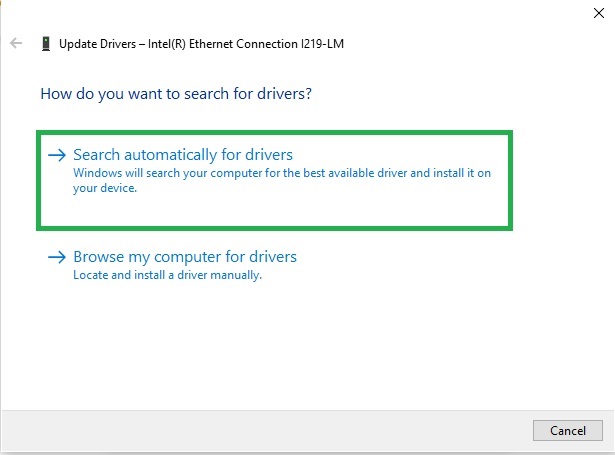
Step 4: Even after searching for it, if you are unable to find it or the error continues, then uninstall the device and then restart your system.
Step 5: After the reboot, Windows will automatically reinstall your drivers.
Also know: How to Fix Windows Update Error 0x80070643
Method 5: Fix Bad Sectors
To fix the issue of ‘A Device Which Does Not Exist Was Specified,’ you must repair one of the possible disk errors or the bad sectors in the drive.
To fix these bad sectors, follow the given steps carefully.
Step 1: Go to the ‘Command Prompt’ as administrator.
Step 2: Run “chkdsk /f /r X:” (Here, replace the X with the drive letter).
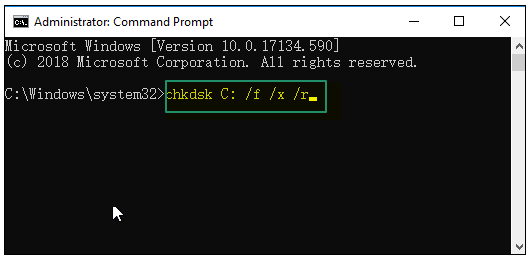
Step 3: The scan will take a few seconds; wait patiently until the process completes. The time it takes to scan is completely dependent on the size of the drive.
Step 4: After it is done, reboot and reconnect the drive again, and now check for the access.
Frequently Asked Questions (FAQs)
Q1. How do I resolve the issue ‘A Device Which Does Not Exist Was Specified Windows 11’ for my drive?
Ans. You can simply fix this issue on your own using several methods. You can fix this by reinstalling and reconnecting the drive, providing complete access to the drive, reassigning the drive letters, and fixing the bad sectors.
Q2. Can rescanning the drive help fix the issues of ‘A device which does not exist was specified in Windows 10’?
Ans. Yes, you can rescan the drivers, but that could be a possibly temporary solution. After this, you can face these kinds of issues again, so we’d recommend you follow other methods as well.
Q3. Does not provide complete access to the drivers to create issues like these?
Ans. Yes, if your storage drivers do not have complete and enough permission to access it, then it often creates issues and hurdles.
To fix the issues of ‘A Device Which Does Not Exist Was Specified,’ the above-mentioned are the primary methods, and mostly these ways can resolve these issues on your own. And drivers should not be taken lightly; resolve issues with them as soon as possible.